USER GUIDE UK CORDLESS TELEPHONE Voxtel D210/D215 V1
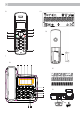
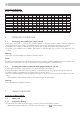
P1 P2 1 OK 8 P3 2 3 7 6 1 2 ABC 3 DEF 4 GHI 5 JKL 6MNO 7 PQRS 8 TUV 9WXYZ 0 5 4 R P4 9 10 11 12 13 P5 MEMO 1 2 ABC 3 DEF 4 GHI 5 JKL 6MNO 7 PQRS 8 TUV 9WXYZ 0 19 18 R 14 15 16 17 20 21 P6
BECAUSE WE CARE Thank you for purchasing this product. This product has been designed and assembled with utmost care for you and the environment. This is why we supply this product with a quick installation guide to reduce the number of paper (pages) and therefor save trees to be cut for making this paper. A full and detailed user guide with all the features descripted can be found on our website www.aegtelephones.eu.
Radio signals between the cordless handset and the base unit: To use your cordless handset and base together, you must be able to establish a radio link between them. The signal between the handset and base is in accordance with the normal standards for a DECT phone: maximum range up to 300 metres outdoors or 50 metres indoors.
8 OK Left soft key (menu/ok) t In idle mode: press to access the main menu t In sub-menu mode: press to confirm the selection t During a call: press to access Intercom/phonebook/ redial list/ call list 5.2 Cordless handset display (see P2) The LCD display gives you information on the current status of the telephone. # Meaning Steady when the handset is in range of the base. Flashes when out of range of the base or not registered to the base. Steady when an intercom call is in progress.
5.3 Corded Base Station # Meaning 9 Ans On/Off In Idle: Press to switch the answering machine ON or OFF. 10 Repeat/OGM In Idle mode: Press and hold to record an OGM. Press to playback the OGM. In TAM message playback mode: Press once to repeat the current message, or twice to go back to the previous message. 11 Play/Stop In idle mode: Press to playback messages. During TAM message playback: Press to stop playing messages. 12 MEMO FWD/MEMO In idle mode: Press and hold to record a Memo.
5.4 Base Station Display UK Indicates a call is in progress. Indicates that handsfree is being used. Indicates the time of day. Indicates that the base ringer volume is switched off. This will display when you are in the phonebook menu. Indicates when you have a new Voice Mail message. (This is a network service depend on your operator). This will display when it is a repeat call. Indicates the sequence number of the CID record. This will display when there is a new CID entry or if one is being viewed.
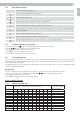
Using the corded base: 5.6.2 0 1 2 3 4 5 6 7 8 9 * # 6 Character table 0 SP A D G J M P T W * # B E H K N Q U X ? , 1 C F I L O R V Y / , 2 3 4 5 6 S 8 Z \ - À Ć ö Ł Ñ 7 ġ 9 ( . Á È Ì č ē ę Ù Ǒ ) & Â É Í ď ĕ ě Ú Ý Ã Ê Î Ä Ë Ï Å ĉ Ƭ Ą ċ ø Æ Ӏ ư Ç û Ò ĝ Û Ǔ Ó ù Ü ħ Ô Š lj ĩ Õ ß ĥ Ž Ö ė Ø ý ģ INSTALLING YOUR PHONE 6.
Direct dialling to connect to the line and then enter the phone number. UK 7.1.2 t Press Note: If you enter a wrong digit you cannot correct it with the “C” ( 7.1.3 Call from the phonebook t Press , , OK to access the phonebook and press t Press to dial out the selected phonebook entry. / ) key. to select the desired phonebook entry. Note: The alphanumeric keys provide a short-cut to find entries beginning with the corresponding letters. 7.1.
7.7 Turn off the handset ringer In idle, press and hold # to turn off the handset ringer. The icon is displayed on the LCD. Note: and show “CALL” or the caller display number, when there is an The display will still flash the call icon incoming call, even if the ringer is turned off. To turn the ringer back on, press and hold # again. 7.8 Turn on the keypad lock You can lock the keypad so that it cannot be used accidentallyy while carrying it around. icon will display.
Using the corded base: Make an External Call UK 7.10 7.10.1 Preparatory dialling Enter the phone number and lift up the corded handset or press number, if you make a mistake, press to delete digits. to dial the number. When entering the Note: To insert a pause in the dialling sequence, press and hold the < 0 > button, the screen will then show a “P” in the number. Press R to insert a flash signal and the screen will show a “F”. 7.10.
Note: It is not possible to dial numbers from memories or use the speakerphone when the mains power is off. When the mains power is off, you can also answer an incoming call with the corded handset. When the phone rings, pick up the corded handset to talk to the caller. 7.16 Redial You can redial any of the last 10 numbers called. If you have stored a name in the phonebook to go with the number, the name will be displayed as well. 7.16.1 Redial a Number from the Redial List to view the redial list.
7.18 Make an Internal Call This feature allows you to make internal calls, transfer external calls. If the called base or handset is not answered within 60 seconds, the called base or handset will stop ringing and the calling one will return to standby mode. 7.18.1 Intercom Using the cordless handset: ) and all the other registered handset numbers will display, along with a 1. In idle mode, press “C” ( „7“ and a „9“. 2.
Using the corded base: During an external call: 1. Press to show all the other registered handset numbers, plus a „9“. 2. Enter the number for the handset you want to transfer the call to. The external call is put on hold automatically and the called handset rings. 3. Press on the called handset to establish an internal call. 4. Replace the corded handset on to the base, or press if in speakerphone mode, to end the current call with the external party. 5.
View a Phonebook Entry and / to select “PHONEBOOK“ and then press to access the phonebook. / to select the desired phonebook entry. and / to select “VIEW“. and / to review the name, number and ringtone of the selected phonebook entry. Note: If the number is more than 12 digits, press OK or to view the remaining digits. 8.4 Edit a Phonebook Entry In idle: t Press and / to select “PHONEBOOK“ and then press t Press / to select the desired phonebook entry. t Press and / to select “EDIT“.
Note: If there is no more space in the phonebook, “PB FULL” will appear on the display. 8.9 Edit an entry In idle: t Press to show ”PHONEBOOK”. t Press and / to show ”EDIT”. t Press and the display will show the first phonebook entry in alphabetical order. t Scroll / until you see the contact you want to edit. t Press and the cursor will appear at the end of the name. t Edit the name, pressing to delete characters, if necessary. t Press and the cursor will appear at the end of the number.
The handset and base will ring with the melody associated with that phonebook entry. If the call is from someone who withheld their number, “WITHHELD “ will display. If the call is from someone whose number is unavailable, e.g. an international call or from a private exchange,”OUT OF AREA “ will display. If you’ve got new Caller Display records, the handset will display “X NEW CALLS” in standby mode, where X is the number of new calls, and the base will show “NEW X” at the top right of the display.
t Press to confirm the name. and t The number is shown with the cursor at the end. Modify the number, if necessary, using the digit keys. t Press to confirm the number, and display “MELODY 1“. t Press / to scroll through the melodies. t Press to confirm your selection. You will hear a confirmation tone, and the display will return to the call log. 9.7 Delete an Entry in the Call Log / List t Follow steps 1 and 2 in Section 9.5. t Press and then / to show “DELETE“. t Press to show “CONFIRM?“.
t Press t Press t Press t Press and / to select “DATE & TIME“. and / to select “SET DATE“. and then enter the date information in the format you set in Section 10.1.1. to confirm. Note: By default, the current date will display, starting from 01--01--11 (DD--MM--YY) on power-up. 10.2 Alarm Settings is shown on the handset You can set an alarm time on this phone. When an alarm is set, the alarm icon display.
t Press t Press t Press and and and / / / to select “RING SETUP“. to select “EXT RING“. to select melody you want to hear for external calls. Note: The respective melody will be played while browsing the ringtone list. t Press to confirm. 10.3.3 Set the Ringer Volume t Press and / to select “HS SETTINGS“. t Press and / to select “RING SETUP“. t Press and / to select “RING VOLUME“. t Press and / to select the desired ringer volume (a total of 6 ringer volume levels including “VOLUME OFF“).
10.4 Set the Auto Answer If you turn on the Auto Answer, you can answer a call automatically by just lifting the handset off the base or charger, without having to press any key. t Press and / to select “HS SETTINGS“. t Press and / to select “AUTO ANSWER“. t Press and / to turn on or off the auto answer feature. t Press to confirm. 10.5 Base Settings Using the cordless handset: 10.5.
t Press and the display shows “PIN?------“ t Enter the old system PIN. t Press to display “NEW PIN?------“, and enter your new 4-digit system PIN. t Press to display “CONFIRM?------“, and enter your new 4-digit system PIN again. Note: If the new PIN entered in Step 6 is not the same as the new system PIN entered in Step 5, you must enter the new system PIN at step 5 again. t Press to confirm 10.5.5 Reset your phone You can reset your phone to the default settings.
Ringer Setup 10.8.1 Change Ringer Melody There are 10 base ringer melodies to choose from for external calls. t Press and / to select “SETTINGS“. t Press to show “RING SETUP“. t Press to show “EXT. RING“, then press to show “MELODY“, then press (the current melody, where X = 1 to 10). t Press / to scroll through the Melody list (from 1 to 10). t Press to confirm the setting. UK 10.8 to show “MELODY X“ Note: The respective ringer melody will be played during your selection. 10.8.
t Press t Press and / to select your desired language. to confirm. 10.13 Change the System PIN A 4-digit system PIN code is used for changing the system settings of the base station, and is used to protect your phone from unauthorised use. The default system PIN code is 0000. t Press and / to select “SETTINGS“. t Press and / to select “CHANGE PIN“. t Press and display will show “PIN?”, enter the 4-digit PIN (default setting is 0000) and press .
ANSWERING MACHINE (ONLY for D215 Your phone includes a telephone answering machine that records unanswered calls when it is on. The display on the base will show the number of messages recorded. The answering machine can store up to 59 messages within the maximum recording time of up to about 18 minutes, depending on the compression rate set. As well as recording incoming messages, you can record memos for other users of your phone.
t Press and / to select “STOP”, “FORWARD”, “PREVIOUS”, “DELETE” to perform the following functions during message playback. STOP Stop the current message playback and return to the ANS. MACHINE menu. FORWARD Skip to play the next message. The date and time information of the next message will display if there is another message. PREVIOUS Repeat playing the current message from the beginning. The date and time information of the current message will display.
When your answering machine memory is full and it is in “ANS & RECORD“, the answer mode will change to “ANSWER ONLY“ automatically. It will return to “ANS & RECORD“ mode automatically after some messages have been deleted. 12.5.2 Set the Outgoing Message (OGM) Language. The answering machine announces the outgoing message when it answers a call. There is a pre-set OGM for each of “ANS & REC“ mode or “ANSWER ONLY“ mode, which can be in English or French (Français) on this model. t Press and / to select “ANS.
message, so if you call in and you don‘t get an answer after 3 or 4 rings, you can hang up and save on call charges. t Press and / to select “ANS. MACHINE“. t Press and / to select “TAM SETTINGS“. t Press and / to select “ANSWER DELAY“. t Press and / to select your desired answer delay from the available options “2 RINGS“, “4 RINGS“, “6 RINGS“, “8 RINGS“ or “TIME SAVER“. (The current selection is marked with an asterisk.) t Press to confirm. Warning: If the network message service (e.g.
t Press t Press t Press t Press and / to select “CHANGE PIN“. to show “PIN?----“, then enter the Old PIN. (Default Remote Access PIN is 0000). to show “NEW PIN?----“, then enter your new 4-digit PIN. to show “CONFIRM?----“, then enter your new 4-digit PIN again. Note: If the new PIN entered in Step 6 is not the same as the new PIN entered in Step 5, you must enter the new system PIN at step 5 again. t Press to reconfirm. 12.5.9.
If the TAM is turned off, the TAM ON/OFF indicator will be off unless there are new messages. 12.6.1 Using the direct key to switch the TAM on or off. t From idle mode, press 12.6.2 t Press t Press t Press Using the menu and / to select “ANS. MACHINE“. and / to go to “TAM ON/OFF“ and press to select. to select “ON“ or “OFF“ then to confirm the selection. 12.7 Outgoing Message Settings 12.7.1 Record your Outgoing Message (OGM) You can record your own OGM for “ANS & REC“ mode or “ANSWER ONLY“ mode.
12.7.3.2 t Press t Press t Press t Press t Press t Press t Press Using the Menu and / to select “ANS. MACHINE“. and / to select “TAM SETTINGS“. and / to select “OGM SETTINGS“. and / to select “ANS & REC“ or “ANSWER ONLY“. and / to select “DEFAULT“. to show “PIN ?“ and then enter the system PIN (default 0000). to delete your personal OGM and replace it with the preset OGM. 12.8 Switch between OGMs By default, the answer machine is set in “ANS & REC“ mode which allows callers to leave a message.
Note: You cannot delete New Messages, so you will have to start to play them before trying to delete them. 12.10 Record a Memo on the TAM You can record a memo message for another user. When you record a memo, it is saved as a new message and can be played back in the same way as answering machine messages. Memo recording can still function even when the answering machine is turned off. 12.10.
Warning: If the network message service (e.g. 1571) is enabled on your line, you must set the answering machine to answer calls after either 2 or 4 rings, otherwise the message service will take the call first. 12.12.2 Set the Maximum Recording Time for Incoming Messages You can set the maximum length of the recording time of the incoming messages to be either 1, 2 or 3 minutes, or of unlimited length up to the available memory left on the answering machine. t Press and / to select “ANS. MACHINE“.
Please keep your sales (till) receipt this is your proof of guarantee. 13.1 While the unit is under Guarantee t Disconnect the base unit from the telephone line and the mains electricity supply. t Pack up all parts of your phone system, using the original package. t Return the unit to the shop where you bought it, making sure you take your sales receipt. t Remember to include the mains adapter. 13.2 After the Guarantee has expired If the unit is no longer under Guarantee, contact us via www.
CLEANING AND CARE Do not clean any part of your phone with benzene, thinners or other solvent chemicals as this may cause permanent damage which is not covered by the Guarantee. When necessary, clean it with a damp cloth. Keep your phone system away from hot, humid conditions or strong sunlight, and don‘t let it get wet.
© 2012 Binatone Electronics International Limited All rights reserved Subject to avaibility. Rights of modification reserved. AEG is a registered trademark used under license from AB Electrolux (publ) www.aegtelephones.