UK CORDLESS TELEPHONE Voxtel D80 Voxtel D80 twin Voxtel D80 triple V3 UK USER GUIDE
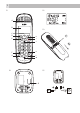
P1 P2 A B P3 C D E H I J F G K L M P4 P5 A
Thank you for purchasing this product. This product has been designed and assembled with utmost care for you and the environment. This is why we supply this product with a quick installation guide to reduce the number of paper (pages) and therefor save trees to be cut for making this paper. A full and detailed user guide with all the features descripted can be found on our website www.aegtelephones.eu.
2. Slide the battery cover back into place. 3. When charging the batteries for the first time, place the handset on the base to charge for at least 24 hours continuously. 4. When the handset is fully charged, icon will appear steadily on the display. Note: Press and hold Menu to switch the idle screen between handset name and number and the time and handset number. 2.5 Set display language To change the display language : 1. 2. 3. 4. / to select “PERSONAL SET”.
C D During a call, press to increase earpiece volume. When the phone is ringing, press to increase the handset ringer volume. Press to scroll through the menu options, redial list, call list and phonebook entries. OK Menu key : Press to open the Menu. Press to select menu options and to confirm a displayed option. During a call, press to turn mute on/off. E Press to make and answer a call. F Press and hold to lock or unlock the keypad.
3.
Overview of the base(see P4) A 3.4 Paging key : Press to find misplaced handsets registered to the base. Long press to start registration of handsets to the base. Navigating the menus The phone has an easy to use menu system. When the handset is switched on and in standby: 1. Press to open the main menu. 2. Then use / buttons to scroll through the available options. 3. Press OK to select an option. To return to the previous menu level, press . standby, press .
ADVANCED SET -- ECO MODE -- ZERO EMIT -- AUTO PREFIX -- RECALL TIME -- DIAL MODE -- CHANGE PIN -- REGISTER -- UNREGISTER -- RESET Note: The dial mode is based on the country version, for some countries it will not show in the menu and is preset to tone dialling. *Only available if a phonebook entry is stored. 4. Using the phone 4.1 Switch the handset on/off Press and hold 4.2 to switch the handset on or off. Calls 4.2.1. Make a call 1. Press . 2. When there is a the dial tone, dial the number.
Adjust the earpiece volume During a call, press 4.4 / to increase or decrease the volume. Redial The last 10 dialled numbers are stored in the redial list. 4.4.1. View or dial an entry 1. Press to open the Redial list. 2. Scroll / to the required entry. 3. Press to dial the displayed entry or press to return to standby. Note: If you have Caller ID and the caller’s number exactly matches an entry stored in the phonebook, the name is displayed. 4.4.2. Copy a Redial list number to the phonebook 1.
4.5 Lock/unlock the keypad The keypad can be locked so that it cannot be operated accidentally while carrying it around. Note: When the keypad is locked an incoming call can still be answered and the handset will operate as normal. When the call ends, the keypad lock comes on again. 1. Press and hold *. KEYS LOCKED and icon is displayed. 2. Press and hold * again to unlock the keypad. 4.6 Mute The handset can be muted so that a conversation can be held without the caller hearing. 1.
3-way conference call To hold a 3-way conference call between 2 internal callers and 1 external caller. During a call with an external caller: 1. Press 2. Press 4.9 on the second handset to start a conference call. to end the call. Paging/Find handset Page can be used to locate a missing handset. . on the underside of the base. All handsets registered to the base will 1. Press ring. 2. To stop the ringing, press on the base again or press any button on the handset. 5.
5.2 View or dial an entry 1. Press 2. Scroll . to open phonebook. / to the required entry. OR Enter the first letter of the name to search alphabetically. The first name that starts with this letter or the nearest letter in the alphabet will be displayed. Scroll to the required entry. / 3. Press to dial or to return to standby. Note: When the name is displayed, to switch between the name and number press OK 5.3 Edit a name and number 1. Press . The display shows « PHONEBOOK ». 2.
Caller Display If subscribed to Caller ID, the caller’s number will be displayed (provided it is not withheld) prior to answering the call. The display can show the first 12 digits or characters of the phone numbers and name. If the caller’s name and number are stored in the phonebook and a number match is found, the caller’s name will be displayed instead. 6.2 Call list The Call list stores details of the last 20 received calls, including the phone number and date and time of the call.
6.4 1. 2. 3. 4. Delete an entry Press to open the Call list. Scroll / to the required entry Press OK scroll to « DELETE ». Press OK the display shows « CONFIRM ? ». 5. Press OK to confirm or 6.5 to cancel. Delete the entire Calls list 1. Press to open the Calls list. 2. Press OK and scroll to « DELETE ALL ? ». 3. Press OK to confirm or to cancel. 7. Clock and Alarm 7.
8.1 UK 8. Personal set Handset tones 8.1.1. Handset ringer volume The handset ring volume can be set to different volume level. Choose from 5 volume levels or Off. 1. 2. 3. 4. 5. to « PERSONAL SET » and press OK Press , scroll Press / to select « HANDSET TONE » and press OK The display shows « RING VOLUME », press OK Press / to select the volume (1 - 5 or « OFF »). Press OK to confirm or to return to the previous menu. Note: When the phone is ringing, adjust the ringer volume by pressing / . 8.
8.3 Auto answer The phone is set to answer calls by lifting the handset off the base or charger. This feature can be switched off so that calls can only be answered by pressing . 1. 2. 3. 4. to « PERSONAL SET » and press OK. Press , scroll to « AUTO ANSWER » and press OK Scroll Press / to select « ON » or « OFF ». Press OKto confirm or to return to the previous menu. 9. Base settings 9.1 Eco mode By operating the phone in Eco mode the power emissions level can be reduced.
3. 4. 5. 6. 7. DIGIT DETECT is displayed. Press OK. Enter the number you want to be detected and press OK. Scroll to PREFIX and press OK. Enter the number you want it replaced with. Press OK to confirm or to return to standby. 9.4 Recall Time This setting is useful to access certain network and PABX/switchboard services. The default recall time is suitable for your country and network operator. It is unlikely that you should need to change this setting unless advised to do so. 1. 2. 3. 4.
9.7 Registering an additional handset Up to 4 handsets can be registered to the base to extend the phone system without having to install extension sockets for each new phone. Note: Handset batteries must be fully charged before registration. Hold the handset close to the base during the registration process. Handsets that were supplied with the base are already pre-registered. On the base: 1. Press and hold Page for 5 seconds. The base will remain in registration mode for 90 seconds.
IMPORTANT Resetting the phone to its default settings will delete all entries in the Call list. Current handset and base settings will also be reset. Entries stored in the phonebook are retained. 1. 2. 3. 4. Press , scroll to « ADVANCED SET » and press OK Scroll to « RESET » and press OK The display shows « RESET ? ». Press OK to confirm or to return to the previous menu. The phone will restart automatically. 9.
Keypad does not seem to work .. Check that the keypad lock is not on. icon is not scrolling during charge .. Adjust the handset slightly on the base. .. Clean the charging contacts with a cloth moistened with alcohol. .. Check that the mains power is connected properly and switched on. .. The battery is full. When the handset is fully charged, on the display. icon will appear steadily No Caller Display .. Check the subscription with the network operator, see. ..
IMPORTANT This equipment is not designed to make emergency telephone call when the power fails. Alternative arrangements should be made for access to emergency services. This product is intended for connection to analogue public telephone networks or a private switchboard. (pabx) Safety and Electromagnetic information • Use only the power supply supplied with this product. Using an unauthorised power supply will invalidate the guarantee and may damage the telephone.
• There is a slight chance that the phone could be damaged by an electrical storm. We recommend that it is unpluged from the power and telephone line cord during an electrical storm. 12. GUARANTEE AND SERVICE The phone is guaranteed for 24 months from the date of purchase shown on your sales receipt.
Standard DECT 1.88 to 1.9 GHz (bandwidth = 20 MHz) Channel bandwidth 1.
14. CE DECLARATION This product is in compliance with the essential requirements and other relevant provisions of the R&TTE directive 1999/5/EC. The Declaration of conformity can be found on: www.aegtelephones.eu 15. DISPOSAL OF THE DEVICE (ENVIRONMENT) At the end of the product lifecycle, you should not throw this product into the normal household garbage but bring the product to a collection point for the recycling of electrical and electronic equipment.
© 2014 Binatone Electronics International Limited All rights reserved Subject to availability. Rights of modification reserved. AEG is a registered trademark used under license from AB Electrolux (publ) www.aegtelephones.