
User's Manual


Home Energy Meter
View the expanded manual:
http://aeotec.com/support
Aeotec by Aeon Labs Home Energy Meter.
Familiarise yourself with your Home Energy Meter.
Quick start.
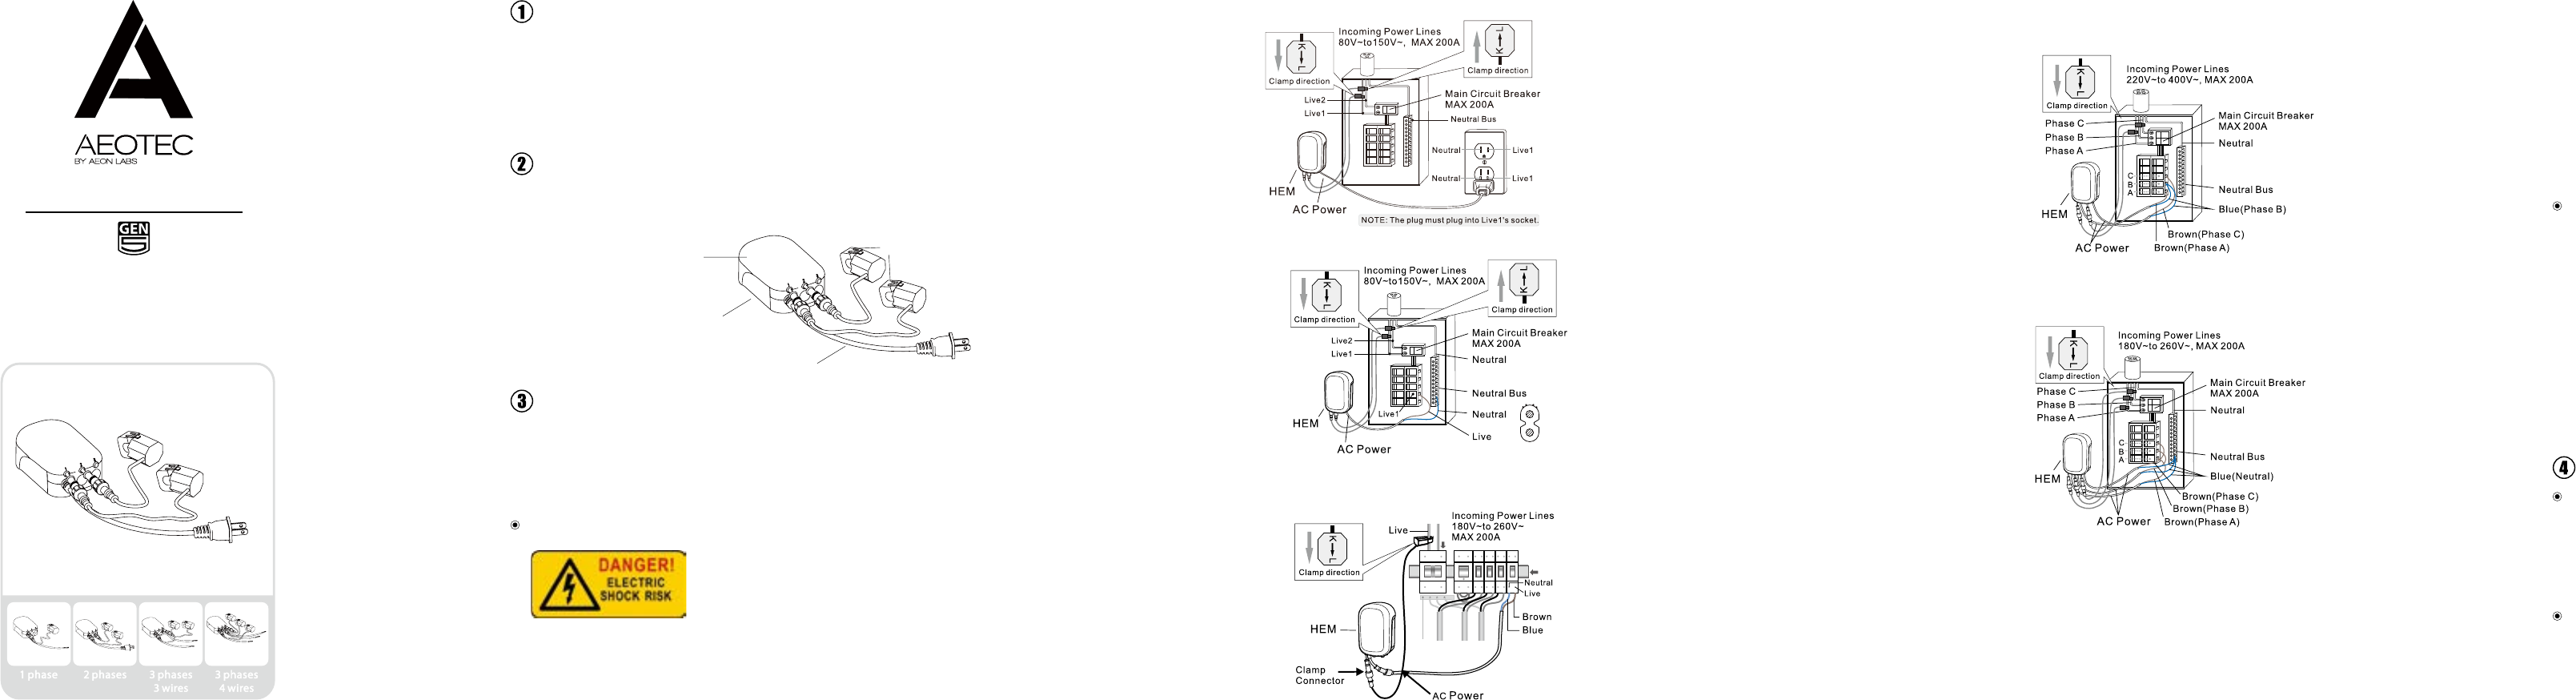
Diagram of USA Version(2 Phases):
Diagram of EU/AU Version(1 Phase):
Diagram of EU/AU Version(3 Phases,3 Wires):
Diagram of EU/AU Version(3 Phases,4 Wires):
NOTE : If you cannot nd a Socket , ask your electrician for help on wiring.
Installing the meter into a circuit box.
Linking your meter to an existing Z-Wave network.
You hear a lot about energy use these days. About how if you reduce the amount of energy you use you’ll both save
money and the environment. But saving money by using less electricity is only possible if you understand when and how
you are using it. That’s what Aeotec’s Home Energy Meters provide you with: understanding, for your whole home.
Installed in an electricity box, your new energy meter will monitor the total amount of electricity your home uses with
accuracy and speed. Using a wireless Z-Wave
®
connection, it’ll then feed the data it records back to your smart home’s
gateway. In near real-time you’ll have a full understanding of how much electricity you use and when you use it.
Your Home Energy Meter from Aeotec by Aeon Labs is comprised of two parts: the Main Body and Clamps. Once installed,
the meter will sit near your home’s main circuit box, while the clamps are attached to it.
The installation of your Home Energy Meter has two major parts: the installation of it into your home’s main circuit box and
the syncing of it to your Z-Wave network. What follows are the instructions for both parts. Please note that only a licensed
electrician, with knowledge and understanding of electrical systems and electrical safety, should perform the electrical
installation of your meter into your home’s circuit box. The syncing of your Home Energy Meter with your Z-Wave network
can be performed by you.
To perform the electrical installation for your Home Energy Meter (HEM), utilise the previous images to determine the
phase version of the HEM and to also illustrate the following steps 3 through 7.
It is now time to permanently affix the Home Energy Meter to a surface. Within each meter is a low-frequency radio
antenna that’s used for wireless communication. This must be taken into consideration when selecting a nal location for
the meter. Thick concrete walls, metals, or motor devices will affect the signal strength of the controller and the meter.
If the home’s circuit box is made of a metal, it is recommended that the Main Body of the meter be installed outside of
the circuit box. Placing the meter inside the circuit box could degrade the quality of the radio signal and negatively impact
its wireless range. To assist with such an installation, each meter is weatherised to the IP44 international standard. This
makes it resistant to rain and snow when installed vertically.
To place the Home Energy Meter (HEM):
1. Remove the backing plate from the back of the HEM.
2. Afx the plate to the selected wall space using the provided screws. The plate should be installed vertically and aligned
so that the wires of the HEM are at the bottom.
3. Attach the HEM to the backing plate.
The electrical installation of your Home Energy Meter (HEM) is now complete. You must now wirelessly link it to your Z-Wave
network.
1. Put your primary Z-Wave controller, usually a gateway or hub, into inclusion mode. If you are not sure how to do this,
please refer to your controller’s user manual.
2. Press the Action Button on your HEM. If it has been successfully linked to your network, its LED will remain illuminated.
If the linking was unsuccessful, your HEM’s LED will continue to blink.
The installation of your Home Energy Meter is now complete.The next step is to set up your Home Energy Meter within the
interface of your primary Z-Wave controller. This will allow you to visualise and utilise the energy consumption data that
your meter collects.
Your Home Energy Meter can report wattage energy usage or KWH energy usage to your primary controller. As each
controller is different, please refer to your controller’s user manual for further information on monitoring and visualising this
data.The specic Z-Wave commands supporting energy monitoring are the Meter Command Classes.
1. Turn off the home’s main electricity breaker and open the main circuit box panel.
2. Connect each clamp to the HEM using the clamp connector. Screw them tight.
3. Clip the clamps of the HEM around the incoming electricity cables that connect to the main circuit breaker.
4. Connect AC Wire to the meter using the AC Wire Connector.
5. Insert the HEM’s neutral AC Wire into the main circuit breaker’s neutral bus terminal.
6. Insert the HEM’s live AC Wire into the main circuit breaker’s live terminal.
7. Replace the main circuit box panel.
8. Turn the main breaker back on.
Important:Only a licensed electrician should perform these steps.
Important: The circuit box's main breaker should be turned off to perform these installation steps.
The following diagrams highlight how the Home Energy Meter should be installed dependent on the region you are in;
In the United States, it is always a 2-phase installation;
In 230 volt countries with a 1 phase installation;
In 230 volt countries with a 3 phases and 3 wires installation;
In 230 volt countries with a 3 phases and 4 wires installation;
Removing your meter from a Z-Wave network.
Resetting your Home Energy Meter.
Your Home Energy Meter (HEM) can be removed from your Z-Wave network at any time. You'll need to use your Z-Wave
network’s primary to do this..
1. Put your main controller into its device removal mode. If you are unsure how to do this, please refer to your controller’s
user manual.
2. Press the Action Button on your HEM. If it has been successfully removed from your network, its LED will blink. If the
removal was unsuccessful, its LED will be solid and it will be then repeated again.
Your Home Energy Meter can be reset to default factory settings with ease.
1. Press and hold the Action Button for 10 seconds.
2. If successful, the LED on the HEM should begin to blink slowly.
Advanced functions.
RedLED
Action Button
AC Input Wire
Clamps
Model: ZW095-A