
Installation Instructions


© Copyright Aero-Spa™, LLC 2013 p/n102203 rev E
5
Figure 3
2) Equipment Set-up
For best results it is highly recommended that the hot tub be drained
and thoroughly cleaned to remove residual dirt and contaminants
prior to installation of the Aero-Spa™ system. The system should be
cleaned with Aero-Spa™ pipe cleaner and filled with filtered water
through the Aero-Spa™ Fill Filter. The hot tub filter element should be
replaced or cleaned using the Aero-Spa™ filter cleaner.
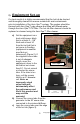
a) Set the equipment on a
level solid spacer block
that is at least 2 – 3/8”
thick and at least 10’
from the hot tub that is
not prone to flooding
(equipment is weather
proof but not
waterproof) (Figure 2). If
the supplied ozone tube
is not of adequate
length, move the
equipment closer to the
hot tub but not closer
than 10’. Do not extend
or shorten the ozone
tube. If the tube is too
long, coil the excess
tube in an 8” diameter
coil. Note: an
improperly sized
ozone tube will
detrimentally affect
the performance and
life of this product and
may void the
warranty!
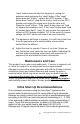
b) Connect the ozone tube from the
generator to the 20’ ozone tube
connected to the sintered diffuser.
c) Loop the ozone tube over the edge
of the hot tub (figure 3).
Aero-Spa™
Figure 2
NORMAL
RESTING SURFACE