Installation Guide Manufactured for Aero-Spa™, LLC E-Mail: info@aero-spa.net Web: www.aero-spa.
For outdoor use only! WARNING Hot tub/Spa care and sanitizing is the sole responsibility of the owner. In some cases a residual sanitizer must be present to minimize cross contamination. Hot tubs/Spas are not intended to treat infections. Never allow use of hot tub/spa if you are unable to verify the condition of open sores, wounds, lesions, cuts, sores, abrasions, boil, etc. or infections of any type exist.
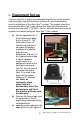
Operation and Precautions IMPORTANT SAFETY INSTRUCTIONS Proper installation and usage of your Aero-Spa™ Ozone Generator is your responsibility. Read and follow this Installation Guide carefully for important installation, operation and safety information. Basic safety precautions should always be followed, including but not limited to the following: Read and follow all instruction. Never operate Aero-Spa™ equipment indoors.
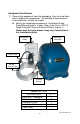
Equipment Identification 1) Remove the equipment from the packaging. Care must be taken when handling the components. Do not drop the generator or sintered diffuser, as they are fragile. a) Identify the equipment components: Installation Guide, Safety/Warning Labels, Ozone Tube, Cycle Timer, GFCI & Surge Protector Plug and Sintered Diffuser (Figure 1). Please note that your product may vary from photos in this installation guide.
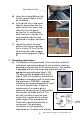
2) Equipment Set-up For best results it is highly recommended that the hot tub be drained and thoroughly cleaned to remove residual dirt and contaminants prior to installation of the Aero-Spa™ system. The system should be cleaned with Aero-Spa™ pipe cleaner and filled with filtered water through the Aero-Spa™ Fill Filter. The hot tub filter element should be replaced or cleaned using the Aero-Spa™ filter cleaner.
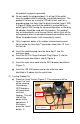
Clear Protector Tube d) Lower the sintered diffuser into the hot tub and allow it to rest on the bottom. e) If the hot tub has a hard cover, align the ozone tube with the center seam of the cover and allow it to lie in the gap to ensure that it is not pinched when the cover is closed. The clear protector tube must be positioned in the gap (see figure 4).
the product is properly grounded. b) Do not modify the plug provided; if it will not fit the outlet, have the proper outlet installed by a qualified electrician. This product is for use on a nominal 120-volt circuit and has a grounding plug that looks like the plug illustrated (type 5-15P) in Figure 6. Make sure that the product is connected to an outlet (type 5-15R) having the same configuration as the plug. No adapter should be used with this product.
pressing the “reset” button does not start the equipment, unplug the extension cord and press the “reset” button. If the “reset” button does not “hold in”, replace the GFCI breaker. If the button does “hold in”, plug the ex-tension cord into the GFCI breaker and unplug the equip-ment from the other end. Press the “reset” button. If the “reset” button does not “hold in” replace the extension cord. If the “reset” button does “hold in” contact Aero-Spa™.
If you substitute swimming pool chlorine (10% – 15% sodium hypochlorite) you would need about half as much. The suggested method on fill and start-up would be to use sodium dichlor on the initial application of the sanitizer and then the first time you need to adjust the free chlorine. Any subsequent time the free chlorine needs to be adjusted use 0.63 OZ (1.25 tablespoons) of regular household bleach (6% sodium hypochlorite).
Strong ozone odor in hot tub 1. Reduce cycle run time 25%. Repeat if odor remains strong after 1 hour. 2. Turn off air pump and call Aero-Spa™, LLC Ozone tube is cloudy in color and not flexible 1. This is normal, periodically check for cracks in ozone tube 2. Call Aero-Spa™, LLC for replacement parts. Sintered diffuser is turning brown 1. This is normal when the water used to fill the hot tub has high iron content.
Water back siphoned into the ozone tube and or the ozone generator 1. A small amount of moisture can be considered normal in high humidity conditions and in such a case nothing needs to be done. If there is more than a few drops proceed to step 2. below 2. Turn off all power by unplugging Aero-Spa™ from the 120 volt power outlet. Remove the sintered diffuser from the hot tub and lay it on the ground at a lower elevation than the generator. Allow the unit to purge the water from the ozone tube.
EXCLUSIVE REMEDY AVAILABLE UNDER THIS WARRANTY If after the expiration of the Customer Service Policy, the Aero product fails to operate properly under normal conditions within the remaining warranty period because of a defect in materials or workmanship, Aero will repair or replace this product without cost to you for parts or labor.