Installation Guide For Aero-Stream® Septic Tank Riser Pipe For additional assistance please contact us at: Technical Support (Toll Free) 877-254-7093 OR info@aero-stream.com P/N 102787 Rev.
Always securely attach a watertight cover to riser. Cover must be bolted or locked to prevent access. Cover must be checked after each tank servicing. Cover must be inspected regularly for damage and security. The secondary safety barrier must be securely fastened in place at all times. The safety barrier must only be removed to gain entry into the tank by a properly credentialed professional donning appropriate safety gear.
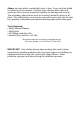
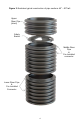
Overview of Aero-Stream® Septic Tank Riser Pipe Figure 1 illustrates typical construction of pipe sections 6” – 18” tall.
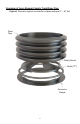
Figure 2 illustrates typical construction of pipe sections 22” – 37” tall.
Figure 3 illustrates typical construction of pipe sections 40” – 50” tall.
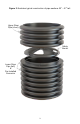
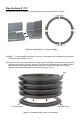
Pipe Sections 6”-18”: 1.) Assemble connector flange by interlocking the four sections as shown in Fig 4. Figure 4: Assembly of connector flange 2.) Apply 77” of butyl sealant to the top of connector, overlapping and kneading the joined ends of the butyl rope together. (Fig. 5) 3.) Center the riser pipe on the connector flange so the inside gap is even all of the way around. When the even gap is achieved, lower the riser pipe onto the butyl rope.
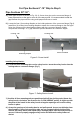
For Pipe Sections 6”-18” Skip to Step 5 Pipe Sections 22”-50”: 4.) Stack pipe sections as shown in Fig. 2 & 3. Center riser pipe on the connector flange of lower pipe section so the gap is even all of the way around. It’s recommended to seal the gap between the pipe sections using multi-purpose silicone or caulk. 5.) Locate the four (4) mounting dimples on the inside perimeter of the connector flange (Fig.6). Install four (4) screws into mounting dimples to attach the connector flange to the riser pipe.