PaceMaster ProSelect / ProElite OWNER’S MANUAL Manufactured by: Aerobics Inc., 34 Fairfield Place West Caldwell, NJ 07006 (973) 276-9700 PSPE.
TABLE OF CONTENTS INTRODUCTION 2 IMPORTANT SAFETY INSTRUCTIONS 3 ASSEMBLY INSTRUCTIONS 4-7 Installation Requirements Unpacking Your Treadmill Tools Required for Assembly Grounding Instructions Assembly Testing Your Treadmill 4 4 4 5 5-7 7 THE CONTROL PANEL 8-9 OPERATING INSTRUCTIONS 10-20 Setting Your Weight and Age Metric Units Wireless Chest Strap Transmitter Vari-Flex™ Cushioning System Warm Up and Cool Down Quick Start Manual Operation Preset Workouts Preset Workout Course Specifications Hea
INTRODUCTION Congratulations on your commitment toward better health and fitness! The staff at Aerobics Inc. would like to thank you for purchasing a PaceMaster treadmill. Not only did you buy one of the highest quality treadmills on the market; you also received excellent value for your dollar. PaceMaster treadmills have been rated “BEST BUY” by more nationally recognized publications than any other treadmill. Aerobics Inc. has been designing and manufacturing home treadmills since 1968.
IMPORTANT SAFETY INSTRUCTIONS Read these instructions before using your treadmill CAUTION: Before starting any exercise program, contact your personal physician and have a complete physical. This is highly recommended if you have not been on a regular exercise program within the last year or are over 35 years of age or are overweight.
ASSEMBLY INSTRUCTIONS Installation Requirements Your PaceMaster treadmill should be installed indoors on a flat, level surface near a 120Volt/ 15Amp outlet. The treadmill requires a dedicated, non-switched outlet that is not part of a GFI (Ground Fault Interrupter) circuit, preferably no more than 5 feet from the outlet to eliminate the need for an extension cord. You must have a minimum of 4 feet of clearance between the rear of the treadmill and any wall or obstruction.
Grounding Instructions DANGER: This product must be properly grounded. If it should malfunction or become inoperable, grounding provides a path of least resistance for electric current to reduce the risk of electric shock. This product is equipped with a cord having an equipment-grounding conductor and a grounding plug. The plug must be plugged into an appropriate outlet that is properly installed and grounded in accordance with all local codes and ordinances.
Figure 2: With the handlebar in place, plug the wire harness (8) into the socket (9) on the power supply board (10). CAUTION: Make sure the treadmill is not plugged into the electrical outlet until assembly is competed. Figure 2 Figure 3: Take one of the side rails (11) and slide the end with the grip over the end of the steel tube protruding from the control panel (12). Make sure the side rail grip touches the control panel.
Figure 5: To install the motor cover, stand in front of the treadmill. Pick up the motor cover (19) so it is level and the word PaceMaster is upside down. Holding the motor cover level and waist high, tilt it 45 degrees by lowering your left hand. Then slide it between the handlebars and lower the motor cover until it is level. Lower the cover all the way, keeping it level. Screw the two #8x1/2” black sheet metal screws (20) into the front of the motor cover.
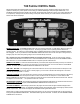
THE ProElite CONTROL PANEL Although the ProSelect and ProElite treadmills have many advanced features to provide versatility in meeting exercise needs, basic operation is extremely easy. Basic operation involves setting your TIME and SPEED goals, then pressing the START button. Your PaceMaster treadmill will gradually accelerate to the set speed, maintain that speed until the timer counts to zero, and then gradually come to a complete stop.
Based on the age entered, the ProSelect and ProElite heart rate treadmills automatically calculate your theoretical maximum heart rate. By pressing the HEART RATE button, the HeartSmart™ Pulse Monitoring System is activated and your current heart rate will be displayed. (The system must detect a heart rate transmission to be activated so you must be wearing the chest strap.) The HEART RATE indicator light will be illuminated. For details, refer to the HEART RATE CONTROL section in this manual.
OPERATING INSTRUCTIONS Initially, you may want to keep both hands on the side rails until comfortable walking on your PaceMaster treadmill. Once comfortable, try removing your hands to let them swing naturally as you would walking outdoors. Always hold on to the side rail or handle bar with one hand when operating the buttons on the control panel. THE FIRST STEP Stand on the center of the treadmill belt. Attach the garment clip on the end of the magnetic safety key to your clothing at waist level.
VARI-FLEX™ CUSHIONING SYSTEM (ProElite Model Only) The Vari-Flex™ Cushioning System provides you with adjustable cushioning. It enables you to fine-tune the cushioning from a soft feel to a more firm running surface. When the black adjustment knob is positioned as far forward as possible (toward the front of the treadmill) the deck cushioning is in the softest position. As the black adjustment knob is rotated toward the rear of the treadmill, the deck cushioning will be at its firmest setting.
Now you are ready to choose your workout mode, whether it is Quick Start, Manual, one of the nine Preset Workouts, one of the four (three on the ProSelect model) Heart Rate Control workouts or one of the four Custom programs. The following pages give you step-by-step instructions on how to use each program. QUICK START Once you have entered your weight and age, Quick Start allows you to begin your workout by pressing one button. You control the speed, incline and time.
To begin using MANUAL operation: Step One: Stand on the running belt and attach the garment clip attached to the end of the magnetic safety key to your clothing. Insert the safety key into its recess on the control panel. Step Two: Enter your weight and age as described in the OPERATING INSTRUCTIONS, SETTING YOUR WEIGHT AND AGE. Step Three: Enter the workout time by pressing the TIME + button in the TIME display window until the desired workout time is displayed.
Step Two: Enter your weight and age as described in the OPERATING INSTRUCTIONS, SETTING YOUR WEIGHT AND AGE. Step Three: Press the PRESET button once and P1 will appear in the DATA window. A mug will appear in the Graphic display window and C90 will appear in the DATA display window. C90 represents 90 calories. This is the default number set at the factory. Step Four: Press the LEVEL + button until the desired number of calories you want to burn are displayed in the DATA display window.
TIP: PaceMaster treadmills provide a “preview” of the total distance, time, calories and Aerobic Points based on the program and level chosen. Press the CALORIES button for the total caloric expenditure and the AEROBIC POINTS button for the total points you will earn. If your goals are different than the program provides, you know prior to beginning the workout that you will need to adjust the intensity level. Your workout will end when the timer has counted down to zero or the STOP button is pressed.
Preset workouts course specs P2 through p7 DO NOT PRINT THIS PAGE 16
HEART RATE CONTROL TRAIN LESS AND BENEFIT MORE FROM YOUR WORKOUTS To maximize the benefits from your workouts, you must maintain a sufficiently high heart rate. Target heart rate training takes the guesswork out of exercising. It provides you with the means to train within safe and effective ranges, all the while maximizing your exercise time and effort. The ProSelect and the ProElite have integrated heart rate control programs, which act as your personal trainer.
HEART RATE CONTROL WORKOUTS H1-Target HRC: Choose a heart rate training zone between 55% to 85% of your theoretical maximum. H2- Fat Burn HRC: Training within the fat burn training zone, between 55% and 69% of your theoretical maximum. H3- Cardio HRC: Train within the aerobic training zone, between 70% and 85% of your theoretical maximum. H4- Interval HRC (ProElite model only) The treadmill automatically alternates between 70% to 85% of your theoretical maximum.
If a problem should occur, the treadmill can be stopped quickly by pulling on the magnetic safety cord to dislodge the key from the control panel. The treadmill will stop a bit more abruptly, but still gently enough to prevent you from being injured. This is an emergency procedure only and should not be used as the normal stopping procedure. CUSTOM PROGRAMS The ProSelect and the ProElite offer an easy way for you to create your own programs, customized to your specific fitness level and goals.
If a problem should occur, the treadmill can be stopped quickly by pulling on the magnetic safety cord to dislodge the key from the control panel. The treadmill will stop a bit more abruptly, but still gently enough to prevent you from being injured. This is an emergency procedure only and should not be used as the normal stopping procedure.
Aerobic Points One of the main reasons people stop exercising is because they don’t see the physical changes they expected. Results, however, can only be realized when you are training properly. For this reason, the Aerobic Point System has been incorporated into the design of PaceMaster treadmills since 1968. The Aerobic Point System was developed by Dr. Kenneth Cooper, the Father of Aerobics and renowned founder of The Cooper Aerobics Center in Dallas, TX to measure the aerobic benefit of the workout. Dr.
Care and Maintenance The following section describes necessary maintenance for your PaceMaster treadmill. This maintenance is the responsibility of the purchaser and is not covered under our warranty. Failure to perform this necessary maintenance could result in damage to your treadmill. CAUTION: Be sure to unplug your treadmill before attempting any cleaning or maintenance. Deck and Tread Belt Cleaning The running belt on your PaceMaster treadmill rides on a low friction deck.
TROUBLESHOOTING Electronic Error Codes The self-diagnostic PaceMaster treadmill has built in sensors that will determine the precise reason for a problem. If the onboard computer detects a problem, an error code will be displayed. When an error message is displayed, "Err" will be displayed in the TIME window and the particular error number (1 thru 99) will be displayed in the DISTANCE window.
Step Three: Locate the drive belt adjustment screw (2) in the lower front end of the treadmill. Insert the allen wrench into the drive belt adjustment screw. Turn the screw 1/2 turn clockwise. Step Four: Complete the adjustment by tightening the four motor mount screws (1). Step Five: Walk on the treadmill to determine if the slippage is decreased or eliminated. Figure 8 Step Six: If no improvement is observed, the hesitation may be caused by a loose tread belt - see "Tread belt tension adjustment" below.
FREQUENTLY ASKED QUESTIONS Q. Why is time displayed as a negative number (– 1:15) ? A. The treadmill’s computer displays time in minutes and seconds until it reaches 59 minutes and 59 seconds. At that point, the clock will display in hours and minutes. – 1:15 represents one hour and 15 minutes. Q. Why can’t I change the speed in warm up or cool down? A. Warm up and cool down speeds are based on parameters recommended by the American College of Sports Medicine and cannot be overridden.
SPECIFICATIONS PROSELECT PROELITE Overall Dimensions 68”L x 30.5” W x 54”H 72”L x 30.5”W x 54”H Treadmill Weight 180 lbs. 190 lbs. Frame Welded aircraft grade extruded aluminum alloy Welded aircraft grade extruded aluminum alloy Running Surface 54”L x 20”W 58”L x 20”W Drive Motor 2.