
User guide


9 GR-LEON4-ITX Development Board
Quick Start Guide
Connecting with the included JTAG adapter
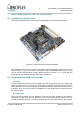
The JTAG adapter shall be connected to the board using the JTAG pin header shown in the
middle bottom of Figure 2-2. Please ensure that the JTAG cable/adapter is connected with
the correct polarity, to prevent unintended damage to the board or cable.
To connect to the board using the JTAG adapter delivered with the board, issue the
command:
grmon -jtag
Connecting with a Xilinx USB JTAG adapter
The JTAG adapter shall be connected to the board using the JTAG pin header, or ribbon
connector, shown in the middle bottom of Figure 2-2. Please ensure that the JTAG
cable/adapter is connected with the correct polarity, to prevent unintended damage to the
board or cable.
To connect to the board using a Xilinx USB adapter, issue the command:
grmon -xilusb
Connecting via the USB interface
Please see the GRMON User's Manual for how to set up the required USB driver software.
Then connect to the board using the command:
grmon -usb
Connecting via serial UART
Please refer to the GR-LEON4-ITX Development Board User Manual and the GRMON
User's Manual for instructions on how to connect via the serial debug interface.
NOTE: The DSU UART interface does not have a RS232 transceiver mounted on the board!
See user board user manual for instructions.
Connecting via Ethernet
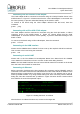
Before connecting via Ethernet the host computer (the computer running GRMON) must be
connected to the same network as the GR-LEON4-ITX board. After that the IP address of the
Ethernet Debug Communication Link (EDCL) must be set up. This address can be set up
either by PROM software or by using another debug link. After connecting with an alternate
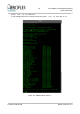
debug link, issue the command edcl <ip address>. Figure 2-3 below shows a session where
an IP address is set and the expected output:
After the EDCL IP address has been set, connect to the target with
© Aeroflex Gaisler AB March 2013, Rev. 0.3
Figure 2-3: Setting the EDCL IP address