
User Manual

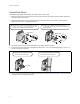
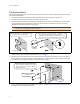
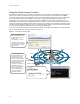
Table Of Contents
- HiveAP 170 Installation Guide
- Kit Contents, Required Accessories, and Tools
- Safety Instructions and Site Hazard Warnings
- Device, Power, and Environmental Specifications
- Mounting the HiveAP 170
- Attaching External Antennas
- Attaching the Ethernet Cable Waterproof Housing
- Connecting to the Network
- Deployment and Configuration Tips
- Where to go for More Information

P/N 330052-01, Rev. A 1
HIVEAP 170
INSTALLATION GUIDE
This guide explains how to mount a HiveAP 170 to a pole or flat surface in virtually any outdoor
setting, and connect it to HiveManager over the network. To register, get product documentation, see
compliance information, and download software updates, visit www.aerohive.com/support
.
KIT CONTENTS, REQUIRED ACCESSORIES, AND TOOLS
The HiveAP 170 kit includes the items shown in Figure 1.
Figure 1 HiveAP 170 kit contents
To install your HiveAP 170, you will need the following accessories (ordered separately) and tools:
• (2) 2.4 GHz antennas (AH-ACC-170-ANT-2G)
• (2) 5 GHz antennas (AH-ACC-170-ANT-5G)
• A switch that provides PoE power, or a PoE provisioning device
• (1) shielded cat5 Ethernet cable rated for outdoor use; length not to exceed 328 feet (100 m)
• Crosshead screwdriver for 1/4” (6 mm) x 3/8” (10 mm) screws
• Drive sockets (nut drivers) for 3/8” (10 mm) nuts
• Flat blade screwdriver to tighten hose clamp
SAFETY INSTRUCTIONS AND SITE HAZARD WARNINGS
Read and follow these safety instructions and hazard warnings before installing a HiveAP 170 outdoors. Keep these
instructions for future reference.
• To comply with RF (radio frequency) exposure limits, do not place the HiveAP 170 within 8" (20 cm) of people.
• You can install the HiveAP 170 in wet, windy locations. Therefore, make sure to install the Ethernet cable
housing for a complete waterproof connection.
• To protect the HiveAP 170 from lightning, do not place it at the highest point of a building or structure.
Plane Bracket (1)
HiveAP 170
Base
Bracket (1)
(4) Sleeve-Bolt Assembly
Sleeve, 5/8” (16 mm),
Bolt 1 15/16” (5 cm),
Hex nut 3/8” (10 mm),
Washer 5/8” (16 mm)
(4) Round Head Screw 1/4” (6 mm)
Lock Washer, Flat Washer
(4) Hex Head Bolt, 3/8”x1/2”
(10 mm x 13 mm)
Lock Washer, Flat Washer 1/2” (13 mm)
Hose Strap (1)
Ground Cable (1)
Ethernet
Housing (1)