
User Manual

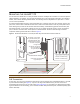
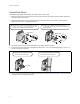
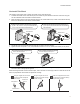
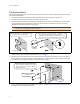
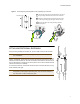
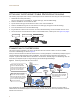
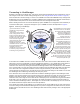
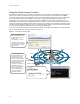
Table Of Contents
- HiveAP 170 Installation Guide
- Kit Contents, Required Accessories, and Tools
- Safety Instructions and Site Hazard Warnings
- Device, Power, and Environmental Specifications
- Mounting the HiveAP 170
- Attaching External Antennas
- Attaching the Ethernet Cable Waterproof Housing
- Connecting to the Network
- Deployment and Configuration Tips
- Where to go for More Information

7
Aerohive Networks
Figure 3 Connecting the grounding cable to the grounding lug on the unit
ATTACHING EXTERNAL ANTENNAS
Once you have grounded your HiveAP 170, you are ready to connect the antennas.
The omnidirectional antennas are available from Aerohive (SKUs AH-ACC-170-ANT-2G,
AH-ACC-170-ANT-5G). These antennas fit the N-type antenna connectors on the top
and bottom of the HiveAP 170. The two connectors on the bottom of the unit are for
the 2.4 GHz antennas, and the two on the top of the unit are for the 5 GHz antennas
(device and antennas are labeled).
To connect the antennas, screw them onto the antenna connectors by hand, turning
them clockwise until tight.
Note: It is extremely important to properly ground your device to complete
your installation.
Note: You do not need to use a tool to tighten the antennas or apply self-
amalgamating PTFE (polytetrafluoroethylene) tape around the threads of
the connectors to create a waterproof seal.
Remove the short piece of cable sheath from the end of
the grounding cable that does not have the connector.
Wrap the exposed wires clockwise snugly around one
of the six grounding lugs and tighten the nut securely.
Connect the other end of the grounding cable to a
proper ground.
Exposed wire
Grounding nut
Grounding lugs
1
2
3
5 GHz
5 GHz
2.4 GHz
2.4 GHz