
User's Manual


Deployment Guide 27
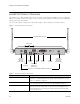
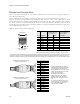
HIVEAP 20 PRODUCT OVERVIEW
Power Connector The 48-volt DC power connector (0.38 amps) is one of two methods through
which you can power the HiveAP 20. To connect it to a 100 – 240-volt AC
power source, use the AC/DC power adaptor that is available as an extra
option. Because the HiveAP does not have an on/off switch, connecting it to a
power source automatically powers on the device.
Mounting Screw To mount the HiveAP 20 on a surface, attach the mounting plate that ships
with the product to the HiveAP by inserting the two pins on the underside of
the chassis into slots in the plate and tightening the mounting screw. For
details, see "Mounting the HiveAP 20" on page 31.
10/100 Mbps PoE Port The 10/100-Mbps Ethernet port supports IEEE 802.3af PoE (Power over
Ethernet) and receives RJ-45 connectors. The HiveAP can receive its power
through an Ethernet connection to PSE (power sourcing equipment) that is
802.3af-compatible, such as one of the PoE injectors available as an optional
accessory from Aerohive. (If you connect the HiveAP to a power source
through the power connector and PoE port simultaneously, the device draws
power through the power connector and automatically disables PoE.)
The HiveAP can also connect to the wired network or to a wired device (such
as a security camera) through this port. It is compatible with
10/100Base-T/TX and automatically negotiates half- and full-duplex
connections with the connecting device. It is autosensing and adjusts to
straight-through and cross-over Ethernet cables automatically. It also
automatically adjusts for 802.3af Alternative A and B methods of PoE. For
details, see "Ethernet and Console Ports" on page 28.
Reset Button The reset button allows you to reboot the device or reset the HiveAP to its
factory default settings. Insert a paper clip, or something similar, into the
Reset pinhole and press the reset button. To reboot the device, hold the
button down between 1 and 5 seconds. To return the configuration to the
factory default settings, hold it down for at least 5 seconds. After releasing
the button, the Power LED goes dark, and then glows steady amber while the
firmware loads and the system performs a self-test. After the software
finishes loading, the Power LED glows steady green.
To disable the reset button from resetting the configuration, enter this
command: no reset-button reset-config-enable Pressing the
button between 1 and 5 seconds will still reboot the HiveAP, but pressing it for
more than 5 seconds will not reset its configuration.
Console Port A male DB-9 serial port to which you can make a console connection using an
RS-232 (or "null modem") cable. The management station from which you
make a serial connection to the HiveAP must have a VT100 emulation
program, such as Tera Term Pro
©
(a free terminal emulator) or Hilgraeve
Hyperterminal
®
(provided with Windows
®
operating systems). The following
are the serial connection settings: bits per second: 9600, data bits: 8, parity:
none, stop bits: 1, flow control: none.
Device Lock Slot You can physically secure the HiveAP by attaching a lock and cable (such as a
Kensington
®
notebook lock) to the device lock slot. After looping the cable
around a secure object, insert the T-bar component of the lock into the slot
on the HiveAP and turn the key to engage the lock mechanism.
802.11b/g RP-SMA Connector You can connect a detachable single-band antenna, such as the Pulse W1038
dipole antenna for the 2.4 GHz band, to the male 802.11b/g RP-SMA
connector. Note that doing so disables the adjacent fixed antenna.
Component Description