
User Manual


The following steps are typical of most installations:
1. Once the engine has been allowed to cool, disconnect the negative battery cable and relieve the fuel
system pressure.
2. Disconnect the existing pump fuel lines. Plug the open fuel line ends and remove the existing pump.
3. Find a suitable place on the vehicle chassis to mount the Aeromotive fuel pump. Make sure the
location will accommodate the pump mounting bolts, will position the pump lower than the fuel tank, is
clear of the exhaust, is clear of any moving suspension or drivetrain components and will keep the
pump clear of road obstructions or debris.
4. Making sure to mount the pump in the upright position and using the pump mounting bracket as a
template, mark and drill two mounting holes to accept ¼” bolts. Mount the pump bracket using two ¼”
bolts, nuts and lock washers. Slide the pump into the bracket and tighten the clamping bolt. Do not
over-tighten the clamping bolt. Doing so can permanently damage the pump motor!
Note: Be sure to route all fuel lines clear of any moving suspension or drivetrain components,
and any exhaust components! Protect fuel lines from abrasion and road obstructions or debris.
5. Connect the fuel tank or cell to the high capacity 100 micron filter, using an AN-06, AN-08 or
equivalently sized fuel line. Connect the filter outlet to the fuel pump inlet (see Flow arrow on pump).
These sections of fuel line should be as large a diameter and short as possible to reduce the
tendencies for vapor lock, cavitation, and premature wear of your Aeromotive fuel pump.
6. Connect the fuel pump outlet to the carburetor in the vehicle’s engine compartment, using AN-06 or
equivalently sized fuel line.
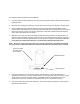
AN-08 Outlet port
AN-08 Inlet port
Factory set outlet
pressure screw,
Do not adjust