2-668-392-12(1) © 2006 Sony Corporation
Owner’s Record The serial number is located inside battery compartment. Record the serial number in the space provided below. Refer to these numbers whenever you call upon your Sony dealer regarding this product. Model No. COM-1 Serial No. _______________________ WARNING You are cautioned that any changes or modifications not expressly approved in this manual could void your authority to operate this equipment.
interference, and (2) this device must accept any interference received, including interference that may cause undesired operation. The supplied interface cable must be used with the equipment in order to comply with the limits for a digital device pursuant to Subpart B of Part 15 of FCC Rules. If you have any questions about this product: Visit: http://www.sony.
Note on using IP communication is not a replacement for your ordinary telephone and should not be used for emergency calling. Notes on this manual Screen shots in this manual may be different from the actual displays in the supplied software. LCD display The LCD of your Personal Communicator is designed with precision technology. However, in some cases, individual pixels may remain lit or may not light at all. Also, the brightness of the display may appear inconsistent, depending on the angle of view.
Table of Contents Overview......................................6 For Detailed Information ..............8 What’s in the Box .........................8 Preparation The Parts of Your Personal Communicator ..........................9 The status bar ......................... 12 Using the keyboard ................ 14 Step 1: Preparing a Power Source ....................................15 Installing the supplied battery ...15 Charging the battery ...............
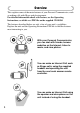
Overview This explains some of the main features of your Personal Communicator, such as making calls with Skype and playing music. For detailed information about each feature, see the Operating Instructions, available as a PDF file on the supplied CD-ROM. The features described below are only a few of your unit’s capabilities. Explore the unit and the Operating Instructions PDF file to find the features most interesting to you.
You can listen to music wirelessly from a friend’s Personal Communicator, and a friend can listen to music wirelessly from your Personal Communicator.
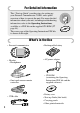
For Detailed Information This “Start-up Guide” provides steps for setting up your Personal Communicator COM-1 and a quick overview of how to operate the unit. For more detailed information about your unit, including troubleshooting information, refer to the Operating Instructions, available as a PDF file on the supplied CD-ROM ( page 44). The cover page of the Operating Instructions PDF file is shown on the right.
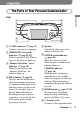
Preparation The Parts of Your Personal Communicator (USB) connector ( page 17) Connects your unit to a computer. WIRELESS LAN switch/ indicator ( page 21, 25) Turns on wireless LAN. When it turns on, the indicator lights up. “Memory Stick Duo” access indicator ( page 12) When the unit accesses the “Memory Stick Duo,” the indicator lights up.
DC IN 6V jack ( page 16) Connects to the supplied AC power adaptor. Status indicator ( page 21, 25) Lights up blue when the unit turns on wireless LAN in infrastructure mode. Lights up orange for Ad Hoc mode. OPTION button ( page 28) Displays a menu of options relating to what you are currently doing. Microphone Picks up your voice for applications requiring voice input. Center button Activates the selected item or confirms an entry.
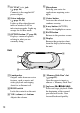
To connect the supplied headset To (headset) jack Remote call control button Answers or ends an Internet call. Microphone Preparation Clip Holds the remote controller to your clothes. Picks up your voice during an Internet call. About the built-in antenna Built-in antenna Used by the unit to connect to the wireless network.
To insert and remove a “Memory Stick Duo” (not supplied) Insert a “Memory Stick Duo” as illustrated below. When the unit accesses the “Memory Stick Duo,” the “Memory Stick Duo” access indicator lights up. Grip the groove with your finger, and gently pull in the direction indicated by the arrow. Terminal side Insert the “Memory Stick Duo” in the direction indicated by the arrow on the unit, and gently push until it clicks into place.
Remaining battery power Signal strength of the network connection The more circles displayed around the antenna, the stronger the signal of the network connection. Wireless LAN status Displays icons indicating whether your unit is connected to wireless network in infrastructure mode or Ad Hoc mode ( page 21, 25).
Using the keyboard Slide the front panel of the unit upward to use the keyboard. Num key Sym key Enter key Fn key Shift key To enter capital letters, numbers, and symbols Press the modifier key (Shift, Num, Sym, or Fn) first, and then press another key. For the key arrangement, refer to the chart of the Operating Instructions PDF file. After modifier keys are pressed, the following icons appear on the status bar of the display ( page 12). To lock a modifier key, press it twice. To unlock it, press it again.
Step 1: Preparing a Power Source Installing the supplied battery 1 Open the battery compartment cover by placing your thumb or finger on the word “Open” on one end of the cover and pressing towards the other end of the cover. Preparation Make sure that the battery is inserted before using the unit. 2 Insert the battery, label side up, aligning the metal contacts on the battery with the contacts inside the battery compartment.
Notes • Turn off the unit before replacing the battery. Removing the battery while the unit is turned on may damage data in the unit and cause a malfunction. • Be sure the battery is inserted when the unit is in use. Using the unit without the battery is neither recommended nor supported. • Do not use any other type of battery in your unit. Charging the battery Charge the battery using either the supplied AC power adaptor or the supplied USB cable.
Connection using the supplied USB cable USB cable (supplied) Preparation To (USB) connector Notes • If your unit is connected to your computer via the included USB cable and the computer enters a power saving mode (such as system suspend, sleep, or hibernation), then your unit’s battery will begin discharging. • Do not leave the unit connected for extended periods to a notebook computer that is not connected to AC power, because the unit may discharge the computer’s battery.
Step 2: Setting up Your Personal Communicator Turning on your unit Slide down and hold the POWER switch until the POWER indicator lights up green. The start-up screen appears for about 30 seconds. When you use your Personal Communicator for the first time, the initial set-up wizard appears. Once the initial set-up is completed, the set-up wizard will no longer appear when the unit is turned on. POWER indicator POWER switch To turn it off Slide down and hold the POWER switch again.
Entering your information Center button Activates the selected item or confirms an entry. Preparation Follow the on-screen instructions to enter information about yourself. Entering “My Profile” items creates your user profile, visible to other users connected via the Ad Hoc Application ( page 33). Use the following buttons and the keyboard ( page 14) to fill in the items. 4-way button (///) Moves the highlight or cursor. BACK button Returns to the previous screen.
Wireless LAN Settings — Infrastructure Mode Infrastructure mode enables your unit to connect to the Internet via a wireless access point near you.
Turning on wireless LAN in infrastructure mode WIRELESS LAN switch Status indicator Preparation WIRELESS LAN indicator 1 Slide and hold the WIRELESS LAN switch upward. The WIRELESS LAN indicator lights up green, and the status indicator lights up blue. The Connection Dialog appears. 2 Select the wireless network you want to connect to. If you select a wireless network that requires a WEP/WPA-PSK security key, the Wireless Network Settings screen appears.
Note • The unit is compatible only with the IEEE 802.11b wireless LAN standard. Both of the IEEE 802.11b and 802.11g wireless networks may be displayed, but the unit can connect only to networks capable of and configured for the 802.11b. Check with the administrator of your network for the status. 22 Item Options Display Name Enter a name to describe the wireless network in Connection Manager.
To use the Connection Manager Select the “Connection Manager” from “Tools” on the Home menu. It offers the following features: • You can register wireless network that is not displayed in the Connection Dialog. To register the wireless network, select “Add Manually” on the Connection Manager screen. • You can specify the order in which the unit will attempt to connect to the wireless networks that you have registered. • You can delete wireless network from the registered list.
Wireless LAN Settings — Ad Hoc Mode In Ad Hoc mode, your unit connects one-on-one with another unit. Your unit A friend’s unit The unit’s Ad Hoc Application enables you to communicate with a nearby user without connecting to the Internet. Add a user to your Ad Hoc Contact List before using this feature. When connected with another unit in Ad Hoc mode, your unit supports the Ad Hoc Application, with features such as Music Streaming (streaming music between units).
Turning on wireless LAN in Ad Hoc mode When you select the Ad Hoc application on the Communication menu, the unit automatically turns on the wireless LAN in Ad Hoc mode. The WIRELESS LAN indicator lights up green, and the status indicator lights up orange. WIRELESS LAN switch Status indicator Preparation WIRELESS LAN indicator To disconnect from wireless network Slide and hold the WIRELESS LAN switch upward.
Select a user you want to add to your Ad Hoc Contact List. A message is sent to the selected user, asking for permission to add the user to your Contact List. If the user agrees to be added, his or her profile information is registered in your Ad Hoc Contact List and your profile information is registered in his or her Contact List. You can communicate with an online user. You can add a friend at any time by performing this process.
Basic Operations Home Menu The Home menu is the starting point to access the various applications and features of your unit. To display the Home menu, press the HOME button. HOME Basic Operations To start an application from the Home menu Press / to select an item, and press the center button to start the selected application.
Context Menu On most screens, you can display a list of available features, this is called the Context menu. To display the Context menu, press the OPTION button. The options vary depending upon the screen you are viewing. Note • Some screens do not have Context menu. OPTION What’s Up Screen The What’s Up Screen shows the status of selected contacts, enabling you to easily select and start communicating with them. You can assign up to 90 boxes to this screen.
For more detailed information about the What’s Up screen, refer to the “What’s Up” section of the Operating Instructions, available as a PDF file on the supplied CD-ROM. Info Screen New event Basic Operations When a communication event occurs, such as a new message being received or a chat invitation arriving, an event icon appears on the status bar of the display. When this happens, press INFO to view detailed information about the event.
Things to Do With Your Personal Communicator Communication — Skype Skype is an Internet communication tool that includes a voice call feature using Internet. It offers the following features: • Talking with other Skype users • Text chat with other Skype users • Calling traditional telephone numbers (SkypeOut) 1) • Receiving calls from traditional phones (SkypeIn) 1) • Sending files to other Skype users 2) 1) Additional charges apply for SkypeOut and SkypeIn.
Communication — Google Talk Google Talk is an Internet communication tool. It offers the following features: • Text chat with other Google Talk users • Link to Gmail Before starting Google Talk Register for a Gmail account. If you have not yet signed up for Google Talk, visit to get a Gmail account. You can use your existing Gmail account with your unit. 2 Sign in to Google Talk. The unit automatically tries to turn on wireless LAN in infrastructure mode.
Communication — Yahoo! Messenger Yahoo! Messenger is an Internet communication tool. It offers the following features: • Text conversation with other Yahoo! Messenger users • Link to Yahoo! Mail Before starting Yahoo! Messenger Register for a Yahoo! ID. If you have not yet signed up for Yahoo! Messenger, visit to get a Yahoo! ID. You can use your existing Yahoo! ID with your unit.
Communication — Ad Hoc Application Ad Hoc communications allows COM-1 users to interact with each other one-on-one. With an Ad Hoc connection, you can enjoy such features as Music Streaming, where you stream music between your device and a friend’s COM1 Personal Communicator. 1 Select “Ad Hoc Application” from “Communication” on the Home menu. The unit automatically turns on wireless LAN in Ad Hoc mode, and the Ad Hoc Contact screen appears.
Web When the unit is connected to the Internet via wireless network, you can browse websites. 1 Select “Home Page” from “Web” on the Home menu. The Web browser menu appears. 2 Browse websites as you would on a computer. The unit automatically tries to turn on wireless LAN in infrastructure mode. For more detailed information about the Web browsing features, refer to the “Web” section of the Operating Instructions, available as a PDF file on the supplied CD-ROM.
Music Your unit is a music player, able to play music files stored on the unit. See the Operating Instructions (available as a PDF file on the supplied CD-ROM) or the File Structures section of this document ( page 40) for more details about the relationships between programs, file formats, and USB modes. 1 Connect your unit to a computer using the supplied USB cable, and transfer music files from the computer to the unit. Use the one of the following software programs and audio codecs.
Photo Your unit can display photos. You can get photos onto your unit in a variety of ways, including transferring them from a computer via the mylo Image Transfer on the supplied CD-ROM, transferring them from a computer by dragging and dropping with Windows Explorer, and transferring them by way of a “Memory Stick Duo.
Video Your unit can play video files. You can transfer videos onto your unit or onto a “Memory Stick Duo” by the Image Converter 2 program (not supplied). See the Operating Instructions (available as a PDF file on the supplied CD-ROM) or the File Structures section of this document ( page 40) for more details about the relationships between programs, file formats, and USB modes. 1 Transfer video files to your unit from a computer. 2 Select “Video” from the Home menu. A list of video files appears.
Text You can get text files onto your device in a variety of ways, including transferring them from a computer by dragging and dropping with Windows Explorer, or transferring them by way of a “Memory Stick Duo.” See the Operating Instructions (available as a PDF file on the supplied CD-ROM) or the File Structures section of this document ( page 40) for more details about the relationships between programs, file formats, and USB modes.
Tools 1 Select “Tools” from the Home menu. The Tools menu appears. 2 Select your desired Tools feature. For more detailed information about these features, refer to the “Tools” section of the Operating Instructions, available as a PDF file on the supplied CD-ROM. Things to Do With Your Personal Communicator The Tools menu includes the following administrative features: • “Settings”: Adjust a variety of settings for the unit. • “Connection Manager”: Manage the list of wireless networks.
For More Information File Structures The folder structures of the unit’s internal memory and of a “Memory Stick Duo” are described below. Folder structure of the internal memory Depending on the file category or the software program or feature used to transfer files to the unit, the files are stored in different folders, as shown in the following table. ROOT OMGAUDIO DROP BOX MP_ROOT 101MNV01 * TOOLS SETTINGS HOTSPOTDB MUSICDB MUSIC PICTURE DOCUMENT WEBPAGE * The folder name shown is an example.
File category, application software, or function Folder Audio files transferred using SonicStage “OMGAUDIO” folder Audio files transferred using; • Windows Media Player 10 “MUSIC” folder • Windows Explorer (drag and drop) “PICTURE” folder Photo files transferred using either the mylo Image Transfer program (supplied) or Windows Explorer (drag and drop) Video files transferred using the Image Converter 2 program (not supplied) “MP_ROOT” folder Text files created on your unit or transferred using Windows E
Folder structure of “Memory Stick Duo” Only the following “Memory Stick Duo” folders can be used with this unit. Depending on the file category or the software application or feature used to store files to the “Memory Stick Duo,” the files are stored in different folders, as described in the following table. ROOT DCIM 100MSDCF 1) MP_ROOT 101MNV01 2) PSP 3) MUSIC PHOTO MUSIC PICTURE DOCUMENT The folder name shown is an example. The folder is created and named according to the rules of the DCF standard.
File category, application software, or function Folder Audio files transferred using; • Windows Media Player 10 “MUSIC” folder • Windows Explorer (drag and drop) Audio files that were stored when the “Memory Stick Duo” was used with a PlayStation Portable.
Supplied CD-ROM The supplied CD-ROM contains the Operating Instructions PDF file and the supplied software. You can install the following software programs from the supplied CD-ROM. About the Operating Instructions PDF file An Operating Instructions manual that covers in detail all aspects of using your unit is supplied with your unit in PDF format. You can install the Operating Instructions PDF file from the supplied CD-ROM. To view the PDF file, you must have Adobe Reader installed on your computer.
mylo Utility This software helps you use your Personal Communicator. This software contains the following features. Continued For More Information • mylo Launcher You can start up the software such as SonicStage, mylo Image Transfer, mylo Tools, or Image Converter 2 (not supplied) from mylo Launcher on your computer. • mylo Image Transfer This software lets you transfer your favorite pictures from your PC to your device.
System requirements • • • • • • • • Computer: IBM PC/AT or Compatible (The software does not run on Macintosh.) CPU: Pentium lll 450 MHz or higher USB port (Hi-Speed USB Recommended) RAM: 128 MB or more Hard disk drive space: 200 MB or more (1.5 GB or more is recommended) (The amount of necessary space depends on the Windows OS or the size of your audio files.) USB port CD-ROM drive (Digital Music CD playback capabilities by WDM) When creating a music CD or an ATRAC CD, CD-R/RW, MP3 CD drive is required.
Installing the PDF file and the supplied software Use the following steps to install the Operating Instructions PDF file and the supplied software. 1 Turn on your computer, and insert the supplied CD-ROM into the CD drive. The installation menu screen appears. To install the Operating Instructions PDF file only Click [Install COM-1 Operating Instructions (PDF)] in step 2 of “Installing the PDF file and the supplied software.” Continued For More Information 2 Click [Install SonicStage and mylo Utility].
Starting up the supplied software Use the following steps to start up the supplied software. For more detailed information about the operation of the software, refer to the Help supplied with the software. 1 Double-click (mylo Launcher icon) on the desktop. mylo Launcher screen appears. 2 Click the software you want to start up. You can also start the software by clicking [Start] - [Program] - [mylo Utility], and then click the software you want to start up.
When installation is not successful – Q&A Q1 Does your computer meet the system requirements? A1 Check the system requirements for the installation ( page 46). Q2 Were you logged on as an “Administrator,” and did you close all running software programs before beginning the installation? A2 Log on as an “Administrator.” Close all running software programs, including background programs such as virus-protection software.
On Copyrights and Licenses • “mylo” and are trademarks of Sony Corporation. • SonicStage and SonicStage logo are trademarks or registered trademarks of Sony Corporation. • OpenMG, “MagicGate”, “MagicGate Memory Stick”, “Memory Stick”, “Memory Stick , ATRAC, ATRAC3, PRO” ,“Memory Stick Duo” ,“Memory Stick PRO Duo” , ATRAC3plus, ATRAC Advanced Lossless and their logos are trademarks of Sony Corporation. • “PSP” is a trademark of Sony Computer Entertainment.
• This product contains browser technology (“Opera Browser”) licensed from Opera Software ASA (www.opera.com). (Opera®Browser from Opera Software ASA. Copyright 1995-2006 Opera Software ASA. All rights reserved.
THIS SOFTWARE IS PROVIDED BY ERIC YOUNG “AS IS” AND ANY EXPRESS OR IMPLIED WARRANTIES, INCLUDING, BUT NOT LIMITED TO, THE IMPLIED WARRANTIES OF MERCHANTABILITY AND FITNESS FOR A PARTICULAR PURPOSE ARE DISCLAIMED.
For More Information • This product is protected by certain intellectual property rights of Microsoft Corporation. Use or distribution of such technology outside of this product is prohibited without a license from Microsoft or an authorized Microsoft subsidiary.
Index A O Ad Hoc Application 33 Ad Hoc Mode 24 Operating Instructions PDF file 44 Overview 6 B P Battery 15 Built-in antenna 11 Parts of Your Personal Communicator 9 Photo 36 Preparing a Power Source 15 C Context Menu 28 Copyrights and Licenses 50 File Structures 40 Skype 30 SonicStage 44 Starting up the supplied software 48 Status bar 12 Supplied CD-ROM 44 Supplied software 44 System requirements 46 G T E Entering your information 19 F Google Talk 31 H Headset 11 Home Menu 27 I Info Screen
Printed on 100% recycled paper using VOC (Volatile Organic Compound)free vegetable oil based ink.