
Manual


Aerovent IM-401 3
4 .5 BEARING REPLACEMENT, BELT DRIVEN FANS
In the event of a bearing failure of the drive shaft bear-
ings, we recommend that the entire bearing assembly or pillow
block bearings be replaced. To replace the assembly, follow the
procedure outlined below.
NOTE: All impeller hardware is metric. All motor,
bearing, and drive (sheave, etc.) are U.S. standard.
a. Loosen the belts by moving the motor towards the fan
case.
b. Remove the belts.
c. Remove the access cover to the belt guard to expose the
belt sheave.
d. Remove the belt sheave from the drive shaft.
e. Remove the impeller.
NOTE: Be sure to record the location of the taper lock bush-
ing on the drive shaft. This must be replaced in the proper
location to assure the correct impeller placement.
f. Disconnect the grease lines at the bearing assembly.
g. Remove the bearing assembly by removing the mounting
bolts.
h. Install the new bearings.
i. Replace the taperlock bushing on the shaft in the correct
location and torque the locking bolt (see Table B).
j. Replace the grease lines.
k. Install the belt sheave. Proper sheave alignment is critical.
l. Replace the belts and tighten.
m. Replace the access cover.
n. Lubricate the bearings per Section 4.3.2.
4.6 DIRECT DRIVE, IMPELLER REMOVAL
AND INSTALLATION
Remove the impeller.
NOTE: Be sure to record the location of the taper-
lock bushing on the drive shaft. This must be replaced in the
proper location to assure the correct impeller location.
Replace the taperlock bushing on the shaft in the cor-
rect location and torque the locking bolt (see Table B).
Install the impeller on the taperlock bushing and torque
the mounting bolt (see Table C).
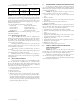
Lubricate motor bearings with grease gun at the follow-
ing intervals and numbers of strokes:
NOTE: Normal amount of grease delivered by a hand car-
tridge type grease gun. Remove the purge plug when equipped.
Grease does not have to purge from the purge plug, but the
purge plug should be removed to release pressure. The grease
fittings should be cleaned before attaching the grease gun to
prevent contamination.
Use only the following lubricants or their equal:
Polyrex EP2 Shell Gadus S2 V100 2
Chevron SRI-2 Mobil Grease #77
Precision No. 2 Starfak H, M and No. 2
Mobilux No.2 Texaco Premium RB
CAUTION: Do not over lubricate bearings or use a grease
other than specified.
4.3.2 Shaft Bearing Lubrication
Model ATABD belt driven fans are equipped with
bearing grease leads extending to fittings on the outer surface
of the fan casing. The bearings are lubricated at the factory.
Lubrication is not required unless the fan has been in storage
for more than six (6) months.
Bearings should be lubricated every six (6) months for
continuous duty fans, and every six (6) to twelve (12) months
for noncontinuous duty fans.
The bearings should be lubricated with the fan in
operation.
Lubricate the bearings with a hand cartridge type grease
gun applying three (3) strokes per bearing.
Standard lubricants do not apply to fans operating at
temperatures above 275°F. Consult factory for high tempera-
ture applications.
4.4 BELT REPLACEMENT
In the event of belt failure, it is recommended that the
belts be replaced with a complete new set of matched belts.
Do not mix old and new belts. The old belt will be longer and
the entire load would be carried by the new belt. For replacing
belts, follow the procedure outlined below:
1. Loosen the motor base adjusting nuts to move the motor
in towards the fan case.
2. Remove old belts.
3. Slip new belts in place.
4. Adjust the motor base to tighten the belts just enough to
prevent slippage; any tighter could cause premature bear-
ing failure. After the first thirty-six (36) hours of operation
the belts should be checked. If required, tighten the belts
to take up the initial stretch. After the initial stretch, only
periodic checking will be necessary.
HORSEPOWER PERIOD
STROKES
(SEE NOTE)
5 to 7
1
⁄2 12 Month 1
10 to 40 6 to 12 Month 3
50 to 150 6 Month 3