
Installation Guide


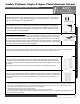


Round Fluted Wrap
Round Fluted Wrap
Round Fluted Wrap
-
-
-
Around Aluminum Column
Around Aluminum Column
Around Aluminum Column
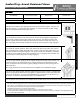
INSTALLATION INSTRUCTIONS
R
OUND
F
LUTED
W
RAP
-A
ROUND
A
LUMINUM
C
OLUMN
AFCO Form AL02-R Rev.7/2013
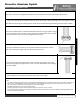
1. Measure the height of the opening where the column will be placed. Cut each col-
umn stave (piece)
1/4” longer than the opening. A circular saw with a metal cutting
blade is recommended for cutting the staves.
2.
To assemble the column, hinge the smaller opening of the stave into the larger
o
pening of the stave. Continue to add staves in this manner around the existing post
until only one stave remains. Hinge the last modified stave to the partially assembled
column and snap into place. Tap lightly with a rubber mallet if necessary to ensure the
joint is fully engaged.
Note: The stave with the modified lip has a portion of the inter-locking
lip removed.
3
.
T
o secure the column, attach the column to the overhead beam or header with th
e
a
ppropriate fasteners and screws. Repeat this at the bottom of the column.
Note: High performance tie down brackets are available at an additional charge.
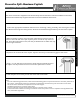
4
.
T
o assemble and install the capital and base, remove one screw from each side of th
e
b
ase. Place the two pieces of the base around the bottom of the column, flush with th
e
f
loor and re-insert the screws to secure in place. Repeat this process with the capital at
the top of the column. To secure the capital, gently slide the capital to the top of the
column. Pre-drill holes and insert appropriate sized screws through the capital and the
column wall. Be sure the capital is flush with both the header and the base.
If needed, caulk between seams for a finished look. Allow the base to rest on the floor.
It is not recommended to secure the base to the floor.
Note: For decorative capitals, see installation instructions provided with the decorative
capital.
Notes:
a. This column is not load-bearing.
b. All column staves should be cut square and to the same length.
c. Installation should be on a smooth level surface.
d. 2nd story balconies should not be attached directly to the side of any column.
e. Columns should be installed according to standard construction practices and in compliance with applicable local,
state, and federal regulations.
SIZE CHART
C
OLUMN
S
IZE
S
TAVES
P
ER
C
OLUMN
M
AXIMUM
S
IZE
OF
E
XISTING
R
OUND
P
OST
M
AXIMUM
S
IZE
OF
E
XISTING
S
QUARE
P
OST
12
5 9
3/4” 7 1/2”
15
5
12” 9”
18
6
15” 11”
24
6 22
1/4” 15 1/2”