INTRODUCTION CONGRATULATIONS and THANK YOU for your purchase of this AFG elliptical! Whether your goal js to win races or simply enjoy a fuller, healthier lifestyle, an AFG elliptical can help &F you attain it ~ adding club-quality performance fo your at-home workouts, with the ergonomics and = innovative features you need to get stronger and healthier, faster, Because we're committed to designing Ei fitness equipment from the inside out, we use only the highest quality components.
JINRIKISHA S Sang Hotheaded M1538 pd SISSY BMllporsIiEnedt SHIPBUILDING Wading Sundae ” ANTS aa : IMPORTANT PRECAUTIONS SAVE THESE INSTRUCTIONS Read ali instructions before using this elliptical. When using an electrical product, basic precautions should always be followed, including the following: Read all instructions before using this elliptical. It is the responsibility of the owner to ensure that all users of this elliptical are adequately informed of all warnings and precautions.
| ASSEMBLY INTRODUCTION IMPORTANT: READ THESE SAFER Y INSTRUCTIONS BEFORE USE! SSW A WARNING [a A There are several areas during the assembly process of an elliptical:that special attention must be pad, 1t is very important ‘to follow the -assembly:instructions correctly and to: make sure all parts are firmly tightened.
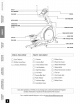
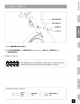
DISPLAY LEFT HANDLEBAR PULSE GRIP CONSOLE 3, = Es RIGHT HANDLEBAR Ee BOTTLE HOLDER &= Zi CONSOLE MAST i CONSOLE HAST BOOT =m {op Tap cap ’ HANDLEBAR COVERS yam POWER ADAPTER SOCKET —E— ELBOW COVER FOOT PAD ey / rT FRONT STABILIZER TUBE PEDAL ARM Sw (0 S55 LOWER LINK ARM 5mm T Wrench [I 1 Console [1 2 Elbow Covers SE [1 Phillips Screw Driver [1 1 Console Mast [7] 2 Pedal Arm Covers [1 13/15mm Hat Wrench [1 1 Front Stabilizer Tube [7] 1 Water Bottle Holder ] [3 1 Left Handlebar [1 1 Water Bottle SS [3 1 Right
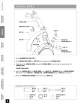
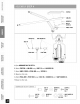
AX, “ep FRONT STABILIZER TUBE BOAT) A) Open HARDWARE BAG FOR STEP 1. B) Attach the FRONT STABILIZER TUBE to the MAIN FRAME using 2 BOLTS (A). ©) Slide FOOT LEVELER AXLE through MAIN FRAME TUBE. (The FOOT LEVELER AXLE is on top of bottom Styrofoam, beside the side shroud). D) Slide left and right FOOT LEVELERS onto the AXLE. GC) Attach FOOT LEVELERS to the FOOT LEVELER AXLE using 2 BOLTS with BLUE THREAD LOCK (B) and 2 FLAT WASHERS (C).
Skidded Sandra JINRIKISHA S Sang Hotheaded BMllporsIiEnedt SHIPBUILDING Wading ANTS aa {/ C CONSOLE MAST WATER BOTTLE GAVE BOLT (E) BOUT 109 CAP NT (0 WASHER OW) — SPRING WASHER BOUT(R) i 2 bed SJ WASHER (4) SPRING WASHER (Y) A. Open HARDWARE BAG FOR STEP 2. B. Slide CONSOLE MAST BOOT and TOP CAP onto the bottom of the CONSOLE MAST. GC. Carefully pull the CONSOLE WIRES through the CONSOLE MAST using the twist tie located inside the CONSOLE MAST. DO NOT PINCH WIRES! D.
RIGHT HANDLEBAR WAVY WASHER (1) WASHER BOLT Open HARDWARE BAG FOR STEP 3. B) Slide RIGHT HANDLEBAR onto CONSOLE MAST and attach using 1 BOLT (8), 1 WASHER (H} and 1 WAVY WASHER (1). C) Repeat on other side.
Skidded Sandra JINRIKISHA S Sang Hotheaded BMllporsIiEnedt SHIPBUILDING Wading ANTS aa A WASHER (K} be BOLT(H vee SCREW (L) pe WHEEL COVER WASHER (0) BOLTON) Open HARDWARE BAG FOR STEP 4. B) Attach FOOT PAD to LINK ARM using 4 BOLTS (J) and 4 WASHERS (K). C) Attach WHEEL COVER to PEDAL ARM using 1 SCREW (L). Dj Repeat on other side. E) Attach PEDAL ARM to PIVOT TUBE using 1 BOLT (M), 1 WASHER (N} and 1 WAVY WASHER (0). F} Repeat on other side.
LOWER HANDLEBAR LOWER LINK ARM pL SPACER RINGS NUT(R) WASHER (Q) BOLT(P} SPACER LOWER LINK ARM BA gp Bag, 2a PER-ATTACHED SPACER AND SPACER RINGS A) Open HARDWARE BAG FOR STEP 5. B) Slide SPACER into LOWER LINK ARM. C) Place SPACER RINGS on hath sides of the SPACER. While holding SPACER RINGS, slide LOWER LINK ARM into bottom end of LOWER HANDLEBAR. D} Insert 1 BOLT (P) into LOWER HANDLEBAR and secure using 1 WASHER (G) and 1 NUT (R). E) Repeat on other side.
a ET BEB covers before snapping into position. AARDVARK BAG FON STEP 6 CONTENTS: B) Snap HANDLEBAR COVERS together over the RIGHT HANDLEBAR. Note the position of the snap tabs on the GC) Attach HANDLEBAR COVERS with 1 BOLT A) Open HARDWARE BAG FOR STEP 6. D} Repeat on other side. por ER BEFORE Elliptical CONNECTIONS.
CONSOLE WIRES CONSOLE MAST PER-ATTACHED SCREWS SHED! RECENT You NOTE: There is NO hardware bag for this step. All hardware is per-installed. B) Carefully tuck the CONSOLE MAST wires into the CONSOLE MAST before attaching the CONSOLE. C) Attach CONSOLE to the CONSOLE MAST using the 4 PER-ATTACHED SCREWS. A) Attach the CONSOLE MAST wires to the CONSOLE wires. DO NOT PINCH WIRES! BEFORE ELLIPTICAL CONDITIONING TROUBLESHOOTING LIED. YOu BEGIN OPERATION GUIDELINES & MAINTENANCE WARRANTY. IMPORTANT.
BEFORE YOU BEGIN | INTRODUCTION CONGRATULATIONS! on hosing your elliptical. You've taken an important step in developing and sustaining an exercise program! Your elliptical is a tremendously effective tool for achieving your personal fitness goals. Regular use of your elliptical can improve the quality of your life in so many ways.
shortwave IRHR0H] Athabasca M1538 pd Sundae JINRIKISHA S Sang BMllporsIiEnedt SHIPBUILDING ANTS aa AE ELLIPTICAL OPERATION | POWER Your programmable elliptical is powered by a power supply. The power must be plugged into the power Jack, which is located in the front of the machine near the STABILIZER TUBE. Make sure the console power switch. located next to the power jack, is in the ON position.
06 0 A) MONITOR DISPLAY: Speed, Time, Heart Rate. Distance. Calories, and Resistance Level. B) LARGE LED WINDOW: Displays program profiles. £) STOP: Tress to pause/end your workout. Hold for 3 seconds to reset the elliptical DB) START: Press to begin exercising, start your program, or resume exercising after a pause. £) PROGRAMMING BUTTON: Used to select Program, Level, Time, and other options. Press to change display feedback during workout.
shortwave IRHR0H] Athabasca M1538 pd Sundae JINRIKISHA S Sang BMllporsIiEnedt SHIPBUILDING ANTS aa AE QUICK START 1) Turn on Elliptical 2) Press START button and begin exercising. 3) Program will automatically default to MANUAL (P1), the time will count up from 0:00, and the resistance will default fo feel 1.
PROGRAM PROFILES ! INTRODUCTION Iu MANUAL Allows you to adjust the resistance elev to your preference, without a preset program. = Ai INTERVALS a2 Improves your strength, speed and endurance by raising and lowering the resistance levels == through-out your workout to involve both your heart and muscles. Ei Ay WEIGHT LOSS Promotes weight loss by raising and lowering the resistance level, while keeping you in your fat burning zone.
Wold W1338 pi os snowboarding Wad fk Argosy IRVLBOIH RELATIVE] JINRIKISHA S BMllporsIiEnedt ANTS aa ALWAYS CONSULT YOUR PHYSICIAN BEFORE BEGINNING AN EXERCISE PROGRAM. HOW OFTEN? (Frequency of Workouts) The American Heart Association recommends that you exercise af least 3 fo 4 days per week to maintain cardiovascular fitness. If you have other goals such as weight or fat loss, you will achieve your goal faster with more frequent exercise.
TARGET HEART RATE ZONE CHART INTRODUCTION What is Target Heart Rate Zone? a a Target Heart Rate Zone tells you == the number of times per minute Ei your heart needs to heat to 0% achieve a desired workout effect, represented as a percentage the maximum umber of times | 8 your heart can beat per minute. Target Zone will vary for each individual, depending on age, current level of conditioning, and personal fitness goals.
Wold W1338 pi os snowboarding Wad fk Argosy IRVLBOIH RELATIVE] JINRIKISHA S BMllporsIiEnedt ANTS aa RIX scrimmage STRETCH FIRST Before using your product, it is best to take a few minutes to do a few gentle stretching exercises. Stretching prior to exercise will improve Flexibility and reduce chances of exercise related injury. Ease into each of these stretches with a slow gentle motion. Do not stretch to the point of pain. Make sure not to bounce while doing these stretches. 1.
REX] THE IMPORTANCE OF WARM UP & COOL DOWN WARM UP The first 2 to 5 minutes of a workout should be devoted to warming up. The warm-up will limber your muscles and prepare them for more strenuous exercise, Make sure that you warm-up on your product af a stow pace. The warm up should gradually bring your heart rate into your Target Heart Rate Zone.
MONTHLY LOG SHEETS INTRODUCTION MONTH MONTHLY-GLAD WEEK # DISTANCE CALORIES TIME SPORTING PRECAUTIONS ASSEMBLY MONTHLY TOTALS : MONTH MONTHLY GOAL WEEK # DISTANCE CALORIES TIME BEFORE YoU BEGIN Prevaricate OPERATION MONTHLY TOTALS MONTH MONTHLY GOAL WEEK # DISTANCE CALORIES TIME TROUBLESHOOTING & MAINTENANCE MONTHLY TOTALS : LIMITER WARRANTY BH
wain W1338 pi os snowboarding Wadi fk Argosy IRVLBOIH Sang MILLISECONDS ANTS aa TROUBLESHOOTING | Your AFG elliptical is designed to be reliable. However, if you do experience problems with your elliptical, please reference the troubleshooting guide listed below. PROBLEM: The console dis not light up. SOLUTION: Verify the following: « The outlet the machine is plugged into is functional. Double check that the breaker has not tripped. e The correct prows cord is being used.
INTRODUCTION HEART RATE. TROUBLESHOOTING PROBLEM: There is no heart rate reading. SOLUTION: Remove the console and verify that the heart rate cables are attached properly, making pe) sure that the cables are securely inserted into the console. EH Sens CY YOU MAY EXPERIENCE AN ERRATIC READOUT UNDER THE FOLLOWING CONDITIONS: 5 ® Gripping the heart rate handlebars too tight, Try to maintain moderate pressure while holding onto the A.
wain W1338 pi os snowboarding Wadi fk Argosy IRVLBOIH Sang MILLISECONDS ANTS COMMON PRODUCT QUESTIONS ARE THE SOUNDS MY ELLIPTICAL MAKES NORMAL? Our elliptical are some of the quietest available because they use belt drives and friction free magnetic resistance. We use the highest grade bearings and belts to minimize noise. However. because the resistance system itself is so quiet, you will occasionally hear other slight mechanical noises. Unlike older, louder technologies, there are ne fans.
MAINTENANCE | INTRODUCTION WHAT KIND OF ROUTINE MAINTENANCE IS REQUIRED? wi We use sealed bearings throughout our elliptical so lubrication is not needed. The most important s= maintenance steps are fo wipe perspiration off the unit after each vse and periodically checking the == assembly bolts for tightness.
sighting ITE) #1938 204 iy synovial WILT Hi i Vlad RIND SNpoRsIIEned Weight Capacity = 275 hs FRAME » LIFETIME AFG warrants the frame against defects in workmanship and materials for the lifetime of the original owner.
CUSTOMER TECH SUPPORT For fast. and friendly service, please contact one of our trained customer pantechnicon phone, snail-or our website, Customer Tech Support Hotlink: 1-877-60AFB5S5 Email: Website: www.advancedfitnessgroup.com Every employee at AFG takes pride in providing you with a high quality product. We want to know if you have a problem and we want to have an opportunity to correct it for you. NOTE: Please read the TROUBLESHOOTING section before contacting Customer Tech Support.