
User manual


• A minimum 50mm on sides (where 1 side wall ), min 100 x 50 mm(in a
corner with 2 sides wall ) clearances of the cooktop must be provided to
allow the air to flow freely
Lay The Sealant and Install The Cooktop
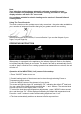
• Apply the sealant around perimeter of the top
cutout edges, image 3.
• Lower the cooktop into the cutout, so an even seal will be formed, image 4.
• Use packing wood where necessary to secure the cooktop into the cabinetry.
image 3 image 4
ELECTRICAL CONNECTION
Before connecting to the mains supply ensure that the mains power
corresponds with the requirements on the cooktop’s rating plate.
The appliance must be adequately earthed .
The cooktop has an earth wire and does not have a plug. It must be connected by
means of a special power cord, which must be correctly earthed.
In particular: The cooktop must be connected to the mains using 3x2.5mm2 power line
via a bipolar switch which has at least 3mm clearance between contacts.
All electrical work must be done by a licensed electrician.
COOKING AND USAGE TIPS
Ideal Heat Settings
• For general cooking it is recommended to turn the element to its highest
setting till the pot heats up, then reduce the setting to the appropriate heat
level.