
Operation Manual


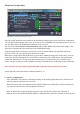

6. Hardware Buffer on/off
Note: For WaveRT drivers (Vista), this box is labeled “
Note: For WaveRT drivers (Vista), this box is labeled “
Allow Pull Mode (WaveRT)
Allow Pull Mode (WaveRT)
” instead!
” instead!
Enables the hardware buffer for the highlighted device. This only works for so called “WavePCI”
miniports, as other types of WDM drivers do not usually allow direct access to the hardware buffer.
Adjustment for best hardware buffer performance involves the “ASIO Buffer Size” slider and the “Buffer
Offset” slider (see below). Hardware buffering works best for rather small ASIO buffer sizes. Try
something between 128 and 256 samples as a starter!
The biggest advantage of using the hardware buffer is that this method uses a lot less CPU. In addition, it
may be possible to decrease latencies even further.
In multi-device-setups, it is possible to mix Hardware-buffered devices with devices that are not. This,
however, is not particularly recommended!
If hardware buffering is not supported by a particular audio device, there will be an additional latency of a
couple hundred milliseconds, which is clearly audible.
“Allow Pull Mode (WaveRT)”
There are two basic access methods for a WaveRT device, “pull-mode” (also called “event-mode”) and
“push-mode” (also called “polling mode”). “push-mode” is thought to be supported by all WaveRT
drivers and (Vista) OS platforms, whereas “pull-mode” wasn't even officially documented by Microsoft
until almost one year after Vista went RTM. As a consequence, “pull-mode” is still broken in a number
of instances.
If this box is left unchecked, ASIO4ALL will never use “pull-mode”, otherwise it will use it whenever
possible. If it works, “pull-mode” provides tighter timing and is generally thought to be technically better
than “push-mode”.
Note: The old ASIO4ALL 2.8 behavior for this option was as if
Note: The old ASIO4ALL 2.8 behavior for this option was as if
checked
checked
! If you check this box and there
! If you check this box and there
are no problems, keep it checked for better performance!
are no problems, keep it checked for better performance!
7. Kernel Buffers/Buffer Offset
If hardware buffering is disabled, this control lets you add up to two more buffers to be queued for audio
output. Each additional buffer increases the output latency of the device by the time it takes to play one
buffer. Therefore, the initial setting of “2” should only be changed on less powerful machines, where
reasonably small ASIO buffer sizes cannot be achieved with the default setting.
If hardware buffering is enabled, this control determines the amount of clearance (in ms) between where
ASIO4ALL will insert data into/read data from the hardware buffer, and the position where ASIO4ALL
currently thinks the hardware read/write position is. Sound complicated already? You haven't even seen
the code that calculates this...
As a general rule: Higher settings increase latencies and stability, lower settings have the adverse effect.
You should, however, be able to achieve a setting that is very close to zero (“4ms” would still be
considered “very close to zero”, while “10ms”, the default, would indicate that there is room for
improvement.)
With Envy24-based PCI-sound cards, there may be an option in your sound card control panel that reads
“DMA Buffer Transfer Latency” (Seen with Terratec products) or similar. You should set this to the
lowest possible value, e.g. “1ms” for best results.