
User Manual


Part No. 2002831-39 Rev. D
2
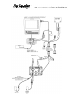
Granular Spinner Spreader Configuration (continued)
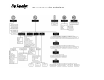
STEPS ACTION
5 Enter Vehicle Name
The display combines the Vehicle Make and Model for use as a Vehicle
Name. Use the on-screen keyboard to edit the vehicle name if desired. Press
Finish to complete Vehicle setup and continue with the configuration process.
If you selected Self-Propelled Spreader in Step 3 on page 1, then skip
ahead to Step 7.
If you selected another type of vehicle, then continue below.
6 a Select New Implement
Select an implement from the drop-down list menu, or press the New button to
create a new implement.
6 b Select Implement Attachment Method
Use the drop-down list to select an implement attachment method. Check the
Spinner Spreader Implement Type check box; then press Next to continue.
6 c Enter Distance From Hitch to Application Point
Enter the distance from the hitch to the application point using the number pad
button. Press Next to continue.
6 d Enter Implement Name
Use the keyboard button to enter a name for the implement. Press Finish to
complete the implement setup process and return to the Operating Setup
Wizard.
7 Select Operating Mode
Select Rate Logging/Control from the drop-down list box as the operating
mode. Press Next to continue.
8 Select Controller
Use the drop-down menu to select a controller, or press the New button to add
a controller. Press Next to continue.
Note: If you do not need to create a new controller, skip ahead to Step 11 on
page 3.