
User Manual
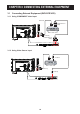
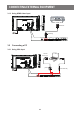
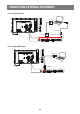
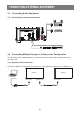
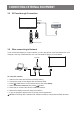
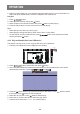
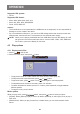
Table Of Contents
- Warnings and Precautions
- Polish Center for Testing and Certification Notice
- Electric, Magnetic and Electromagnetic Fields (“EMF”)
- China RoHS
- North Europe (Nordic Countries) Information
- Waste Electrical and Electronie Equipment-WEEE
- 1.4 Mounting on a Wall
- 1.5 Using of Remote sensor and power indicator
- 2.1 Control Panel
- 2.2 Input/Output Terminals
- 3.1 Connecting External Equipment (DVD/VCR/VCD)
- 3.2 Connecting a PC
- 3.3 Connecting Audio Equipment
- 3.4 Connecting Multiple Displays in a Daisy-chain Configuration
- 4.1 Change Picture Format
- 4.2 Play Multimedia Files
- 4.3 Play options
- 5.1 Settings
- 5.2 Network Settings
- 6.1 USB device compatibility
- INPUT MODE
- 8.1 Pixels and Sub-Pixels
- 8.2 Types of Pixel Defects + Dot Definition
- 8.3 Bright Dot Defects
- 8.4 Dark Dot Defects
- 8.5 Proximity of Pixel Defects
- 8.6 Pixel Defect Tolerances
- 8.7 MURA
- 9.1 Cleaning
- 9.2 Troubleshooting
- 10.1 PM-32
- 10.2 PM-43
- 10.3 PM-55

4.3.3 Playing photo files
1. Select in the top bar.
2. Select a photo thumbnail, then press
button.
USB deviceSortPlay All OptionsInfo
Date
Start a slideshow
If there are multiple photos in a folder, select a photo, then select {Play All}.
• To skip to the previous or next photo, press
or button, and then press button.
• To stop the slideshow, press H button.
Slideshow options
While you play a slideshow, press button, then press button to select an option:
• {ShufeOff}/{ShufeOn}:Enableordisablerandomdisplayofpicturesintheslideshow.
• {Repeat}: Select {Repeat} to watch a slideshow repeatedly or {Play once} to watch once.
• {Slideshow Time}: Select the displaying time for each photo in the slideshow.
• {Slideshow Transitions}: Select the transition from one photo to the next.
• {Media Server}: When you play content from a media server, you can select another media
server.
OPERATION
27