Electric Range Users Guide & Installation Instructions This book contains many important safety messages. Always read and obey all safety messages. Installer:Leave these instructions with the appliance Important - Save the installation instructions for the local electrical inspector’s use. U107401-01 www.aga-ranges.
Warning The anti-tip device supplied with this range must be correctly fitted when the appliance is installed.
Using your Range Contents General Safety Instructions 8 The Cooktop 10 The Broiler 12 The Ovens 13 The Clock 14 Both ovens 16 Multi-function oven 17 Multi-function oven modes 17 Handyrack 18 Oven racks 19 Oven lights 19 Storage 19 Multi-function (Left hand) Oven cooking guide 21 Cooking chart 22 Cleaning your range 23 Troubleshooting 26 Service and spares 28 Installation 31 3
Read all instructions before using this appliance. IMPORTANT SAFETY INFORMATION Save these instructions for future reference. Have your appliance properly installed and grounded by a qualified technician in accordance with the National Electrical Code ANSI/NFPA No. 70—latest edition, and local code requirements. To eliminate the risk of burns or fire by reaching over heated surface units cabinet storage space located above the surface units should be avoided.
Read all instructions before using this appliance. IMPORTANT SAFETY INFORMATION Save these instructions for future reference. Teach them not to play with controls or any other part of the range. the range that may become warm or hot. Do not leave plastic items on the cooktop as they may burn, melt or soften. Never store items of interest to children in the cabinets above a range or on backguard of a range; children climbing on the range to reach them could be seriously injured.
Read all instructions before using this appliance. IMPORTANT SAFETY INFORMATION Save these instructions for future reference. This appliance contains or produces a chemical or chemicals which can cause death or serious illness and which are known to the state of California to cause cancer, birth defects or other reproductive harm. DO NOT TOUCH HEATING ELEMENTS OR INTERIOR SURFACES OF OVENS Oven and Broiler heating elements may be hot though they are dark in color.
Read all instructions before using this appliance. IMPORTANT SAFETY INFORMATION Save these instructions for future reference. Protective Liners - Do not use aluminum foil to line oven bottoms. Foil liners may result in a risk of electric shock, or fire and will damage the enamel finish. Never allow aluminum foil to contact the heating elements. Use the Right Size Pan This range is equipped with cooktop elements of different sizes.
Read all instructions before using this appliance. IMPORTANT SAFETY INFORMATION Save these instructions for future reference. General Safety Instructions This appliance must be installed by a competent person in accordance with the installation instructions. The installation must comply with the relevant regulations and also the local electricity supply company requirements Clean with caution. If a wet sponge or cloth is used to wipe spills on a hot surface, be careful to avoid steam burns.
Read all instructions before using this appliance. IMPORTANT SAFETY INFORMATION Save these instructions for future reference. When using an electrical appliance near the cooktop, be sure that the cord of the appliance does not come into contact with the cooktop. Take care that no water seeps into the appliance The range is designed for cooking foods only and must not be used for any other purpose.
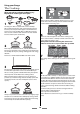
Using your Range The Cooktop When you cook on a electric cooktop its very important to use the right sort of pans... 5 Always lift pans off the cooktop. Sliding pans may cause marks and scratches. Always turn the control to the off position before removing a pan. 1 Use only pans that are suitable for electric cooktops. We recommend stainless steel and enameled steel pans because pots and pans with copper or aluminum bases leave traces on the cooktop that are difficult to remove.
Using your Range When cooking on the cooktop you may see the cooktop area you are using switch off and on. This is caused by a safety device that limits the temperature of the cooktop. It is quite normal, especially when cooking at high temperatures. If it happens a lot with a particular pan however it may mean the pan is not suitable – perhaps too small or too uneven - for a electric cooktop.
Using your Range The Broiler Before using for the first time, to dispel manufacturing odors, turn on the broiler and run for 30 minutes with the broiler pan in position. To clear the smell make sure the room is well ventilated to the outside air, by opening windows for example. Caution: Accessible parts may be hot when the broiler is in use. Young children should be kept away. For best results preheat for 2 minutes with the broiler pan in position.
Using your Range The Ovens The clock must be set to the time of day before the ovens will work. See ‘The Clock’ section for instructions on setting the time of day. Before using for the first time, to dispel manufacturing odors turn the ovens to 400°F (204°C) and run for an hour. To clear the smell make sure the room is well ventilated to the outside air, by opening windows for example. During use the appliance becomes hot. Care should be taken to avoid touching the heating elements inside the oven.
Using your Range The Clock To stop the beeper when it sounds Setting the time of day To stop automatically Turn the Adjusting knob counter clockwise Use when you have started the oven manually. Turn the Setting knob to ) position. the ( Use the adjustment knob to set the time you need. ‘Stop Time’ shows. AUTO will show in the display. Setting knob Adjusting knob When the clock is first connected the display will flash ( ) and ( ) alternately. Turn the Setting knob to the (auto) setting.
Using your Range Clock Special Features Turn the Setting knob to the ( ) position. The display will show the current time of day plus the ‘cook period’ you just set. Key Lock When the key lock is activated, the clock can be operated as usual but the ovens are locked and will not come on. This means that your child could select a cook program but the program will not be activated and ovens will not switch on. Use the adjustment knob to set the ‘Stop time’ you need. ‘Stop Time’ shows.
Using your Range Cooking using the timer (Delayed baking) Both ovens Before using for the first time, to dispel manufacturing odors turn the ovens to 400°F (204°C) and run for an hour. To clear the smell make sure the room is well ventilated to the outside air, by opening windows for example. The timer can be used to turn just one oven or both on and off automatically. The start and stop time must be the same for both ovens but different cooking temperatures can be set.
Using your Range Convection oven Multi-function oven This function operates the fan and the heating element around it. An even heat is produced throughout the oven, allowing you to cook large amounts quickly. The left hand oven of your range is Multi-function. It has many varied uses. We suggest you keep a careful eye on your cooking until you are familiar with each function. Remember - not all functions will be suitable for all food types.
Using your Range Conventional oven (top and Handyrack base heat) This function combines the heat from the top and base elements. It is particularly suitable for roasting and baking pastry, cakes and biscuits. Food cooked on the top rack will brown and crisp faster than on the lower rack, because the heat is greater at the top of the oven than at the base, as in ‘Convection assisted oven’ function. Similar items being cooked will need to be swapped around for even cooking.
Using your Range Oven racks Steam When cooking foods with high water content (e.g. oven fries) there may be some steam visible at the grille at the rear of the cooktop. This is perfectly normal. Oven lights the rack guard should be at the back pointing upwards As well as the flat racks some models are supplied with drop racks. The drop racks increase the possibilities for oven rack spacing. Press the appropriate button to turn on one of the oven lights.
Using your Range To remove the drawer pull it right out Lift up the ends of the plastic clips (one each side) to release the catches holding the drawer to the side runners and at the same time pull the drawer forward and away from the side runners. For safety’s sake push the drawer runners back out of the way. To refit the drawer Pull out the side runners. Rest the drawer back on the side runners and, keeping it level, push it right back.
Using your Range Multi-function (Left hand) Oven cooking guide Remember - not all modes will be suitable for all food types. The oven control settings and cooking times given are intended to be used only as a guide. Individual tastes may require the temperature to be altered to provide a preferred result. Food is cooked at a lower temperature in a convection oven than in a conventional oven. When using recipes, reduce the temperature by 20°F and the cooking time by 5-10 minutes.
Using your Range Cooking chart Conventional Oven Food Convection Oven Rack Temperature Position Approximate Cooking Time Temperature FISH 375°F 3 350°F Fillets 15-20mins. 375°F 3 350°F Whole 10mins.per lb + 10mins. 375°F 3 350°F Steaks according to thickness. 325°F 2-3 300°F 20-25mins. per lb + 20-25mins. 400°F 2-3 375°F 15-20mins. per lb + 15-20mins. 325°F 2-3 300°F 30-35mins. per lb + 30-35mins. 400°F 2-3 375°F 20-25mins. per lb + 20-25mins. 325°F 2-3 350°F 30-35mins.
Using your Range Cleaning your range IMPORTANT: Turn off the cooktop and use an oven glove to protect your hand from potential burns. Take care when using a sharp scraper. Essential information Before thorough cleaning isolate the electricity supply. Remember to switch on the electricity supply before use. Scrape the major spill or melted material from the cooking zone and push into a cold area, and then allow to cool before cleaning further.
Using your Range Cleaning chart All Parts listed here can be cleaned using hot soapy water (dishwashing liquid detergent) and a soft cloth. For more difficult cleaning, follow the appropriate instruction. Check cleaner manufacturers guidelines for compatibility with the material of your range. Part Finish How to clean Electric Cooktop Glass with anodized aluminum surround. Remove any dried baked on food deposits from the cooktop glass with a electric cooktop scraper, available from electrical retailers.
Using your Range Control Panel Ovens The control panel and control knobs should only be cleaned with a soft cloth wrung out in clean hot soapy water - but take care that no surplus water seeps into the appliance. Wipe with a clean dampened cloth then polish with a dry cloth. Some of the oven lining panels can be removed for cleaning and for cleaning behind. They can also be put into a dishwasher. Remove the racks first.
Using your Range Troubleshooting oven door open. Make sure that the broiler pan is pushed right back to the ‘backstop’ when broiling. A crack has appeared in the Cooktop surface Disconnect the range immediately from the power supply and arrange for its repair. Don’t use the range until after the repair. If there is an installation problem and I don’t get my original installer to come back to fix it who pays? See the "Service and spares" section for imformation about service. You do.
Using your Range A dish of water when placed on the rack should be the same depth all over. (For example, if it is deeper at the back, then the back of the range should be raised up or the front lowered). If the range is not level arrange for your supplier to level it for you.
Using your Range Service and spares If you have a problem In the unlikely event that you have a problem with your appliance, please refer to the rest of this booklet, especially the problem solving section, first to check that you are using the appliance correctly. Please complete the appliance details below and keep them safe for future reference - this information will enable us to accurately identify your particular appliance and help us to help you.
Read all instructions before installing or using this appliance. Installation Instructions Save these instructions for future reference. Installation This book contains many important safety messages. Always read and obey all safety messages. Installer:Leave these instructions with the appliance Important - Save the installation instructions for the local electrical inspector’s use.
Warning The anti-tip device supplied with this range must be correctly fitted when the appliance is installed.
Installation Installation 31 Regulations 32 Tools 32 Materials 32 Installation Safety Instructions 33 Dimensions and clearances 33 Location guidelines 34 Moving the Range 34 Checking the parts 36 Leveling the Range 36 Anti-Tip Device 36 Electrical Connection 37 Assemble the range 40 Range operational checks 42 How To Remove the Range for Servicing 43 Schematic diagram of the Range 44 Schematic diagram of the Range 45 Technical Data 46 31
Read all instructions before installing or using this appliance. Installation Instructions Save these instructions for future reference. Regulations Tools This range has been design-certified by CSA International according to UL858, latest edition. You will need the following tools 1. Electric drill 2. Safety glasses 3. Masonry drill bit & anchors (only required if fitting the range on a stone or concrete floor) 4. Steel tape measure 5. Phillips head screwdriver 6. Flat head screwdriver 7.
Read all instructions before installing or using this appliance. Installation Instructions Save these instructions for future reference. Installation Safety Instructions Dimensions and clearances Provide adequate clearances between the range and adjacent combustible surfaces. These dimensions must be met for safe use of your range. Warning! Improper installation, adjustment, alteration, service or maintenance can cause injury or property damage. Refer to this manual.
Read all instructions before installing or using this appliance. Installation Instructions Save these instructions for future reference. We recommend a gap of 43/” (111cm) between units to allow for moving the range. Do not box the range in; it must be possible to move the range in and out for servicing. A clearance of 5” (13cm) is required if the range is near a corner of the kitchen to allow the oven doors to open. Location guidelines Do not locate the range where it may be subject to strong drafts.
Read all instructions before installing or using this appliance. Installation Instructions Save these instructions for future reference. Moving the Range The range is very heavy. Take great care. We recommend two people maneuver the range. Ensure that the floor covering is firmly attached, or removed to prevent it being disturbed when moving the range around. You will need the leveling tool. Make 10 complete (360°) turns clockwise. (This means turning and removing the leveling tool 20 times).
Read all instructions before installing or using this appliance. Installation Instructions Save these instructions for future reference. Checking the parts spirit level, take two readings-with the level placed diagonally first in one direction and then the other. Check that the range has the following parts. Leveling tool & Allen keys The rollers can be adjusted to level the range.
Read all instructions before installing or using this appliance. Installation Instructions Save these instructions for future reference. Recommended acceptable electrical outlet area. Orient the electrical receptacle so the length is parallel to the floor. Electrical Connection When installed the range must be electrically grounded in accordance with local codes or; in the absence of local codes with the National Electrical Code ANSI/NFPA 70, latest edition.
Read all instructions before installing or using this appliance. Installation Instructions Save these instructions for future reference. 4-Wire Conduit Installation Fitting a 3-Wire Power Cord Disconnect the supplied power cord from the terminal block and ground post. Keep the terminal block parts; you will need them. Remove the strain relief clamp from the power cord and remove the power cord and strain relief clamp from the mounting bracket.
Read all instructions before installing or using this appliance. Installation Instructions Save these instructions for future reference. The neutral or ground wire of the power cord must be connected to the neutral terminal located in the center of the connector block. The power leads must be connected to the outside terminals. Make sure the connections are tight. Now tighten the stain relief device to clamp the power cord.
Read all instructions before installing or using this appliance. Installation Instructions Save these instructions for future reference. Assemble the range Fit the Door Handles Remove the 4mm Hex headed screws from the doors with the hexagon key tool. Use the screws to fit the door handles. The two end caps (one each end) of the standard rear flue grille must first be removed. The handles should be above the fixings. They are held in place by two fixing nuts on the inside face.
Read all instructions before installing or using this appliance. Installation Instructions Save these instructions for future reference. Fit the splash back (optional) If the rear spacer is not fitted. Hold the splash back in position. The splash is fitted using 4 screws in the rear edge of the flue grille, two at each end. Fit the splash baqck over the inner screws and then refit the outer two screws. (see figure).
Read all instructions before installing or using this appliance. Installation Instructions Save these instructions for future reference. Range operational checks Fit the plinth Oven check Set the clock to the time of day - the ovens will not work if the clock is not set. When the clock is first connected the display will flash ( ) and ( ) alternately.
Read all instructions before installing or using this appliance. Installation Instructions Save these instructions for future reference. How To Remove the Range for Servicing Lower the front roller by turning the leveling tool clockwise until the front feet are just clear of the floor. Slide range forward to disengage the range from the anti-tip bracket. Follow these procedures to remove appliance for servicing: Disconnect electrical supply to appliance and unplug the electrical supply cord.
Right hand end cooktop element controller Left hand end cooktop element - 1200w Left rear cooktop element - 1700W Left front cooktop element - 1200W Right rear cooktop element - 1200W Code Description REC LEE LRE LFE RRE Left hand end cooktop element controller Left rear cooktop element controller Left front cooktop element controller Right rear cooktop element controller Right front cooktop element controller Code Description LEC LRC LFC RRC RFC Right front cooktop element - 1800W Right hand end co
Oven light switch Left hand oven thermostat Right hand oven thermostat Oven light bulb Right hand oven element Right hand oven switch block Timer clock Thermal cut out OLS OTL OTR OVL ROE RSB TCK TCO L1 Supply (BlacK) Oven fan motor OFM L2 Neon indicator light NLI L2 Supply (Red) Left hand oven switch block LOS Neutral Supply (White) Left hand top outer element LTO N Left hand top inner element LTI L2 Left hand fan element LFE Ignition switches IGS Ignition spark generator Cooling
Read all instructions before installing or using this appliance. Installation Instructions Save these instructions for future reference. Technical Data INSTALLER: Please leave these instructions with the User. DATA BADGE LOCATION: instructions. Inside base of drawer cavity - remove drawer. For removal of drawer see installation Dimensions Overall height (splash not fitted) minimum 35 /’’ (89.8 cm) Overall width 43 /’’ (110cm) See ‘Positioning the Range’ 26 ¾” (68cm).
Read all instructions before installing or using this appliance. Installation Instructions Save these instructions for future reference.
Aga Ranges 110 Woodcrest Road Cherry Hill, NJ 08003 USA 1.866.4AGA.4USA www.aga-ranges.com Email support@aga-ranges.