AGA 13 AMP RETRO-FIT WITH AIMS (OIL TO ELECTRIC) USERS INSTRUCTIONS LEAVE WITH CUSTOMER PLEASE READ THESE INSTRUCTIONS BEFORE USING THIS APPLIANCE For use in GB and IE 06/09 EOPI 515757
CONTENTS SECTION PAGE USER GUIDE 3 HEALTH & SAFETY 3 THE AGA COOKER 3 OPERATING THE AGA 4 THE HEAT INDICATOR 5 OVEN VENT 5 GUIDE TO AGA COOKING 6 FITTING OF OVEN SHELVES 7 REMOVAL OF OVEN SHELVES 8 AIMS (AGA INTELLIGENT MANAGEMENT SYSTEM) 9 AIMS SET-UP 9 AIMS CONTROLLER HANDSET 9-10 INFORMATION (MAIN MENU SCREEN) 11 SETTINGS DATE/TIME SCREEN 11 AIMS PROGRAMME SCREEN 12 HOLIDAY SCREEN 13 CARING AND CLEANING 14 AIMS HANDSET CARE 15 SERVICING 16 2
USERS GUIDE HEALTH & SAFETY Consumer Protection As responsible manufacturers we take care to make sure that our products are designed and constructed to meet the required safety standards when properly installed and used.
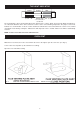
Fig. 1 DESN 513946 OPERATING THE AGA The following points are intended to help during the period of change-over from a previous cooker. The Aga book and the new user guide video provide a very useful introduction to the cooker. After the Aga has been assembled When first used the Aga will emit an odour for a short while. This is simply due to the protective oil burning off the hotplates.
THE HEAT INDICATOR BLACK too low SILVER RED BLACK LINE correct amount of stored heat too high The heat indicator is above the Roasting Oven door and has three sections: black, silver and red. When the indicator is on or about the black line in the silver section the cooker is at the correct working temperature. The purpose of the heat indicator is to show whether or not the cooker contains the full amount of stored heat when the cooker is in its normal operational mode.
GUIDE TO AGA COOKING As the Aga Cooker is heated differently from an ordinary cooker, exact conversions are not possible. Look in the Aga Book for a similar recipe. Below is a quick guide to oven usage. OVEN TEMPERATURE HIGH GRILLING SCONES PASTRIES BREAD YORKSHIRE PUDDING ROASTS SHALLOW FRYING 2=TWO OVEN AGA ROASTING OVEN Top - grilling; 2nd runner - scones, small pastries; 3rd runner - bread rolls, Yorkshire pudding; 4the runner - roasts, poultry, small cakes in cases in the large meat tin.
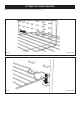
FITTING OF OVEN SHELVES When using the oven shelves for the first time follow Figs. 3a - 3d. Fig. 3a DESN 512403 Fig.
REMOVAL OF OVEN SHELVES Fig. 3c DESN 512405 Fig.
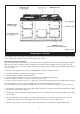
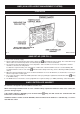
AIMS (AGA INTELLIGENT MANAGEMENT SYSTEM) CONTROLS * * NOTE: OVEN VENT FAN NOT IN USE FOR THIS RETRO-FIT Fig. 4 DESN 515282 AIMS SET-UP (SEE FIG. 4) 1. Connect the electricity supply. 2. Turn the right hand control knob from the OFF setting to the Normal manual control setting. The cooker will heat up until it reaches the Normal temperature as indicated by the black line on the heat indicator. 3. The left hand control knob will alter the oven temperature.
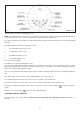
Fig. 5 DESN 515271 The handset has 10 buttons and a display screen. NOTE: If the AIMS handset is unused for an extended period of time, the display screen will automatically turn OFF to conserve battery power. The controller is designed to be operated within the kitchen area. Press firmly any button on the handset to turn the display back on, and the Information (main menu) screen is automatically displayed. The AIMS Controller handset has four display screens: 1. The Information (main menu) screen 2.
INFORMATION (MAIN MENU) SCREEN Press the button to activate this screen This indicates the current cooker mode, (Normal, Low or Slumber). If an arrow is showing this indicates the cooker is heating up from Low or Slumber to Normal. Indicates that the cooker is operating automatically (AIMS) or manually (according to switch position on main Aga control panel) Icon indicating the current time and day This will only show if the Holiday mode has been set DESN 515272 Fig.
AIMS PROGRAMME SCREEN Use the button to activate this screen and to move through the different actions and set an AIMS programme. To go back a step at any time press . 1. Set the frequency of the programme Once or Twice daily using + and - buttons. 2. Press button to select start time for ‘Normal’ setting then use the + or - buttons to set start time. 3. Press the button to select finish time then use + and - buttons to set finish time. When a time is selected it will be highlighted in dark blue. 4.
THE HOLIDAY SCREEN Press the programme. button to activate this screen and to move through the different operations and set a holiday 1. Set a start date and time using the + or - buttons. Pressing the button after each field has been entered to move you to the next field. When a field is selected it will be highlighted in dark blue. 2. Set an end date and time using the + or - buttons. Pressing the button after each field has been entered to move you to the next field. 3.
CARING AND CLEANING REMEMBER: BE CAREFUL OF THE HOT APPLIANCE DO NOT USE A STEAM CLEANER TO CLEAN THIS COOKER. DO NOT USE ABRASIVE PADS OR OVEN CLEANERS. Top Plate and Front Plate The easiest way to clean the Aga top plate and front plate is to mop up spills as soon as they happen. Baked-on food is more difficult to clean but can usually be removed with the Aga vitreous enamel cleaner or mild cream cleaners using a damp cloth, or, if necessary a nylon scouring pad.
AIMS HANDSET CARE Operating Distance The Handset will only operate in the same room as the appliance and up to a maximum distance of 4 metres from the appliance. If out of recommended operating range, the handset may show “OFFLINE”. Move handset back to within the recommended distance and the handset should correct itself. See note at foot of page for “Handset to Base Unit Signal Check”. Cleaning The Handset should be wiped clean using a soft clean cloth.
SERVICING z In the event of your appliance requiring maintenance, please contact Aga Service or your Aga Specialist. z Your cooker must only be serviced by a qualified engineer, from an authorised Aga Specialist. z Do not alter or modify the cooker. z Only the spares specified by the manufacturer, are to be fitted.
For further advice or information contact your local Aga Specialist With Aga's policy of continuous product improvement, the Company reserves the right to change specifications and make modifications to the appliance described and illustrated at any time. Manufactured by Aga Station Road Ketley Telford Shropshire TF1 5AQ England www.aga-web.co.uk www.agacookshop.co.uk www.agalinks.