
Installation Guide


21
CAUTION: BEFORE LIGHTING: ENSURE KNOB (A) IS IN THE OFF POSITION (SEE FIG. 27). ALSO
ENSURE GAS SUPPLY TO RANGE IS ON, AND THE GAS SERVICE COCK (C) IS IN THE ON POSITION
(SEE FIG. 31), AND THE ELECTRICAL SUPPLY TO THE AGA IS SWITCHED ON.
LIGHTING PROCEDURE - SEE FIGS 15 - 23
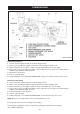
1. The main burner gas flow is set with the oven thermostat control knob (B). (See Fig. 14). First, ensure
both knobs are turned fully clockwise. Knob (A) to the OFF position and oven thermostat control knob (B)
to the minimum setting (thin end of the white band).
2. Turn oven gas control knob (A) slightly anti-clockwise towards the IGNITION position ( ) until reaching
stop, press down and hold for 5 seconds (gas flows only to the flame supervision burner). (See Fig. 16).
3. Continue pressing down knob (A) while turning further anti-clockwise to the ( ) position (this activates
the spark ignitor), continue to hold down for 10 seconds after flame supervision burner has been lit. (If it
does not light, steps 2 and 3 can be repeated). (See Fig. 17).
4. Upon lighting, release knob and turn further anti-clockwise to the ON position (large flame symbol) (See
Fig. 18). Pilot gas flows and mains gas flows according to the appliance setting (knob B).
5. Turn the oven thermostat control knob (B) slightly anti-clockwise into the white band (LOW FIRE position).
Leave in the low fire position for at least 60 minutes, (See Fig. 19).
NOTE: ‘LOW FIRE’ position is attained by turning knob (B) gradually into the white band, until a small flame
along the main burner is observed through viewing window (F). (See Fig. 14).
6. After at least 60 minutes rotate control knob (B) anti-clockwise to the mid-position of the green band for
normal running. (See Fig. 20).
NOTE: It will take up to 24 hours for all ovens to reach operating temperature, the oven heat indicator may
display green before this. Once the oven temperatures are at operating temperature it may be necessary
to make fine adjustment to the oven control knob to achieve the desired temperatures. It is not advisable to
make further changes to the control knob once the desired temperature is achieved.
When the range is lit from cold, moisture may form on the enamel which should be wiped off to prevent
staining.
IF THE FLAME HAS EXTINGUISHED FOR WHATEVER REASON, WAIT THREE MINUTES AND
REPEAT THE LIGHTING PROCEDURE.
COMMISSIONING
YEARLY SERVICE
It is recommended that the range be serviced at regular intervals.
Arrange with the home owner that the range has been turned OFF the night before to ensure it is cold upon
arrival.
1.
Turn off power to the range.
2. Isolate the gas supply by turning off the gas shut off valve, See Fig. 14. This is accessed by removing the
control panel facia (4 screws).
3. Break the hexagon union nut and remove two burner fixing screws, See Fig. 14.
4.
Locate electric wires from gas valve and solenoid, disconnect inline connectors.
5. The burner assembly can now be withdrawn from the combustion chamber.
NOTE: Check there is sufficient length of thermostat capillary tube to allow the burner assembly to be rested
on a work surface without detaching the sensing end from the top of the roasting oven.
6. Lightly brush the perforated top of the gas burner and check that the burner venturi is free of lint and fluff.
NOTE: IT MAY BE NECESSARY TO DETACH THE FLAME SUPERVISION ASSEMBLY FROM THE BURNER
TO ENSURE IT IS FREE.