
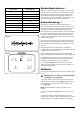
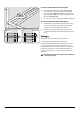
Use and Care Guide


13
1
2
3
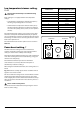
Accessories
Oven shelves
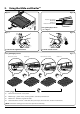
The range is supplied with the following:
• 2 standard shelves (Fig. 2.14)
• 1 drop shelf (Fig. 2.15)
• 2 telescopic shelf with runners (Fig. 2.16)
• 2 sets of side supports (Fig. 2.17)
The oven shelves are retained when pulled forward but can
be easily removed and retted.
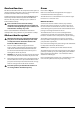
To fit the telescopic shelf runners
1. With the runner arm in the closed position locate the
opening of the upper rear slot onto the side support
(Fig. 2.18). DO NOT locate any further than the opening
at this point.
2. Lift the front of the runner arm to locate the front slot
against the side support (Fig. 2.18).
3. Push the runner arm towards the rear of the oven. The
catch at the front will lift and drop to secure the runner
arm in place (Fig. 2.18).
To fit a shelf to the telescopic shelf runners
Slide the telescopic runners forward until they stop. Holding
the shelf above the runners, tilt the front downward and
locate into the front of the runners. Lay the shelf at. Press on
the rear of the shelf to secure in place.
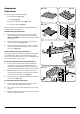
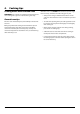
To remove a shelf from the telescopic shelf runners
1. Slide the shelf out on the runners. While holding one
of the runners securely, carefully lift the rear of the
shelf upwards: the shelf will spring clear of the central
restraining tab. Repeat for the opposite side of the shelf.
2. Note: To aid the removal of the shelf you can insert a
suitable at tool through the opening in the side of the
runners and lever the shelf clear (Fig. 2.19).
3. Tilt the front of the shelf downwards and then lift clear
of the runners (Fig. 2.20).
To remove the telescopic shelf runners
1. Firstly, remove the shelf as in the ‘To Remove a Shelf
from the Telescopic Shelf Runners’ section.
2. Place a nger on the underside of the telescopic runner
and lift.
3. Open the catch on top of the runner and pull the runner
forward and down to remove.
Fig. 2.14
Fig. 2.16
Fig. 2.15
Fig. 2.17
Fig. 2.18
Fig. 2.19 Fig. 2.20