
User and Care Manual


33
INSTALLATION
Check the appliance is electrically safe when you have nished.
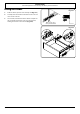
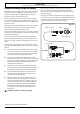
ArtNo.010-0004 Moving the cooker
Restraint chain
Rigid pipe of the appliance
Alternate positions
for anti-tip device
ArtNo.070-0014 - Stability bracket - Wall fitting
Cooker
Stability bracket
Floor
3 mm min
Typical oor mounting
Fig. 9.23
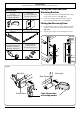
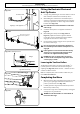
Fitting the Restraint Chain and
Anti-Tip Device
1. A range using a exible gas connector must be secured
with a suitable restraint chain and anti-tip device.
2. When tting the restraint chain it should be kept as
short as is practicable and xed rmly to the rigid pipe
at the top, right-hand, rear of the range, when viewed
from the front (Fig. 9.23).
n
Do not x the chain to the exible hose at the base
of the range.
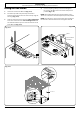
3. A suitable anti-tip device is supplied and shown in
Fig. 9.24.
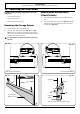
4. When tting the anti-tip bracket (Fig. 9.24 and
Fig. 9.25), adjust the bracket to give the smallest
practicable clearance between the bracket and the
engagement slot in the rear of the range.
5. Fit the bracket so that it engages as far as possible over
the chassis of the range.
n
Do not operate the range before the appliance is
in its installed position and the anti-tip devices are
engaged.
n
If the appliance is moved ensure that the anti-tip
devices are re-engaged and the range has been
returned to its original installed position.
n
DO NOT step, lean or swing on the range doors
or drawer as this could tip the range and result in
serious injury or death.
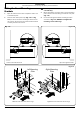
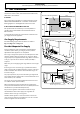
Lowering the Two Rear Rollers
To adjust the height of the rear of the range, rst t a
/8”
(13 mm) spanner or socket wrench onto the hexagonal
adjusting nut (Fig. 9.26). Rotate the nut – clockwise to raise –
counter-clockwise to lower.
Make 10 complete (360°) turns clockwise. Make sure you
lower BOTH REAR ROLLERS.
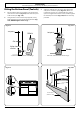
Completing the Move
1. Open the broiler door and right-hand oven door so that
you can get a good grip on the bottom of the fascia
panel as you move the oven (Fig. 9.27).
2. Carefully push the range backwards o the pack base.
Remove the pack base tray.
3. Position the range close to its nal position, leaving just
enough space to get behind it.
n
DO NOT use the door handles or control knobs to
manoeuvre the range.
0
1
⁄
8
" (3 mm) min
Fig. 9.24
Fig. 9.25
Range
Anti-Tip bracket
Fig. 9.26
Fig. 9.27