BERRINGTON SOLID FUEL BOILER STOVE INSTALLATION AND OPERATING INSTRUCTIONS This appliance is hot while in operation and retains its heat for a long period of time after use. Children, aged or infirm persons should be supervised at all times and should not be allowed to touch the hot working surfaces while in use or until the appliance has thoroughly cooled. PLEASE READ THESE INSTRUCTIONS CAREFULLY BEFORE INSTALLATION.
TABLE OF CONTENTS PAGE NO. 1. General . . . . . . . . . . . . . . . . . . . . . . . . . . . . . . . . . . . . . . . . . . . . . . . . . . . . . . . . . . . . . . 3 2. Health & Safety Precautions . . . . . . . . . . . . . . . . . . . . . . . . . . . . . . . . . . . . . . . . . . . . . . 3 Handling . . . . . . . . . . . . . . . . . . . . . . . . . . . . . . . . . . . . . . . . . . . . . . . . . . . . . . . . . 3 Fire Cement . . . . . . . . . . . . . . . . . . . . . . . . . . . . . . . . . . . . . . .
TABLE OF CONTENTS PAGE NO. 37. Vitreous Enamel Cleaning . . . . . . . . . . . . . . . . . . . . . . . . . . . . . . . . . . . . . . . . . . . . . . . . 13 38. Glass Cleaning. . . . . . . . . . . . . . . . . . . . . . . . . . . . . . . . . . . . . . . . . . . . . . . . . . . . . . . . . 13 39. Glass Replacement . . . . . . . . . . . . . . . . . . . . . . . . . . . . . . . . . . . . . . . . . . . . . . . . . . . . . 13 40. Exploded View . . . . . . . . . . . . . . . . . . . . . . . . . . . . . . . .
BERRINGTON SOLID FUEL STOVE INSTALLATION & OPERATING INSTRUCTIONS IMPORTANT WARNING In all cases the installation must comply with current Building Regulations, Local Authority Bylaws and other specifications or regulations as they affect the installation of the stove. This stove must not be installed into a chimney that serves any other heating appliance. There must not be an extractor fan fitted in the same room as the stove as this can cause the stove to emit fumes into the room.
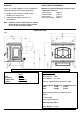
Fig.4 2300 600 Fig.3 Fit the primary air control knob to the flexible drive. (for the boiler model, ensure that the air damper knob spacer is placed between the knob and the flexible drive bracket on the back of the boiler). See Fig.3 FLUES Appliance Flues should be vertical wherever possible and where a bend is necessary, it should not make an angle of more than 45o with the vertical.
with a minimum continuous draught of 15 Pascals. Poor draught will result in poor performance. Similarly an excessive draught will result in the appliance over firing or being difficult to control. An excessive draught may require a flue draught stabiliser to be fitted. Do not connect this appliance to a chimney serving another appliance. The minimum required chimney height is 4.5 metres from the floor on which the appliance is installed.
On completion of the installation and commissioning ensure that the operating instructions for the stove are left with the customer. Ensure to advise the customer on the correct use of the appliance and warn them to use only the recommended fuels for the stove. Fig. 6 Advise the user what to do should smoke or fumes be emitted from the stove. The customer should be warned to use a fireguard to BS 6539 in the presence of children, aged and/or infirm persons.
LOCATION INSTALLATION CLEARANCES There are several conditions to be considered in selecting a location for your Berrington Stove. Maintain at least the following clearances to all combustible material: From the front 900 mm From the Sides 150 mm From the rear 150 mm From the flue pipe 600 mm a. Position in the area to be heated- central locations are usually best. b. Allowances for proper clearances to combustibles.
PLUMBING Fig.9 REGULATIONS The plumbing must be in accordance with all relevant regulations and practices. It must include a gravity circuit with expansion pipe, open to the atmosphere. The central heating will be pump-driven as with other types of boilers. The installation of any electrical services during the installation of this boiler and the associated heating system must be carried out by a registered competent electrician and in accordance with the requirements of the latest issue of BS 7671.
may not always be in the 12 o’clock position but the knob will only rotate once between fully open and fully closed. (See Fig.10) Keep children, clothing and furniture a safe distance away. WARNING NOTE LOW / SLUMBER BURN Properly installed, operated and maintained this stove will not emit fumes into the dwelling. Occasional fumes from de ashing and re fuelling may occur. However, persistent fume emission is potentially dangerous and must not be tolerated.
IMPORTANT NOTES Now that your Solid Fuel Stove is installed and no doubt you are looking forward to many comforts it will provide, we would like to give you some tips on how to get the best results from your stove. 1. We would like if you could take some time to read the operating instructions/hints, which we are confident, will be of great benefit to you. 2. Do not burn fuel with a high moisture content, such as a damp or unseasoned timber.
LIGHTING 1. Before lighting the stove, ensure that any build up of ashes in the fire box has been removed and that the ashpan has been emptied. 2. Open the firebox and cover the grate with crumpled pieces of paper. 3. Lay pieces of kindling on top of the paper towards the back of the fire box. 4. Open the primary air inlet by turning the control knob to setting 4. 5. Open the secondary air control by sliding the control lever located over the top of the fire door to the right. (See Fig.11). 6.
DE-ASHING Fig.13 When ash build-up becomes excessive in the fire chamber shake the firebars by inserting the operating tool into the round slot on the right side of the stove, twisting clockwise and anti-clockwise. A riddling tool is also provided for de-ashing. Fig.12 TO CLEAN CHIMNEY OUTLET These parts are heavy and must be allowed to cool before removal. Remove baffle underneath the boiler cross flow chamber by lifting it upwards and pulling it outwards and insert cleaning brush.
If this stove is finished in a high gloss vitreous enamel, to keep the enamel in the best condition observe the following tips: Fig.15 1. Wipe over daily with a soapy damp cloth, followed by a polish with a clean dry duster. 2. For stubborn deposits a soap impregnated pad can be carefully used on the vitreous enamel. 3. Use only products recommended by the Vitreous Enamel Association, these products carry the Vitramel label. Association PERIODS OF PROLONGED NON-USE 4.
1. 2. 3. 4. 5. 6. 7. 8. 9. 10. 11. 12. 13. 14. 15. 16. 17. 18. 19. 20. 21. RH Side Leg LH Side Front Frame Base Panel Hob Ashtray Front Boiler Air Slide Sub Assy Ashpan Ash Compartment Flexible Drive Front Brick Side Brick No.1 Side Brick No.2 Front Door Assy Ash Door Assy Thermostat Assy Grate Assy Coil Handle Assy Serial Number Plate 22. 23. 24. 25. 26. 27. 28. 29. 30. 31. 32 33. 34. 35. 36. 37. 38. 39. 40. 41.
Aga, Station Road, Ketley, Telford, Shropshire, TF1 5AQ, UK 15 Ref: N00430AXX Rev: 004 DP090715