
User guide


14
Accessories
Oven Shelves
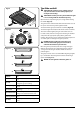
In addition to the at shelves, your cooker is supplied with a
drop shelf (Fig.2-29). The drop shelf increases the possibilities
for oven shelf spacing.
The oven shelves can be easily removed and retted.
Pull the shelf forward until the back of the shelf is stopped by
the shelf stop bumps in the oven sides (Fig.2-30).
Lift up the front of the shelf so the back of the shelf will pass
under the shelf stop and then pull the shelf forward
(Fig.2-31).
To ret the shelf, line up the shelf with a groove in the oven
side and push the shelf back until the ends hit the shelf stop.
Lift up the front so the shelf ends clear the shelf stops, and
then lower the front so that the shelf is level and push it fully
back (Fig.2-32).
Oven Lights
Rotate the oven light control as shown (Fig.2-33).
If the oven light fails, turn o the power supply before
changing the bulb. See the ‘Troubleshooting’ section for
details on how to change the bulb.
ArtNo.320-0011 Removing the shelf 1
ArtNo.320-0012 Removing the shelf 2
ArtNo.320-0013 Removing the shelf 3
Fig.2-30 Fig.2-31
Fig.2-32
Shelf guard
Front
Front
Shelf guard
Flat shelf
Drop shelf
Fig.2-29
Fig.2-33