Use / Install Guide Guide Uso / d’installation Guía de d’utilisation / Instalación French Door Bottom Freezer/Refrigerator Refrigerador con congelador inferior de puerta doble Réfrigérateur à portes françaises/Congélateur en bas AMLFDR23D / AMPROFD23D / HCFDR23D / MMCFDR23D / MELFDR23D
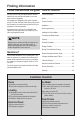
Finding Information Please read and save this guide Table of contents We hope you will enjoy and appreciate the care and attention we have put into every detail of your new, state-of-the-art refrigerator. Finding Information........................................................ 2 Safety............................................................................. 3 Your appliance is designed to offer years of reliable service.
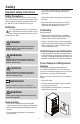
Safety Your door handles may be different from those shown in the images throughout this guide. Important safety instructions Safety Precautions • Avoid contact with any moving parts of the automatic ice maker. Do not attempt to install or operate your unit until you have read the safety precautions in this manual. Safety items throughout this manual are labeled with a Danger, Warning, or Caution based on the risk type. • Remove all staples from the carton to avoid injury.
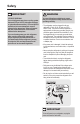
Safety Electrical information IMPORTANT WARNING You must follow these guidelines to ensure that your refrigerator’s safety mechanisms are operating correctly. CFC/HCFC DISPOSAL Your old refrigerator may have a cooling system that used CFCs or HCFCs (chlorofluorocarbons or hydrochlorofluorocarbons). CFCs and HCFCs are believed to harm stratospheric ozone if released to the atmosphere. Other refrigerants may also cause harm to the environment if released to the atmosphere.
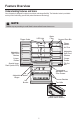
Feature Overview Understanding features and terms Your refrigerator is designed for optimal convenience and storage flexibility. The illustration below is provided to assist you with familiarizing yourself with product features and terminology. NOTE Features may vary according to model. Model is shown without freezer drawer cover.
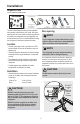
Installation Required Tools You will need the following tools: Tools Necessary: (OR) Phillips Head or Quadrex Head Screwdriver OR AND 6mm Allen Wrench ⅜" and ¼" Socket Wrench OR Adjustable Wrench ⅜" Fixed Wrench Door opening This Use & Care Guide provides general installation and operating instructions for your model. We recommend using a service or kitchen contracting professional to install your refrigerator. Use the refrigerator only as instructed in this Use & Care Guide.
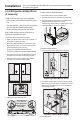
Installation Your door handles may be different from those shown in the images throughout this guide. Level Refrigerator & Adjust Doors (if necessary) To make final door height adjustments: Guidelines for final positioning of your refrigerator: 2. Insert 6mm Allen wrench into the shaft of the lower hinge. • All four corners of the cabinet must rest firmly on the floor. 3. A djust the height by turning clockwise or counterclockwise. Turning clockwise will lower the door.
Installation Reposition the Air Seal (Slide-out Shelves) Shelf features (Select Models) CAUTION 1. Remove air seal by pushing down on the flap with a downward rotation. Shelves must be removed prior to moving the refrigerator. 2. Position the air seal towards the outside end of the shelf to avoid the air tower when shelf is pushed back into place. CAUTION 3.
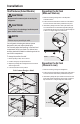
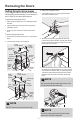
Removing the Doors Getting through narrow spaces To remove the refrigerator doors: If your refrigerator will not fit through an entrance area, before installing the door handles, you can remove the doors. Check first by measuring the entrance. 1. Trace lightly around the door’s top hinges with a pencil. This makes reinstallation easier. To prepare for removing the doors: 1. Make sure the electrical power cord is unplugged from the wall outlet. 2.
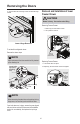
Removing the Doors Removal and Installation of lower Freezer Drawer 4. Unscrew the three lower hinge screws and slide the hinge inwards. CAUTION Drawer is heavy. Use caution when lifting Removing Freezer Drawer: 1. Remove (4) hex head drawer screws. 2. Lift up drawer to remove. DO NOT Remove Other Screws Lower Hinge Removal To reinstall the refrigerator doors: Reverse the above steps. Remove Hex Head Drawer Screw NOTE Upon replacement, the tube needs to be fully inserted up the marking line.
Connecting the Water Supply WARNING NOTE Check with your local building authority for recommendations on water lines and associated materials prior to installing your new refrigerator. For homes with existing shut-off valves a braided stainless steel water line is recommended, and for homes without an existing valve a copper water line with self-tapping saddle valve is recommended. Please refer to www.marvelrefrigeration.com for more information.
TruTouch Controls An indicator light will be illuminated above most active features. Touch the icon to activate the options below. on off Press and hold for three seconds to turn off the cooling system to clean the refrigerator. It also turns off the ice maker. The temperature displays will read OFF. default settings Resets all refrigerator settings such as temp, temp display and tones to their factory default settings.
TruTouch Controls Sabbath Mode NOTE The Sabbath Mode is a feature that disables portions of the refrigerator and its controls in accordance with observance of the weekly Sabbath and religious holidays within the Orthodox Jewish community. If the Temperature Adjustable Cold Zone Drawer is not turned off prior to putting the unit into Sabbath Mode, it will continue to adjust itself to maintain the set point even if the display does not illuminate to show that it is still on.
Automatic Ice Maker Ice maker operation & care - After the refrigerator is installed properly, the ice maker can produce ice within 24 hours. It can completely fill an ice bin in about three days. When using the ice maker for the first time and in order for the ice maker to work properly, it is necessary to clear air from water filter tubing. Once ice maker begins making ice, allow the bucket to fill completely, then discard the first TWO FULL buckets of ice.
Storage Features Shelf features Drawers Your refrigerator includes a variety of storage drawers. These drawers are located in fixed positions at the bottom of the fresh food compartment. CAUTION To avoid injury from breakage, handle tempered glass shelves carefully. Crispers Crisper drawers are designed for storing fruits, vegetables, and other fresh produce. NOTE Features may vary according to model. Your refrigerator includes glass shelves that are designed to catch and hold accidental spills.
Storage Features Special items rack To remove the Crisper Drawer for cleaning: The innovative design of the special items rack allows you to store four bottles of wine or soft drink bottles. 1. Pull the drawer out until it stops. 2. Lift the front slightly and remove the drawer.
Storage Features To change the position of an adjustable door bin: IMPORTANT 1. Before adjusting a bin, remove all food. DO NOT clean the display area of the Custom TempTM Drawer with abrasive or caustic cleaners. Wipe clean with a moist sponge. 2. Grip the bin firmly with both hands and lift it upward. 3. Remove the bin. 4. Place the bin just above desired position. 5. Lower the bin onto supports until locked in place.
Storage Features Freezer Features Clip Pull to Remove Replacing Lower Freezer Basket Instructions 1. Place freezer basket back inside the freezer drawer. Stabilizer Bar 2. Replace clips by sliding them back into the slots. Freezer Baskets To Remove Upper Freezer Basket 1. Find the side where the basket frame is aligned to the clip opening. The basket frame should be aligned to both front and rear clips on the same side (either left or right side). 2.
Storing Food and Saving Energy Ideas for storing foods • Avoid adding too much warm food to the freezer at one time. This overloads the freezer, slows the rate of freezing, and can raise the temperature of frozen foods. Fresh food storage • Keep the fresh food compartment between 34°F and 40°F with an optimum temperature of 37°F. • Leave a space between packages, so cold air can circulate freely, allowing food to freeze as quickly as possible.
Normal Operating Sounds Understanding the sounds you may hear Your new, high-efficiency refrigerator may introduce unfamiliar sounds. These sounds normally indicate your refrigerator is operating correctly. Some surfaces on floors, walls, and kitchen cabinets may make these sounds more noticeable. NOTE Energy efficient foam in your refrigerator is not a sound insulator.
Changing The Water and Air Filters Your refrigerator is equipped with separate water and air filtering systems. The water filter system filters all the water used to produce ice. The air filter removes odors and impurities from the refrigerator compartment. To replace your water filter About your advanced water filter 3. Slide the old filter cartridge straight out of the housing and discard it. 1. Turn Off the ice maker power switch. 2.
Changing The Water and Air Filters Ordering replacement filters Air filter Order new filters by calling 800-223-3900. The air filter is located under the utility bin. Replacing your TruAir air filter To ensure optimal filtering of refrigerator odors, you should change the air filter every six months (the filter status light on the Touch Panel prompts you to replace the filter after six months). 1. Open the air filter door. 2. Remove the old filter and discard it. 3.
Care and Cleaning Protecting your investment Keeping your refrigerator clean maintains its appearance and prevents odor build-up. Wipe up any spills immediately and clean the freezer and fresh food compartments at least twice a year. • Never use metallic scouring pads, brushes, abrasive cleaners, or strong alkaline solutions on any surface.
Care and Cleaning Care and cleaning tips Part Cleaning Agents Tips and Precautions Interior & Door Liners • Soap and water • Baking soda and water • Use two tablespoons of baking soda in one quart of warm water. • Be sure to wring excess water out of sponge or cloth before cleaning around controls, LED lights or any electrical part. Door Gaskets • Soap and water • Wipe gaskets with a clean soft cloth. Drawers & Bins • Soap and water • Use a soft cloth to clean drawer runners and tracks.
Solutions to Common Problems Before you call... If you experience a concern with your refrigerator or notice a product behavior or condition that you do not understand, you can usually avoid a call to your service representative by referring to this section for an answer. Beginning with the following table, this information includes concerns, potential causes, and common solutions. Automatic Ice Maker Concern Potential Cause Common Solution Ice maker is not making any ice. • Ice maker is turned off.
Solutions to Common Problems Opening/Closing Of Doors/Drawers Concern Potential Cause Common Solution Door(s) will not close. • Door was closed too hard, causing other door to open slightly • Refrigerator is not level. It rocks on the floor when moved slightly. • An object has fallen from the baskets blocking the door from closing. • Close both doors gently • Ensure floor is level and solid, and can adequately support the refrigerator. Contact a carpenter to correct a sagging or sloping floor.
Solutions to Common Problems Temperatures Are Too Warm Concern Potential Cause Common Solution Freezer/Refrigerator temperature is too warm. • Doors are opened too frequently or too long. • Door is slightly open. • Warm air enters the refrigerator whenever the door is opened. Open the door less often. • See Concern section, Opening/Closing of Doors/Drawers. Freezer temperature is too warm. Refrigerator temperature is satisfactory. • Freezer control is set too warm.
Service Information If service is required, call your dealer or authorized service agency. The name of the authorized service agency can be obtained from the dealer or distributor in your area. Have the following information readily available: • Model number • Serial number • Date purchased • Name of dealer from whom purchased Clearly describe the problem that you are having.
Warranty Marvel Refrigeration Limited Warranty REGISTER YOUR PRODUCT To register your product in our warranty system submit online at marvelrefrigeration.com. Keep your receipt, delivery slip, or some other appropriate payment record to establish the warranty period should service be required. If service is performed, it is in your best inter-est to obtain and keep all receipts.
Renseignements Veuillez lire et conserver ce guide Table des matières Félicitations et bienvenue dans le monde distingué des propriétaires. Nous espérons que vous allez aimer et apprécier le soin et l’attention que nous avons apportée à chaque détail de votre nouveau appareil ultra moderne. Renseignements............................................................ 1 Votre appareil est conçu pour vous offrir des années de service fiable. Ce manuel d’utilisation et d’entretien Installation...............
Sécurité Instructions de sécurité importantes Mesures de sécurité Ne tentez pas d'installer ou d'utiliser votre appareil avant d'avoir lu les mesures de sécurité présentées dans ce guide. Les mesures de sécurité présentées dans ce guide sont identifiées par les mots Danger, Avertissement ou Attention, selon le type de risque encouru. Définitions Voici le symbole d'avertissement concernant la sécurité. Il est utilisé pour vous avertir des risques de blessures potentiels.
Sécurité Vos poignées de porte peuvent être différentes de celles affichées dans les images tout au long de ce guide. Électricité • Retirez les portes. • Laissez les clayettes et les paniers en place pour que les enfants ne puissent pas grimper facilement à l'intérieur. AVERTISSEMENT Vous devez suivre ces directives pour que les mécanismes de sécurité de votre réfrigérateur fonctionnent correctement. • Demandez à un technicien qualifié d'enlever le réfrigérant et l'huile du compresseur.
Aperçu des caractéristiques Explication des caractéristiques et des termes Votre réfrigérateur est conçu pour vous offrir une commodité optimale et de la polyvalence de rangement. L’illustration ci-dessous est fournie afin que vous puissiez vous familiariser avec les caractéristiques et la terminologie de l’appareil. REMARQUE Les caractéristiques peuvent varier selon les modèles. Les tiroirs sont illustrés sans leurs couvercles.
Installation Outils nécessaires Composants fournis: Vis avant du Vis arrière du couvre-charnière couvre-charnière supérieur supérieur Outils nécessaire : (OU) Vis de charnière supérieure Vis de charnière inférieure ET Tournevis Quadrex ou Phillips Ce guide d'utilisation et d'entretien contient des instructions d'installation et d'utilisation spécifiques à votre modèle. Nous vous conseillons de faire appel à un réparateur ou à un entrepreneur pour l'installation de votre réfrigérateur.
Installation Vos poignées de porte peuvent être différentes de celles affichées dans les images tout au long de ce guide. Mettez à niveau le réfrigérateur et ajustez les portes (si nécessaire) Pour effectuer les derniers réglages de la hauteur de la porte: 1. Ouvrir le tiroir du congélateur pour rendre la charnière inférieure visible. Directives pour le positionnement final de votre réfrigérateur : 2. Insérer la clé Allen 6 mm dans l'axe de la charnière inférieure.
Installation Caractéristiques des clayettes (Certains modèles) Remettre le joint hermétique (étagères à glissière ) 1 Retirer le joint hermétique en poussant vers le bas sur le rabat avec une rotation vers le bas. ATTENTION 2 Placer le joint hermétique vers l'extrémité extérieure de l'étagère pour éviter la tour d'air lorsque remise en place. Les étagères doivent être retirés avant de déplacer le réfrigérateur.
Retrait des portes Passage par des espaces étroits Si votre réfrigérateur ne peut pas passer par une zone d’entrée, vous pouvez enlever les portes. Vérifiez tout d’abord en mesurant l’entrée. Enlever les portes du réfrigérateur 1 Tracer au crayon légèrement autour des charnières supérieures de la porte. Cela facilite la réinstallation. Pour se préparer à enlever les portes : 1 Assurez-vous que le cordon d’alimentation électrique est débranché de la prise murale.
Retrait des portes Instructions de retrait et de remise du tiroir de congélateur 4 Dévisser les trois vis inférieures de la charnière et glisser la charnière vers l’intérieur. ATTENTION Le tiroir est lourd. Soyez prudent lors de l’élévation Retrait du tiroir de congélateur 1 Retirez les (4) vis à tête hexagonale du tiroir. 2 Soulevez le tiroir pour le retirer. Ne retirez pas les autres vis Enlèvement de la charnière inférieur Pour réinstaller les portes du réfrigérateur : Inverser les étapes ci-dessus.
Raccorder l’alimentation en eau REMARQUE AVERTISSEMENT Vérifiez auprès de votre autorité locale du bâtiment pour obtenir des recommandations sur les conduites d’eau et les matériaux associés avant d’installer votre nouveau réfrigérateur. Pour les maisons avec des soupapes d’arrêt existantes, une ligne d’eau en acier inoxydable tressée est recommandée et, pour les maisons sans vanne existante, une conduite d’eau en cuivre avec une soupape auto-taraudante est recommandée. Veuillez vous référer à www.
TruTouch Commandes Un voyant rouge s’allume au-dessus de la fonction activée. Appuyez sur l’icône correspondante pour activer les options ci-dessous. on off (marche/arrêt) Appuyez sur cette touche et maintenez-la enfoncée pendant trois secondes pour éteindre le système de refroidissement afin de pouvoir nettoyer le réfrigérateur. L’activation de cette touche arrêtera également la machine à glaçons. L’affichage de la température indiquera « OFF » (arrêt).
TruTouch Commandes Mode sabbat TruTouch Le mode sabbat est une fonction qui permet de désactiver certaines parties du réfrigérateur et les commandes des modèles à technologie TruTouch afin de se conformer aux rites du sabbat hebdomadaire et des autres fêtes religieuses de la communauté juive orthodoxe.
Distributeur d’eau et de glaçons automatique Utilisation et entretien de la machine à glaçons • Certains bruits de fonctionnement sont normaux. Ils sont produits par : Une fois que le réfrigérateur a été installé correctement, la machine à glaçons commence à produire de la glace après 24 heures. Elle peut remplir complètement le bac à glaçons en trois jours environ.
Caractéristiques de rangement Caractéristiques des clayettes Votre réfrigérateur comprend une variété de tiroirs de rangement. Ces tiroirs sont normalement situés à des endroits fixes dans le bas du compartiment réfrigérateur. ATTENTION Pour éviter les blessures provoquées par des clayettes en verre trempé cassées, manipulez celles-ci soigneusement. Bacs à fruits et à légumes Les bacs à fruits et à légumes permettent le rangement des fruits, des légumes et d'autres produits frais.
Caractéristiques de rangement Étagère pour articles spéciaux La conception novatrice de l'étagère pour articles spéciaux vous permet d'y ranger quatre bouteilles de vin ou de boisson gazeuse. Retrait des bacs à fruits et à légumes pour le nettoyage : 1 Sortez le tiroir jusqu'au bout. 2 Soulevez légèrement l'avant du bac à fruits et à légumes, puis retirez-le.
Caractéristiques de rangement Pour changer la position d’un balconnet réglable : IMPORTANT NE NETTOYEZ PAS la zone d'affichage du tiroir avec des nettoyants abrasifs ou corrosifs. Essuyez au moyen d'une éponge humide. ATTENTION 1 Avant de régler un balconnet, enlevez tous les aliments. 2 Agrippez fermement le balconnet avec les deux mains et soulevez-le. 3 Enlevez le balconnet. 4 Placez le balconnet juste au-dessus de la position désirée.
Caractéristiques de rangement Caractéristiques du congélateur Pour enlever le panier du congélateur supérieur Agrafe Pull to Remove Instructions pour remettre du panier du congélateur Barre stabilisatrice 1 Remettre le panier du congélateur à l’intérieur du tiroir du congélateur. Paniers du congélateur 1 Trouver le côté où le cadre du panier est aligné sur l'attache d’ouverture. Le cadre du panier doit être aligné à la fois aux attaches avant et arrière du même côté (gauche ou droite).
Conservation des aliments et économie’énergie Conseils pour la conservation des aliments Conservation des aliments frais • Conservez le compartiment réfrigérateur à une température située entre 1,1°C et 4,4°C (34°F et 40°F), la température optimale étant de 2,8°C (37°F). • Évitez de surcharger les clayettes du réfrigérateur, car cela réduit la circulation de l'air et entraîne un refroidissement inégal.
Bruits d'un fonctionnement normal Pour comprendre les bruits que vous entendez REMARQUE Votre nouveau réfrigérateur de haute efficacité peut émettre des sons qui ne vous sont pas familiers. Ces bruits indiquent habituellement que votre réfrigérateur fonctionne correctement. Certaines surfaces sur le plancher, les murs et les armoires de cuisine peuvent rendre ces sons plus distincts.
Remplacement des filtres à eau et à air Votre réfrigérateur est équipé d’un système de filtration pour l’eau et d’un autre pour l’air. L'eau servant à la production de glaçons et entièrement filtrée par le système de filtration de l'eau. Le filtre à air enlève les odeurs et les impuretés présentes dans le réfrigérateur.
Remplacement des filtres à eau et à air Filtre à air Le filtre à air est situé sous le bac de rangement Remplacement du filtre à air TruAir En général, vous devriez changer le filtre à air tous les six mois (le voyant lumineux indiquant l'état du filtre sur le panneau tactile vous avertira de remplacer le filtre après six mois d'utilisation) pour assurer une filtration optimale des odeurs du réfrigérateur.
Entretien et nettoyage Protection de votre investissement Gardez votre réfrigérateur propre pour conserver son apparence et éviter les odeurs. Essuyez immédiatement tout renversement et nettoyez les compartiments congélateur et réfrigérateur au moins deux fois par an.
Entretien et nettoyage Astuces d'entretien et de nettoyage Pièce Agents de nettoyage Conseils et précautions Intérieur et revêtements de porte • Eau savonneuse • • Bicarbonate de soude et eau • Utilisez deux cuillerées à table de bicarbonate de soude dans 0,47 L (1 pinte) d’eau tiède. • Essorez bien l’eau de l’éponge ou du chiffon avant de nettoyer autour des commandes, de l’ampoule DEL ou de toute pièce électrique.
Solutions aux problèmes courants Avant de faire appel au service après-vente Si vous avez un problème avec votre réfrigérateur ou que vous remarquez un fonctionnement anormal de l’appareil, vous pouvez dans la plupart des cas, éviter d’appeler le service après-vente en consultant ce chapitre pour trouver une réponse à votre question. En commençant par le tableau ci-dessous, vous pourrez ainsi avoir accès à de l'information qui comprend les problèmes courants, leurs causes et les solutions suggérées.
Solutions aux problèmes courants Fonctionnement du réfrigérateur Problème Cause possible Solution courante Le compresseur ne fonctionne pas. • Le système de refroidissement est arrêté. • Mettez le système de refroidissement en marche. Reportez-vous à la section « Commandes » pour connaître l'emplacement de l'interrupteur du système de refroidissement. • Il s’agit d’une condition normale pour un réfrigérateur à dégivrage automatique.
Solutions aux problèmes courants Températures trop chaudes Problème Cause possible Solution courante La température à l’intérieur du réfrigérateur/congélateur est trop chaude. • Les portes sont ouvertes trop fréquemment ou trop longtemps. • La porte est légèrement ouverte. • De l’air chaud pénètre dans le réfrigérateur chaque fois que la porte est ouverte. Ouvrez la porte moins fréquemment. • Reportez-vous à la section « Problème », à la partie « Ouverture et fermeture des portes et des tiroirs ».
Service après-vente Si un SAV s’impose, appelez votre revendeur ou un centre de réparation agréé Marvel. Vous pouvez obtenir les coordonnées du centre de réparation agréé le plus proche auprès de votre revendeur ou distributeur. Tenez-vous prêt à fournir les informations suivantes. • Numéro de modèle • Numéro de série • Date d’achat • Nom du revendeur où vous avez fait l’achat Décrivez clairement le problème.
Garantie Garantie limitée de Marvel Refrigeration ENREGISTREMENT DE VOTRE PRODUIT Pour enregistrer votre produit dans notre système de garantie, soumettez en ligne sur le site marvelrefrigeration.com. Conservez votre reçu, bon de livraison ou autre document approprié attestant du paiement afin d’établir la période de garantie si une intervention s’avérait nécessaire. En cas d’intervention, il est de votre intérêt d’obtenir et de conserver tous les reçus.
29-FR