WINE CELLAR USER MANUAL
Index Page 2 1 Important instructions for safety and the environment 1.1 For your safety 1.2 Respect for the environment 3 2 Installation 2.1 Installation 2.2 Connection to the electrical mains 4 3 3.1 3.2 3.3 3.4 3.5 Before starting Getting to know the appliance Main features Main components Electronic Control Main control panel and Riserva panel 7 4 4.1 4.2 4.
1 Important instructions for safety and the environment 1.1 For your safety If this Appliance is to replace an existing appliance which in turn is to be removed or disposed of, make sure that it does not become a dangerous trap for children by cutting its power supply cable and making it impossible to close the door. Take the same precautions at the end of the life cycle of the new appliance. This appliance is designed to refrigerate beverages and foods and is destined for household use.
Installation 2 Installation 2.1 Make sure that installation is performed correctly, adhering to all of the instructions in the specific installation guide provided with the appliance. Connection to the electrical mains 2.2 The appliance is equipped with a 13 Amp UK plug. It must be connected to the electrical mains by means of a corresponding UK socket. Do not use extension cords and/or multiple adapters for connection. Do not use extension cords and/or multiple adapters for connection.
3 Before starting 3.1 Know your appliance Congratulations for having purchased your new Aga Refrigeration Unit. You can now use our innovative conservation system, which will allow you to keep all of your food in the best way possible. This manual will answer most of your questions about the product’s features. Should you require further information, please call our Customer Service Team on 0845 602 3015 or consult our website: www.aga-web.co.uk.
Before starting 3 Main components 3.
3 Before starting 3.4 Electronic Control The innovative system of electronic control designed by Aga keeps a constant temperature in the three compartments and displays it on the control panel. It also lets the user interact with the control system through personalised setting of the various function and by sending sound and/or visual signals should there be any operating anomalies with the appliance. 3.
Turning the appliance on and off 4 Componenti Turning on principali and off 3.3 4.1 First start-up When the appliance is connected to the electrical power supply but has not yet been turned on, the display shows the message (safety message to warn that power is supplied to the appliance), while all of the keys on the panel are off. To turn on all of the appliance compartments, press the Unit button for three seconds.
4 Turning the appliance on and off 4.2 How to adjust the temperature for suit various needs To adjust the temperature in the various compartments, use the up/down key for that compartment (see chapter 3.5). If the “keypad locked” message appear, simultaneously press the keys Menu and Up/Down (Down) for 3 seconds. Wines compartment Each model has been carefully tested before leaving the factory and is adjusted so as to ensure high performance and low consumption.
To prevent accidental modification of settings, the keypad locks automatically after a certain period of time and the display shows the message “keypad locked”. To re-activate it, simultaneously press the keys Menu and Up/Down (Down) for at least three seconds. Settings and Special Functions 5 Customisation and Language Settings 5.
5 Settings and Special Functions Vacation TriMode This function (recommended in case of prolonged absences since it allows considerable energy savings) brings the Tri-Mode compartment temperature to - 18°C (46.4°F). It is possible to program the duration, or it can be manually deactivated upon re-entry after a period of absence. This function remains active even if during the period of absence there is a prolonged interruption of electrical power.
Settings and Special Functions Air Filter 5 The View Status function permits visualising the exact quantity of filtered air in liters and the time left before the filter needs to be replaced. The Reset Filter function sets to zero the quantity of air filtered and the time left before the filter needs to be replaced. It is necessary to set the meter to zero each time the cartridge is replaced.
5 Settings and Special Functions 5.3 Basic settings of the Menu Select the Menu button to select . TriMode Options and used the Up/Down button The freezer compartment can, if required, be converted to the refrigeration o Fresco operating mode. How to set the Fridge function How to set the Fresco function How to revert to the Freezer function Default Setting This offers the possibility to reset default factory settings and cancels any previous changes.
Settings and Special Functions Set 12/24 5 This function selects the display at 12 or 24 h How to set the display to 12 h How to set the display to 24 h Show Time Through this function it is possible to activate/deactivate the constant visualisation of the time.
6 Internal Layout 6.1 Internal Layout (positioning, adjustment, removal) Wine shelf TriMode drawer The shelves can be easily removed for cleaning. Remove the bottles, completely extract the shelf, tilt it upward until the wheels are free of their seat and extract it. Located in the upper drawer of the freezer compartment after removal, make sure to reposition it correctly.
Lighting 7 Lighting 7.1 To provide optimum interior lighting, two different modes are available: a neon system that illuminates the refrigerator compartment from the top and a LED which directly illuminates different areas of the refrigerator compartment, the Cooler drawers and the Freezer drawer. On some models, there is an external night light system located at the base of the appliance. In case of malfunction and/or failure of the lighting system, you should contact an authorized Aga Service Agent.
8 Use of the TriMode compartment 8.1 Use of the TriMode compartment The TriMode compartment, used in conjunction with the Cantina and Riserva compartment, allows great flexibility in the use of the appliance. Some possible uses: Freezer mode Refrigerator mode Cooler mode Spirits, such as vodka, gin, tequila, schnapps, limoncello and the glasses to serve them Rapid cooling of beverages, by activating the bottle cooler function Storage of large amounts of ice.
Conservation of wines 9 General directions 9.1 As is known, wine can be stored for long periods of time if this is done under the following conditions: Suitable temperature without appreciable variations over time Controlled level of humidity Protection from light Absence of noise and vibrations Absence of odours Bottle kept horizontal. All of these conditions are fully met in the Aga Wine Cellar. Conservation temperature 9.
9 9.3 Conservation of wines Time of conservation Improvement of wine over time and its duration usually depends on the character of the variety and its type. The following chart shows the best period of conservation and aging for various types in ideal conservation conditions offered by your appliance. However, you should always follow the instructions of the manufacturer, especially for fine wines. 9.
Conservation of wines New wines (Vin Nouveau) Red wines Sparkling wines Liqueur and straw wines 9 Due to the special processing they undergo, new vintage wines contain a low tannin content and are therefore more enjoyable if served between 12° C and 14° C. Since they contain more tannin and are less acidic, red wines are normally served at higher temperatures.
10 Food Conservation 10.1 Recommendations for conserving fresh food Vegetables Wash vegetables in cold water and dry well. Place vegetables in vacuum packed containers, plastic containers or vegetable bags. Fruit Wash and dry fresh fruit. Pack very aromatic fruit in plastic bags. Fruit should be placed in the low humidity Fresco compartment. Packaged meat Place in the refrigerator in its original packaging. After opening, wrap the remaining food in plastic bags or aluminum foil.
Recommended times for food conservation Fresh foods Conservation area Time Large cuts Cooler Compartment 4 days Steaks, poultry and wild game Cooler Compartment 3 days Ground meat Cooler Compartment 1-2 days Carpaccio Cooler Compartment Immediately Boiled meat and roasted meat Refrigerator Compartment 2 days Meat sauce Refrigerator Compartment 6 days Raw and cooked fish Cooler Compartment 2 days Soups and broths Refrigerator Compartment 2 days Pasta Refrigerator Compartment 2 d
12 Care and Cleaning 12.1 Care and Cleaning To clean the parts in steel use a microfiber cloth and the sponge provided in the kit with the appliance. Every now and then, to make to steel shiny, wipe with a slightly damp microfiber cloth. Scrupulously follow the detailed directions that can be found in the provided kit and never use abrasive or metallic products which could scratch and damage the finishing on the appliance permanently.
Troubleshooting guide Troubleshooting guide 13 13.1 If you notice malfunctions in your appliance, use this guide before calling Service. This guide may help you resolve the problem yourself or could provide important information to ensure rapid and effective service. Message “Call Service” A malfunction is usually indicated on the display. Problems that cannot be resolved by the user are signalled through a malfunction code and the message “Call Service”.
generali ed avvertenze per Troubleshooting guide 13 1 Indicazioni la sicurezza e per l’ambiente 13.2 Malfunction indications appearing on the display Display message Power Failure Door open Drawer open Cellar too warm Cellar too cold Riserva too warm Riserva too cold Fridge too warm Fridge too cold Cooler too warm Cooler too cold Freezer too warm Freezer too cold Error Code...
Prior to calling Service Prior to calling Service 14 14.1 If our recommendations were not sufficient to solve the problem, please get in touch with our Contact Centre for further support on 08458 152 020 Before calling, write down the model type and serial number and any messages which may have appeared on the display.
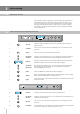
15 Menu Map 15.
Menu Map Settings TriMode Options Default Settings Fridge Enter to confirm Fresco Enter to confirm Freezer Enter to confirm 15 15.
16 Useful Information 16.1 Spares Replacement Water filter 16.
B090002-00 EN Contact 0845 815 2020 Station Road, Ketley, Telford, Shropshire, TF1 5AQ England. www.aga-web.co.uk Aga is a trading name of Aga Consumer Products Limited, part of the Aga Rangemaster Group plc. Registered in England & Wales under Registered Number 3872754.