
User Manual

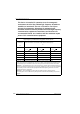


Table Of Contents
- Table of contents
- About this manual
- Introducing the Drystar 5500
- Basic operation (operator mode)
- Advanced operation (Key-operator mode)
- Overview of Key-operator functions
- Stopping the printing process
- Viewing printer information
- Changing the configuration settings
- Printing images
- Saving the configuration settings
- Restoring the configuration settings
- Performing the calibration procedures
- Installation
- Quality control for general radiography applications (DT 2 B & DT 2 C)
- Quality control for mammography application (DT 2 Mammo) (optional)
- Controlling the Drystar 5500 via a remote PC (with browser)
- System description
- Preventive maintenance and replacements
- Troubleshooting
- Equipment information sheet
- Drystar media density response data
- Quality Control Charts
- Remarks for HF-emission and immunity
- Remarks for HF-emission and immunity
- This device is intended for operation in the electromagnetic environment given below. The user of the device should ensure that it is used in such an environment.
- This device is intended for operation in the electromagnetic environment given below. The user of the device should ensure that it is used in such an environment.
- This device is intended for operation in the electromagnetic environment given below. The user of the device should ensure that it is used in such an environment.
- This device is intended for operation in an electromagnetic environment in which the radiated high frequency disturbance variabl...
- Remarks for HF-emission and immunity
- Index

263
2900H EN 20071108Index
DRYSTAR 5500/5503 REFERENCE MANUAL
Operator mode..................................24
P
Power
button location
.............................27
switching off ................................36
switching on ................................34
Power consumption.........................229
Print head
how to clean?
............................115
Print head profile calibration
registration
........................118, 120
starting......................................118
TPH profile........................119, 120
Print image,accessing .....................100
Print job, delete.................................42
Print queue.......................................39
Print queue, checking......................197
Printer AE-title
how to change?
...........................78
Printer information
how to view?
...............................60
Printing files
from a printer floppy
...................102
from hard disk ...........................101
how to stop?................................59
viewing system area..................233
Proxy settings
how to switch off?
......................170
Q
Quality control
charts
........................................241
Quality control for general radiography
applications (DT 1 B & DT 1 C)
calculated operating levels
.144, 145
how to perform the quality control
procedures?
..............................149
how to set the default values?....142
performing the Annual QC tests .152
performing the daily QC test ......149
performing the Weekly QC tests.151
Quality control for general radiography
applications (DT 2 B & DT 2 C)
........141
Quality control for the mammography
application
calculated operating levels
.........157
how to establish the reference values
and verifying image quality
........154
Performing the Annual QC tests.164
Performing the daily QC test......161
Performing the Weekly QC tests 163
Spatial Resolution and Artifact Levels
and Low Contrast Visibility
.........160
Quality control for the mammography
application (DT 2 Mammo)
..............153
Quality problems.............................220
R
Remote PC
configuration with crossed network
cable
........................................167
configuration with straight network
cable
........................................167
Restoring settings
how to restore settings from a
diskette?
...................................107
how to restore settings from a floppy
disk?
.........................................107
RoHS label. See Labels
S
Safety
compliance
.................................18
precautions.................................13
transport after installation ..........184
Security precautions .........................17
Service mode ...................................24
Specialist mode ................................25
Start-up errors ................................218
Status indicator
LED status
..................................28
location.......................................27