
Service manual


Section I: Imagesetter
Installation 1-13
1.3.3 Unlocking and Installing the Imagesetter
1.3.3.1 Imagesetter and Imagesetter to Buffer
Accessories Kit
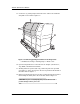
The imagesetter comes with an accessory kit. Check the contents of this box
against the hardware illustrated in Figure 1-9.
Figure 1-9 Accessories for installing the imagesetter and for attaching the
imagesetter to the buffer.
➀–Chafe tray. ➁–Extension platen. ➂–Nuts for attaching the side plates to the
platen and the brackets to the imagesetter frame. ➃–Side plates. ➄–Brackets.
The chafe tray is part of the imagesetter installation hardware. The extension platen
and related hardware are used when attaching the imagesetter to the buffer. See
Avantra 36/44 Buffer Service Manual, Chapter 1.
Steps:
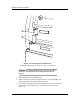
1. Remove the foam strips between the front panels and frames. Refer to
Figure 1-10.
See Chapter 4, Section 4.2.2., Top, Middle, and Bottom Front Panels for
removing the front panels.
2. Lift the top cover and remove the packing strips on the frame rests, left and
right. Refer to Figure 1-10.
3
5
4
1
2