
Service manual


Section IV: On-line Processor
Removal and Replacement 3-9
3.4 LUTH Motor Control Board
The following describes how to remove and replace the motor control board.
Tools Required: Phillips screwdriver, needle-nose pliars
Remove:
1. See the removal procedures in Section 3.3, CPU-OLP for exposing the
board.
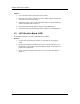
2. Remove the connectors at X5 and X7. Refer to Figure 3-7.
3. Remove the connectors at X6 and X2. Refer to Figure 3-7.
NOTE: Note the position of the power connectors for replacement.
4. Using a needle-nose pliars, release the two (2) nylon standoffs from the
front of the board. Refer to Figure 3-7.
5. Using a phillips screwdriver, remove the mounting screws at the rear.
Refer to Figure 3-7.
Figure 3-7 The LUTH motor control board.
➀
–Motor control board.
➁
–Two rear mounting screws.
➂
–X5 connector.
➃
–X7 connector.
➄
–Two mounting standoffs.
➅
–Motor board and CPU LED
alignment.
➆
–CPU board.
➇
–Jumper fuses.
➈
–X6 wiring.
➉
–X2 wiring.
2
3
4
9
10
1
6
5
7
8