Thank you for purchasing this AGFAPHOTO digital camera. Please read these operating instructions carefully in order to use the digital camera correctly. Keep the instructions in a safe place after reading so that you can refer to them later. Precautions • Do not aim the camera directly into the sun or other intense light sources which could damage your eyesight. • Do not try to open the case of the camera or attempt to modify this camera in any way.
Contents GETTING STARTED 1 USING THE MACRO 26 USING THE SELF-TIMER & BURST 27 USING THIS MENU 1 USING THE APERTURE PRIORITY 28 CONTENT 2 USING THE SHUTTER PRIORITY 28 PARTS OF THE CAMERA 3 USING THE MANUAL EXPOSURE 29 INSTALLING THE BATTERY PACK 5 USING THE STABILIZER 29 LOW BATTERY INDICATOR 5 RECORDING MOVIE CLIPS 30 CHARGING BATTERY PACK 6 SETTING THE MOVIE SIZE 30 INSERTING MEMORY CARD 7 RECORDING AUDIO CLIPS 31 ABOUT CAMERA MEMORY 7 PLAYING BACK AUDIO CLIPS 31 DCF
PROTECTING ALL FILES 43 PROTECTING MULTIPLE FILES 43 EDITING IMAGES 44 ROTATING STILL IMAGES 44 CHANGING THE IMAGE SIZE 45 CHANGING THE IMAGE WITH EFFECTS 45 CHOOSING THE IMAGE WITH PHOTO FRAME 46 COPYING THE FILES 47 SETTING THE DPOF 48 CHOOSING A START-UP IMAGE 49 MAKING CONNECTIONS 50 CONNECTING THE CAMERA TO A TV 50 CONNECTING THE CAMERA TO A PC 51 USING THE CARD READER 51 CONNECTING THE CAMERA TO A COMPUTER WITH THE USB CABLE 51 APPENDIX 52 ABOUT THE FOLDER & FILE NAME 52
Getting Started Using This Menu Getting Started This section contains information you should know before using this camera. Basic Operation This section explains all recording features of this camera. Basic Recording This section explains how to record still images, movies, and audio files. Other Recording Functions This section explains common operations about recording images. Playback This section explains playback, delete, and edit functions of still images, movies and audio files.
Content AGFAPHOTO DC-8338i USB Cable AV Cable Soft Case Strap Rechargeable Lithium-ion Battery Software Installation Quick Start Guide CD-ROM Battery Charger & Adaptor Caution y Actual accessories may be different. y Note that the shape of the charger plug depends on the area where you purchased the camera. y Do not swing the camera around by the strap.
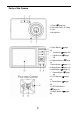
Parts of the Camera 1. Flash ( page 25) 2. Self-timer Lamp / AF Lamp 3. Lens 4. Microphone 5. Zoom Button ( page 24) y Thumbnail ( y Digital zoom ( page 39) page 38) 6. Playback Button ( page 14) 7. Menu Button ( page 17) 8. Mode Button ( page 14) 9. ASM Button ( page 16) y Delete Button ( page 40) 10. LCD Monitor ( page 10) 11. Flash Button ( page 25) 12. SET/DISP Button ( page 12) 13.
14. Shutter Button ( page 21, 30) 15. Power Button ( page 13) 16. Stabilizer 17. Speaker 18. Strap Ring 19. USB/AV Terminal ( page 20, 51) 20. Battery Cover ( 21.
Installing the Battery Pack The camera is powered by a rechargeable lithium-ion battery (Li-Ion 820 mAh). 1 Open the battery cover. y Slide the battery cover in the direction indicated by the arrow. 2 Insert the batteries. y Install the battery with the terminal facing inside the camera. 3 Close the battery cover. Low Battery Indicator A low battery indicator appears on the LCD screen when the batteries are nearly exhausted.
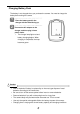
Charging Battery Pack The battery is not charged when you purchase the camera. You need to charge the battery before using the camera 1 Place the battery pack in the charger with the label facing up. 2 , Connect the AC adaptor to the charger, and then plug it into a power outlet. y The charger lamp lights red and battery charging begins. When charging is completed, the lamp becomes green.
Inserting Memory Card You can use SD Card with this digital camera. The memory card slot is located beneath the battery cover, adjacent to the battery compartment. 1 Open the battery cover. y Slide the battery cover in the direction indicated by the arrow. 2 Insert the card. y Insert the card with the label facing up and the arrow pointing in. Tips y To remove the card, gently press on the edge of the card and release it. Pull the card out and close the battery cover. 3 Close the battery cover.
Setting Display Language/ Date & Time When using the camera for the first time after purchasing, be sure to choose a language and set the date & time before using the camera. Setting the Display Language 1 Turn the power on, and set the camera to the Setup Menu ( 2 page 18). Language]. or to select Select [ y Press [LANGUAGE] then press or the SET button to launch the submenu. 3 Select a language. y Press or to select a language and press or the SET button to apply the setting.
4 Apply the setting. y After adjusting the settings, press the SET or the MENU button to apply the setting. Caution y If the batteries are removed for longer than 48 hours, the Date and Time will need to be re-set.
Using LCD Monitor The LCD monitor is used to compose images while recording, adjust settings and replay images. The following indicators may appear on the LCD monitor while recording or playing back images.
PLAYBACK mode 7 Recording info ( 8 Histogram 9 Captured date & time File number / Total 10 Voice memo control ( 5 Battery ( 11 DPOF ( 6 Storage media 12 Resolution ( 1 Playback mode ( 2 Protect ( 3 Voice memo ( 4 page 14) page 42) page 32) page 5) page 12) page 32) page 48) page 23) Caution y Some information may not display correctly if you display images captured by other camera model.
Changing the LCD Status Press the SET/DISP button changes the LCD status as shown below: REC mode (A) OSD on (B) Full OSD (C) Guide line (D) OSD off Tips y Use the “Guide line” to compose images easily before shooting images.
Basic Operation Turning the Power On / Off 1 Press the POWER button (n) to turn on the camera in the REC mode. y The power turns on, the lens extends and the LED lights in green. Press the PLAYBACK button (o) to turn on the camera in the PLAYBACK mode. y The power turns on, and an image displays on the LCD monitor (p). 2 Press the POWER button (n) again to turn the power off. y The power turns off, the lens retracts and the LED turns off.
Changing the Mode You can record images and voices in the REC mode. And using the PLAYBACK mode to replay, delete, or edit images on the LCD monitor. Switching between REC mode and PLAYBACK mode In REC mode: press the PLAYBACK button (n) to switch to the PLAY mode. In PLAY mode. press the PLAYBACK (n) or the MODE (o) button to switch to the REC mode. Selecting the REC mode 1 Set the camera to the REC mode ( 2 page 14). Launch the mode palette.
Display Title Landscape Sunset Backlight Night Scene Description Used for the wide scenic views. Enhance the red tone for recording sunset images. Shooting the image of backlight object by changing metering. Shooting the subject while keeping the background night scenery. Sports Used to take still pictures in high speed motions. Party Used for the wedding or indoor parties. Snow Used for the beach or snow scenes. Kids Take a still image to capture moving kids.
Selecting the ASM mode 1 Set the camera to the REC mode ( page 14). y It cannot be switch to ASM mode while in Movie or Voice REC mode. 2 Launch the ASM mode. y Press the ASM button (n) to toggle switch between Aperture Priority, Shutter Priority, Manual Exposure mode. y For detail operation ( page26).
Using the Menus When a menu is displayed, the four-way control and the SET button are used to make the desired settings. REC menu 1 Turn the power on, and set the camera to the REC mode ( 2 page 14). Open the REC menu. y Press the MENU button (n) to display the menu. 3 Select an item. y Press or (o) to select a menu item. 4 Change the setting. y 5 Press or (o) to change the setting. Press the MENU (n) or the SET (o) button to save the settings and close the menu.
Sharpness / 35 / Effect Off / B&W / Sepia / Negative / Red / Green / Blue 35 Date Stamp Off / Date / Date & Time 35 Digital Zoom Off / On 24 Face Tracking Off / On 36 Photo Frame Off / Frame 1 ~ 10 36 AF Lamp Auto / Off 36 REC menu list (Movie) Menu Item Available Setting Movie Size / Metering White Balance Page 30 / / / Auto / / 33 / / / / 33 Setup menu 1 Turn the power on, and set the camera to the REC or PLAYBACK mode ( 2 page 14).
5 Change the setting. y Press or (o) to select an option and press or the SET (o) button to apply the setting. 6 Press the MENU (n) button to close the menu. Setup menu list Menu Item Functions [Shutter]: Sets the shutter sound on and off. [Start-up]: Sets a type of the start-up sound. Sounds [Beep]: Sets the operation sound on and off. [Volume]: Adjusts the volume of the shutter sound, start-up sound, beep and playback sound.
Menu Item Functions Use this function if the camera experiences a “Folder cannot be created” error or if you want to restart numbering, for example, after erasing all files. [Series]: File No. Store the latest used file number no matter deleting files or inserting a new memory card. [Reset]: Reset file numbering each time the memory card is changed. y Resetting the file number is useful for avoiding the file name duplication when images are downloaded to a computer page 52).
Basic Recording Recording Still Images 1 Turn the power on, and set the camera to the REC mode page 14). ( 2 Compose the subject on the monitor. y Aim the focus area (n) to the subject that you want to take. 3 Half press the shutter button to focus the image. y The focus area (n) becomes green while in focus, then shutter speed (o), aperture value (p) and ISO value (q) are displayed.
Using the Q mode The Q mode provides a simplified camera interface. Larger icons and fewer controls make it easier to take pictures anytime, especially for the beginners and elder users. You can use only the basic settings in the Q mode: Flash: Auto / Red eye / Force on / Slow sync / Force off Button Macro: Off / On Stabilizer: Off / On SET/DISP: OSD on / Guide line / OSD off Resolution: 8M / 3:2 / 16:9 / 6M / 4M / 2M / VGA Drive Mode: Off / 2 sec. / 10 sec.
Setting Image Size and Quality You can select lower image resolution and quality to decrease the image size to capture more images. Choose a suitable setting according to the desired image quality and purpose. For details, see page 17. Resolution Values Image Size 3264 x 2448 Print Size Printing larger than A4-size. Larger Printing to postcards or attaching to e-mail.
Using the Zoom Function Your camera has a combination of optical and digital zoom functions that allows you to zoom in on far away subjects or zoom out for a wide angle shot. The optical zoom is achieved by mechanically adjusting the lens of the camera. The digital zoom enlarges or shrinks the image using a software process. 1 Select the zoom setting, and point the camera at the subject. 2 Press the zoom button (n) to compose the image. [W]: zoom out for a wide-angle shot.
Using the Flash The flash is not only for taking pictures when there is insufficient light, but also when the subject is in shade or in backlight conditions. Press the flash button to cycle your camera through the various flash modes. The flash will not activate when continuous shooting or movie recording. 1 Turn the power on, and set the camera to the REC mode ( 2 page 14). Press the flash button (n) to change the flash mode. y Each time the flash button is pressed, the flash icon (o) changes.
Using the Macro Your camera is equipped with a macro function that allows you to focus on very close subjects. In macro mode you can focus on subjects 15 cm from the lens when in the maximum wide angle setting and 40 cm in the maximum telephoto setting. 1 Turn the power on, and set the camera to the REC mode ( 2 page 14). Press the macro button (n) enters the macro mode. y The macro icon (o) displays in the LCD monitor. y To leave the macro mode, press the macro button (n) again.
Using the Self-timer & Burst Use the self-timer to set a delay from the time the shutter button is pressed to the time the image is shot. Use the burst to record continuous still images shooting. 1 Turn the power on, and set the camera to the REC mode ( 2 page 14). Open the REC menu ( y Use or page 17). to select [Drive mode] from the REC menu. 3 Change the setting. y Press or to select a drive mode, then press the SET button. Off: Record a single image. 2 sec.
Using the Aperture Priority In this mode, you can set an aperture value to match the brightness. A higher aperture value brings the background out of focus. Selecting a lower aperture value allows you to soft the background. 1 Turn the power on, and set the camera to the Aperture Priority ( 2 page 16). Adjust the aperture value by pressing 3 or button. Press shutter button to take a picture.
Using the Manual Exposure You can manually set the shutter speed and aperture to achieve a particular effect. 1 Turn the power on, and set the camera to the Manual Exposure ( 22 page 16). Use the SET button to switch between aperture value and shutter speed control. Press or 3 to adjust the setting. Press shutter button to take a picture. y Press the shutter button halfway, the difference between the standard exposure and the selected exposure appears in red.
Recording Movie Clips 1 Turn the power on, and set the camera to the Movie mode page 14). ( 2 Compose the subject on the monitor. y Aim the focus area (q) to the subject that you want to take. y The LCD monitor displays the available recording time (p). 3 Start recording. y Press the shutter button (n) to start recording. y Using the zoom button (o) to adjust the image size.
Recording Audio Clips 1 Turn the power on, and set the camera to the Voice REC mode page 14). ( 2 Press the shutter button to start recording. y The voices are recorded from the microphone (n) of the camera. Be careful to avoid touching the microphone while recording. 3 Press the shutter button again to end recording. y The camera will stop recording automatically when the memory capacity has been reached.
Recording a Voice Memo You can add a voice memo to the still images after you record it. 1 Turn the power on, and set the camera page 14). to the PLAYBACK mode ( 2 Press or to select a still image that you want to add a voice memo. y If the image already has the voice memo recorded, the appears on the LCD monitor. The new recording will replace the previous one. 3 Open the PLAYBACK menu. y 4 Press the MENU button, using four-way control to select Voice Memo ( and press the SET button.
Other Recording Functions Setting the Metering There are 3 different light metering options available on your camera. Option Description Light is measured from the entire shooting screen, but gives more importance to the values near the center. Selects an exposure based on readings from multiple points in the subject area. Selects an exposure based on a single reading taken from the center of your picture.
Setting the ISO With the initial settings, the ISO sensitivity is automatically set according to the brightness of the subject. Option Auto Description Sets the ISO sensitivity automatically. ISO 50 Sets the sensitivity to ISO 50 equivalent. ISO 100 Sets the sensitivity to ISO 100 equivalent. ISO 200 Sets the sensitivity to ISO 200 equivalent. ISO 400 Sets the sensitivity to ISO 400 equivalent. ISO 800 Sets the sensitivity to ISO 800 equivalent.
Setting the Sharpness You can select whether you want the image to have sharp or soft outlines. Option Description The edges of the image are emphasized. The edges will become sharp, but noise may occur in the recording image. The edges of the image are sharp. This is suitable for printing. The edges of the image are softened. This is suitable for editing images on PC. Setting the Photo Effect You can add special effects to your images in Record mode or in Playback mode.
Setting Face tracking After initializing face tracking function, the lens will lock the main character in the picture and follow the movements. Also use auto digital zoom technology to retract and extract zoom lens that allows you to become the focus of lens. Tips y Pressing the shutter halfway showing green AF area means focus is complete. y Face tracking is powered by Arcsoft. y Under some environmental influences, face tracking function may be limited.
Playback Playback Images 1 Turn the power on, and set the camera to the PLAYBACK page 14). mode ( y The latest recorded image appears on the LCD monitor. y If there are no images stored, a message [No image] appears. 2 Press the four-way control (n). or y : displays the previous image. y : displays the next image. Tips y Holding down or scrolls images in a high speed. Playback Movie Clips 1 Turn the power on, and set the camera to the PLAYBACK mode ( page 14).
Magnifying & Trimming Still Images 1 Turn the power on, and set the camera to the PLAYBACK mode ( 2 page 14). Select an image. y Press or (p) to select the image that you want to magnify or trimming. y Only still images can be magnified and trimmed. 3 Magnify the image. y Press [T] (n) to magnify the image, and the central portion of the image is displayed. You can use the arrow button (p) to view different parts of the magnified image. y 4 Trim the image.
Viewing in Thumbnail 1 Turn the power on, and set the camera to the PLAYBACK mode ( 2 page 14). Press the zoom button [W], a thumbnail screen is displayed. 3 Use the four-way control to select the desired image, and press [T] or the SET button to show the selected image in full screen. Tips y You can protect or delete multiple images in thumbnail, see page 41, 43. Playback a Slide Show 1 Turn the power on, and set the camera to the PLAYBACK mode ( 2 page 14). Enter the slide show.
Deleting Files Deleting a Single File 1 Turn the power on, and set the camera to the PLAYBACK mode ( 2 page 14). Open the menu. y Press the MENU button (n), then use the four-way control (o) to select Delete ( ) and press the SET button (o). 3 Press or 4 Press or 5 Press the SET button (o) to delete the image. y (o) to select [SINGLE], and then press the SET button (o). (o) to select the image you want to delete. Repeat step 4~5 to delete images.
Deleting Multiple Files 1 Turn the power on, and set the camera to the thumbnail screen ( 2 page 39). Open the menu. y Press the MENU button, then Press or to select to select Delete ( ) and press the SET button. 3 Press y 4 or to select [Select], and then press the SET button. The frame of the selected image turns green. Select multiple images. y Use the four-way control to select the image. y Press the SET button toggles the on and off.
3 Press 4 Press the SET button to delete all unprotected images. or to select [ALL], and then press the SET button. Protecting a Single File 1 Turn the power on, and set the camera to the PLAYBACK mode ( page 14). 2 Open the menu. y Press the MENU button, then use the four-way control to select Protect ( ) and press the SET button. 3 Press or to select [SINGLE], and then press the SET button. 4 Press or to select the image you want to protect.
Protecting All Files 1 Turn the power on, and set the camera to the PLAYBACK mode ( 2 page 14). Open the menu. y Press the MENU button, then use the four-way control to select Protect ( ) and press the SET button. y You can open the menu in full screen or in thumbnail. 3 Press y or to select [Lock all], and then press the SET button. To unlock all files, select [Unlock all] in this step, then press the SET button. 4 Press the SET button to protect all images.
5 Protect images. y Press the MENU button, then select [Yes] and press the SET button. All selected images will be protected. y To cancel protect, press the MENU button in this step. Editing Images Rotating Still Images 1 Turn the power on, and set the camera to the PLAYBACK mode ( 2 page 14). Press or to select the image you want to rotate. 3 Open the menu. y Press the MENU button, then use the four-way control to select Rotate ( and press the SET button.
Changing the Image Size 1 Turn the power on, and set the camera to the PLAYBACK mode ( page 14). 2 Press 3 Open the menu. y Press y to select the image you want to resize. Press the MENU button, then use the four-way control to select Resize ( 4 or ) and press the SET button. or to select an option, and then press the SET button. The resized image will be saved as a new file. Caution y Only a large size image can be resize to a smaller one.
Choosing the Image with Photo Frame 1 Turn the power on, and set the camera to the PLAYBACK mode ( page 14). 2 3 Press or Open the menu. y Press the MENU button, then use the four-way control to select Photo Fames ( 4 to select the image you want to add the photo frame. Press or ) and press the SET button. to select the image you want, then press the SET button to apply the choice. y The edited image will be saved as a new file.
Copying the Files You may copy the data from the camera’s internal memory to the memory card for convenience. 1 Be sure you have inserted a memory card into your digital camera. Set the camera to the PLAYBACK mode. page 14). ( 2 Open the menu. y Press the MENU button, then use the four-way control to select Copy to card ( ) and press the SET button. 3 Press y or to select [Single], then press the SET button. To copy all images to a memory card, select [All].
Setting the DPOF The Digital Print Order Format (DPOF) setting allows you to select images on the memory card for printing and specify the number of print copies in advance using the camera. This is extremely convenient for sending the images to a photo developing service or for printing on a direct print function compatible printer. 1 Turn the power on, and set the camera to the PLAYBACK mode ( 2 page 14). Open the menu.
Choosing a Start-up Image 1 Turn the power on, and set the camera to the PLAYBACK mode ( page 14). 2 Open the menu. y Press the MENU button, then use the four-way control to select Start-up ) and press the SET button. Image ( 3 Press or to select the image you want, then press the SET button to apply the choice. y A message “Completed” appears. 4 Set the camera to the Setup Menu ( 5 Press or Image ( page 18). to select Start-up ) then press or the SET button.
Making Connections Connecting the Camera to a TV You can display recorded images on a television with a supplied AV cable. 1 Set the TV out to match the TV system that you are using ( 2 Turn off the camera and the TV. 3 Use the supplied AV cable to connect the camera to the TV set. 4 Set the TV input signal to Video In. y 5 page 20). Refer to the documentation included with your TV for more information. Display on TV.
Connecting the Camera to a PC There are two ways to download files from the camera’s internal memory or memory card to a computer: y Inserting the memory card into a card reader y Connecting the camera to a computer using the supplied USB cable Using the Card Reader 1 Eject the memory card from the camera and insert it in a card reader that is connected to a computer. 2 Open [My Computer] or [Windows Explorer] and double-click the removable drive icon that represents the memory card.
Appendix Folder & File Name Your digital camera automatically creates a directory of folders in the internal memory or memory card that it uses to organize still images, movie clips and other information. Folder Structure Folder name begins with a 3-digit number from 100 to 999 and followed by “DICAM”, each folder holds up to 9999 files. If new files are made, a new folder named in sequence will be made automatically.
Troubleshooting Problem Power does not turn on. Cause Solution Battery is inserted in the wrong Reload battery in the correct direction. direction. Batteries are dead. Replace or recharge batteries. The battery compartment door Make sure the battery is open. compartment door is securely closed. The camera does not take The flash is charging. Wait for the flash to charge. pictures. Memory is full. Insert a new memory card. Memory card is not formatted The card may be defective, correctly.
Specifications Sensor 8.0 megapixel CCD, Size : 1/2.5 inch Lens Focal Length : f = 6.2 (W) ~ 18.6 (T) mm , 3X optical zoom, 4X digital zoom LCD monitor 3.0” LCD monitor Focus Range Normal: 80 cm ~ Infinity ( from the tip of barrier ) Macro: (W) 15 cm ~ 80 cm / (T) 40 cm~ 80 cm (from the tip of barrier) Aperture F/ 2.8 (W), 5.2 (T) Shutter 8 ~ 1/2000 sec. File Format Still Image: EXIF 2.2 compatible format (JPEG compression), DCF compatible.
Dimension Camera Body ( W x H x T ) : 97.5 x 57.0 x 20 mm Weight Camera Body w/o battery: Approx. 110 (g) *These specifications are subject to change without notice.
z ² ² z ² ² z ² ² z ² ² 1~ 1/2000 ² z ² 1~ 1/2000 z ² ² ² ² z z ² ² z ² ² ² ² z z ² ² ² ² z z ² ² z ² ² z ² ² z ² ² z ² ² Focus 56 Macro Flash ² ² z ² ² z ² ² ² z ² ² ² ² ² z ² ² z ² ² ² ² ² z ² ² z ² ² z ² ² ² ² ² z ² ² ² ² ² ² z ² z ² ² ² ² ² z z ² ² ² ² ² z ² ² z ² ² ² ² z ² ² ² ² z ² ² z ² ² ² ² ² ² ² z ² z ² ² ² ² ² ² ² z ² ² ² ² ² ² ² ² ² ² ² ² ² ² z ² ² ² ² ² ² ² ² ² ² ² ² z z z z z z z ² ² z z ² ² z z ² z z ² z z Stabilizer ² ² Shu
² ² ² ² Menu Still Capture VGA 2M 4M 6M 16:9 3:2 8M Function Resolution ² ² ² ² ² ² ² ² ² z ² ² ² ² z ² ² ² ² z ² ² ² ² z ² ² ² ² z ² ² ² ² z ² ² ² ² z ² ² ² ² z ² ² ² ² z ² ² ² ² z ² ² ² ² z ² ² ² ² z ² ² ² ² z ² ² ² ² z ² ² ² ² z ² ² ² ² ² ² ² ² ² z ² ² ² ² z ² ² ² ² ² ² ² ² ² ² ² ² ² Movie Size 57 ² ² Mode ² ² z ² ² ² Quality Spot ² ² Multi ² ² Center ²
² ² ² ² ² ² ² ² ² ² ² ² ² ² ² ² ² ² ² ² ² ² ² z ² z ² ² ² ² ² ² z ² ² ² ² ² ² ² z ² z ² ² ² ² ² ² z ² ² ² ² ² ² ² z ² z ² ² ² ² ² ² z ² ² ² ² ² ² ² z ² z ² ² ² ² ² ² z ² ² ² ² ² ² ² z ² z ² ² ² ² ² ² z ² ² ² ² ² ² ² z ² z ² ² ² ² ² ² z ² ² ² ² ² ² ² z ² z ² ² ² ² ² ² z ² ² ² ² ² ² ² z ² z ² ² ² ² ² ² z ² ² ² ² ² ² ² z ² z ² ² ² ² ² ² z ² ²
² ² ² ² ² ² ² ² ² ² ² ² ² ² ² ² ² ² ² ² ² ² ² ² ² ² ² ² ² ² ² ² z ² z ² ² ² ² z ² z z ² z ² ² ² ² z ² z z ² z ² ² ² ² z ² z z ² z ² ² ² ² z ² z z ² z ² ² ² ² z ² z z ² z ² ² ² ² ² z z z ² z ² ² ² ² z ² z ² ² z ² z ² ² ² z ² ² z z ² z ² ² ² ² z ² z z ² z ² ² ² ² z ² z z ² z ² ² ² ² z ² z ² ² z ² z ² ² ² ² z ² z ² ² z ² z ² ² ² ² z ² z ² ² z
² ² ² ² ² ² ² ² ² ² ² ² ² ² ² ² ² ² ² ² ² ² ² ² ² ² z ² z ² z ² z ² ² ² ² ² z ² ² ² ² ² z ² ² ² ² ² z ² z ² ² ² ² ² ² ² ² ² ² ² ² ² z z Effect Date Stamp 60 Off Date & Time Date Off Blue Green Red Negative Function Mode ² Digital Zoom On ² Off ² On Menu Still Capture ² Face Tracking Frame 1 ~ 10 ² Off ² Scene Mode ² Photo Frame
Function Auto Off Mode Menu Still Capture Scene Mode { : Available ² ² z ² z ² z ² ² z : Set to [OFF] after power off. : Do not display menu. : Setting is retained even after mode switch or power off. ± : Not available.
Customer care More information con the complete AGFAPHOTO digital camera product range can be found under www.plawa.com Service & Repair Hotline (EU): 00800 752 921 00 (from a landline only) Service & Support Hotline (Germany): 0900 1000 042 (1.49 Euro/ min. from a German landline only) Online Service / International contact: support-apdc@plawa.com Manufactured by plawa-feinwerktechnik GmbH & Co. KG Bleichereistraße 18 73066 Uhingen Germany AGFAPHOTO is used under license of Agfa-Gevaert NV & Co. KG.
waste equipment for recycling, please contact your local city office, your household waste disposal service or the shop where you purchased the product. FCC Compliance and Advisory This device complies with Part 15 of the FCC Rules. Operation is subject to the following two conditions: 1.) this device may not cause harmful interference, and 2.) this device must accept any interference received, including interference that may cause unsatisfactory operation.