
Operation Manual


System Telephone
ST 40 IP
5
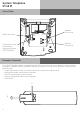
Connection
Connect the RJ 45 plug of the line cord of your ST 40 IP into a network socket which is connected to
your network. Please note that the LAN module 508 / 510 must be part of this network.
- Insert the RJ 45 plug into the socket until you hear a positive click.
- To release the plug, press the release latch on the plug and at the same time pull out the cable
from the socket (use a small screw driver if required).
Registration
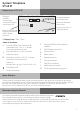
Display Position
Your Display can be adjusted to 6 different viewing angles.
- Please wait until „ASIP Timeout“ is displayed.
- Press and hold the „SET“ button for at least 4 seconds.
- Allocate a unique IoP name to your ST 40 IP:
- Select „Name“ and press „edit“.
- Enter the required name for the ST 40 IP. By using „clear“ you can delete single letters or the
complete name. „Store“ will save the name entered.
Enter the way in which the telephone should receive the IP address:
- Select „DHCP“ and press „edit“.
- Select if your telephone should receive the IP address automatically („Client“), or if
you want to allocate a permanent IP address („Static“).
- If you selected „Static“, then enter the IP address, the Subnetmask („Mask“) and the
Standard Gateway („GWay“).
- Under „Server“ enter the IP address of your LAN module 508 / 510 .
- To enable/disable compression, select „Comp“ and press „edit“.
- Press „Reboot“. The telephone will be restarted and will register to the LAN module.
- Start the programming of the LAN module and activate the telephone:
- Allocate an extension number to your ST 40 IP: