
Technical data


Chapter 1 33
Installation and Setup
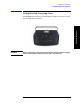
Turning on the Analyzer for the First Time
Installation and Setup
— Press Save.
— Connect the LAN cable to the LAN connector (not the Timing
LAN connector) located on the rear panel of your analyzer (see
“Rear-Panel Features” on page 61).
— Cycle the analyzer power. Refer to “Configuring for Network
Connectivity” on page 158
NOTE It is necessary to cycle the power to the analyzer after plugging in the
LAN for the analyzer to recognize the network.
Why Aren’t All the Personality Options Available?
Many measurement personality options are available for your use and
are loaded in the instrument. To make an option available, you must
also have a license key entered.
Using an External Reference
If you wish to use an external source as the reference frequency, you
must connect an external reference source and set the reference
frequency as follows:
1. Connect an external source to the EXT REF IN connector on the
rear panel (see “Rear-Panel Features” on page 61). The signal level
should be greater than –15 dBm.
2. Select the frequency of the external reference into the analyzer:
a. Press System, Freq/Time/Ref
b. Select the up and down arrow navigation keys to highlight the
desired reference frequency.
c. Press Select to set the reference source and frequency that you
have highlighted.
d. Press Cancel to abort your reference change and retain the
previously selected frequency reference. See “Setting System
References” on page 152 for more information.