
User`s guide


General Power Meter Functions 2
N1913/1914A EPM Series Power Meters User’s Guide 81
Calibration Procedure Using 8480 Series Power Sensors and
N8480 Series Power Sensors (with Option CFT)
The following procedure describes how you calibrate the power meter with
the 8480 Series power sensors and N8480 Series power sensors with
Option CFT.
There are a variety of methods to connect the power sensors to the power
meter depending on the model of power sensor you are using. Refer to
Table 2- 5 on page 82 for details on connecting different power sensor
models.
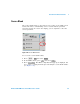
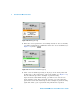
1 Press , and .
Verify the reference calibration factor of your power sensor with that
displayed under . The value shown is obtained from the sensor
calibration table (if one is selected), otherwise it is the last value set or
the default of 100%. If the value is incorrect, press . The
reference calibration factor pop- up window will be displayed. Use the
numeric keypad to enter the required value in the pop- up window.
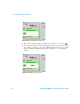
2 Confirm your choice by pressing .
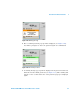
3 Press the to start the calibration routine. The Calibrating pop- up is
then displayed (the power meter automatically turns on the POWER
REF output).
NOTE
V8486A and W8486A sensors
For most 8480 Series sensors, the correct (A type or D type) linearity correction table is
automatically selected. However, for the V8486A and W8486A sensors, the automatic
selection must be overridden and the D type correction selected. Subsequent connection of
another A type sensor will result in a warning message stating that “Linearity Override May
be Required”.
To select the linearity type to be applied,
• Press , and to select either or .
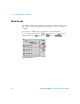
Tab les
Linearity
Atyp
Dtyp
2 of 3
Ref CFs
Ref CFs
Ref CFs
%
Cal