
Technical data


120 16800 Series Portable Logic Analyzers Service Guide
6 Replacing Assemblies
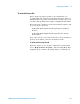
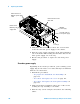
5 Using Torx T20 screwdriver, remove the 4 screws that
secure the 600 watt power supply to the chassis.
6 Slide the power supply toward the front panel and lift it
out of the frame while holding the line filter cable for the
lower power supply out of the way.
7 Reverse this procedure to replace the 600 watt power
supply.
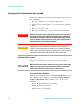
Secondary power supply
Depending on the model you ordered, your secondary power
supply may be 175 watts or 15 watts and may look different
than the one shown here.
1 Perform the procedures:
• “To prepare the instrument for disassembly" on
page 116.
• “To remove and replace the cover" on page 118.
• “To remove and replace the front panel assembly" on
page 125.
2 Using a Torx T10 screwdriver remove the 2 side screws
securing the tray assembly to the frame.
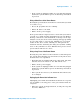
3 Slide the tray out far enough to disconnect the following
cables:
600 watt
power supply
T-15
screws (4)
Release latches on line
filter cable
MIB
Release tab on
600 watt power
supply cable
Release latches on
600 watt power supply
cable
Line filter cable for
lower power supply