
Technical data

Testing Performance 3
16800 Series Portable Logic Analyzers Service Guide 49
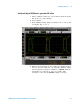
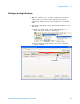
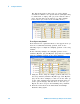
3 Select the plus sign to expand bus “My Bus 1”.
Align the blue bars vertically
The first time you run eye finder, the blue bars will already
be vertically aligned (as shown above). In this case you can
skip to the next section (“Run eye finder”).
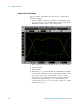
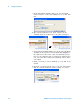
After running eye finder, the blue bars will not be vertically
aligned because an independent sample position will be
determined for each channel.
4 If the blue bars in the eye finder display are not
vertically aligned, grab the right-most blue bar in the “My
Bus 1” row with the mouse pointer and move it all the
way to the left. Release the mouse button. This will
vertically align all of the blue bars.
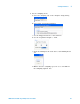
5 Using the mouse pointer, grab the top blue bar for “My
Bus 1” and move it to the recommended starting position
of 300 ps. All of the blue bars below will follow.
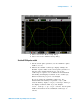
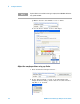
Run eye finder
6 Click the Run button in the Thresholds and Sample
Positions dialog.
7 Ensure that an eye appears for each bit near the
recommended starting position. Depending on your test
setup, the eye position may vary. Any skew between
channel 1 and channel 2 of your pulse generator will
cause the eye position to shift to the left or right in the
eye finder display. A shift of up to 0.5 ns should be
considered normal.