Agilent 82350B PCI GPIB Interface Installation and Configuration Guide Agilent Technologies
Notices © Agilent Technologies, Inc. 2002 - 2009 No part of this manual may be reproduced in any form or by any means (including electronic storage and retrieval or translation into a foreign language) without prior agreement and written consent from Agilent Technologies, Inc. as governed by United States and international copyright laws. Manual Part Number 82350-90004 Edition Eighth Edition, July 20, 2009 Printed in Malaysia Agilent Technologies, Inc. 3501 Stevens Creek Blvd.
Safety Notices CAU TI O N WA RN ING A CAUTION notice denotes a hazard. It calls attention to an operating procedure, practice, or the like that, if not correctly performed or adhered to, could result in damage to the product or loss of important data. Do not proceed beyond a CAUTION notice until the indicated conditions are fully understood and met. A WARNING notice denotes a hazard.
Safety Symbols The following symbol on the instrument and in the documentation indicates precautions that must be taken to maintain safe operation of the instrument.
Caution, risk of danger (refer to this manual for specific Warning or Caustion information.
General Safety Information CAU TI O N WA RN ING • Use the device with the cables provided. • Repair or service that is not covered in this manual should only be performed by qualified personnels. • Do not use the device if it appears damaged or defective. • Observe all markings on the device before connecting any wiring to the device. • Do no operate the device in the presence of flammable gases or fumes. • Do no install substitute parts or perform any unauthorized modification to the device.
Environment Conditions This instrument is designed for indoor use in areas with low condensation. Table 1 shows the general environment requirements.
Regulatory Markings The CE mark is a registered trademark of the European Community. The CE mark shows that the product complies with all the relevant European Legal Directives. ICES/NMB-001 indicates that this ISM device complies with Canadian ICES-001. The CSA mark is a registered trademark of the Canadian Standards Association. A CSA mark with the indicators “C” and “US” means that the product is certified for both the U.S. and Canadian markets, to the applicable American and Canadian standards.
Waste Electrical and Electronic Equipment (WEEE) Directive 2002/96/EC This instrument complies with the WEEE Directive (2002/96/EC) marking requirement. This affixed product label indicates that you must not discard this electrical/electronic product in domestic household waste. Product Category: With reference to the equipment types in the WEEE directive Annex 1, this instrument is classified as a “Monitoring and Control Instrument” product.
DECLARATION OF CONFORMITY According to ISO/IEC Guide 22 and CEN/CENELEC EN 45014 Manufacturer’s Name: Manufacturer’s Address: Agilent Technologies, Incorporated 815 – 14th St.
Contents 1 Installing and Configuring the 82350 Getting Started 2 Step 1 - Before you install the 82350 3 Check your shipment 3 System requirements 4 Create an emergency repair disk 6 Step 2: Installing the Agilent IO Libraries Suite 7 Checking for installed Agilent IO Libraries 7 Installing Agilent IO Libraries Suite 9 Step 3: Connecting your instruments 17 Installing the 82350 in your PC 17 Connecting instruments to the 82350 19 Step 4: Configuring the 82350 23 Installing configuration files 23 Configuri
3 82350 Specifications and Information General Requirements 50 General Characteristics 51 Accessing an Electronic Copy of this Guide 52 Contacting Agilent 53 xii
Agilent 82350B PCI GPIB Interface 82350B PCI GPIB Interface Installation and Configuration Guide 1 Installing and Configuring the 82350 This Agilent 82350B PCI GPIB Interface Installation and Configuration Guide shows you how to install and configure the Agilent 82350B PCI GPIB Interface (called the 82350 in this guide) and shows how to use the Agilent IO Libraries Suite to configure the card in PCs with Windows XP or Windows Vista or Windows 7 operating systems.
1 Installing and Configuring the 82350 Getting Started In this guide, an 82350 GPIB Interface System is defined as a system in which GPIB instruments are connected via GPIB cables to an 82350 PCI GPIB Interface Card (called the 82350 in this guide) that is installed in a Windows PC. Figure 1- 1 shows a typical system. GPIB Cable Instrument PC Connect to 82350 GPIB Interface Card installed in PC. Instrument Connect to GPIB port on instrument.
Installing and Configuring the 82350 1 Step 1 - Before you install the 82350 Before you install the 82350, you should: • Check Your Shipment • Check System Requirements • Create an Emergency Repair Disk Check your shipment Your 82350 Interface shipment should include the items in Figure 1- 2. If any items are missing or damaged, keep the shipping materials and contact Agilent Technologies. See Chapter 3 - 82350 Guide Information for addresses/telephone numbers.
1 Installing and Configuring the 82350 System requirements The following is a list of the system configurations that we tested IO Libraries 15.5 on and are therefore guaranteed to work. In general, any x86 or x64 (except Itanium) should work but there may be a decrease in performance. Windows XP Service Pack 3 (or later) Processor Speed: 600 MHz or higher required, 800 MHz recommended Available memory: 256 MB minimum (1 GB or greater recommended) Available hard disk space1: 1.
Installing and Configuring the 82350 1 Windows VISTA SP1 and SP2 (32-bit and 64-bit), Business, Ultimate, Enterprise, Home Basic, and Home Premium Processor Speed: 1Ghz 32- bit (x86), 1GHz 64- bit (x64), no support for Itanium64 Available memory: 1 GB minimum Available hard disk space1: 1.5 GB available hard disk space, includes: • 1GB available for Microsoft .NET Framework 2.
1 Installing and Configuring the 82350 Video: Support for DirectX 9 graphics with 128MB graphics memory recommended (Super VGA graphics is supported) Browser: Microsoft Internet Explorer 7 or greater Create an emergency repair disk The Agilent IO Libraries Suite includes I/O drivers for various PCI plug- in cards. Extensive testing of these drivers and cards has revealed that early revisions of the BIOS code in several PCs are not completely PCI- compliant.
Installing and Configuring the 82350 1 Step 2: Installing the Agilent IO Libraries Suite Below are the steps on how to install the Agilent IO Libraries Suite, using default settings, including: • Checking for Installed Agilent IO Libraries or Agilent IO Libraries Suite • Installing Agilent IO Libraries Suite NO TE See the Agilent IO Libraries Getting Started Guide on your Automation-Ready CD for a full description of installation options and installation troubleshooting information.
1 Installing and Configuring the 82350 • If this group is displayed, click Agilent IO Libraries > Utilities > IO Control to display the IO icon. Then, click the icon and click About Agilent IO Libraries Control to display the installed version (must be 15.0 or greater).
Installing and Configuring the 82350 1 Installing Agilent IO Libraries Suite NO TE NO TE You must have Administrator privileges to install Agilent IO Libraries Suite Connection Expert. Every IO Libraries Suite installation is a “Full installation” In past versions of IO Libraries, there was an option to install IO Libraries as either a Full version or a Runtime version. Beginning with IO Libraries Suite 14.0, the installation process provides a Full installation for all users (i.e.
1 Installing and Configuring the 82350 3 Close all other applications on your PC. NO TE NO TE If you install a PCI card in your computer at the same time you install Agilent IO Libraries Suite 15, a possible conflict can occur. The “New Hardware Found” dialog for the PCI card must be closed before installing IO Libraries. Otherwise the IO Libraries installation will stop until PCI card installation is complete. If you have NI software installed (such as NI MAX, etc.
Installing and Configuring the 82350 NO TE 1 The IVI Shared Components and IVI VISA COM Standard Components are installed in default folders. However, if you need to install the IVI Components in a unique location refer to “Custom Installation of IVI Shared Components” in the IO Libraries Suite 15.5 Connectivity Guide. 7 When the InstallShield Wizard appears, click Next > to begin the IO Libraries Suite software installation. 8 Read the License Agreement(s).
1 Installing and Configuring the 82350 NO TE • If you accept the Typical Installation, click “Next” and proceed to Step 13, Start Copying Files, on page 14. • If you chose the Custom Installation radio button, click “Next” and proceed with Step 10 below. 10 If you chose the Custom setup and you do not have another vendor’s VISA implementation installed on your PC, then you will see the dialog box below, which asks whether you want to install Agilent VISA as the primary VISA.
Installing and Configuring the 82350 1 If you do have another vendor’s VISA installed, you will see a similar dialog box, but the check box will not be selected, indicating that the default is to install Agilent VISA as secondary. For details on this topic, see “Using Agilent VISA in Side- by- Side Mode” in the IO Libraries Suite 15.5 Connectivity Guide.
1 Installing and Configuring the 82350 • Click on any feature in the list to see the feature description and the space requirements for the selected set of features. It is recommended that you install the manuals and sample programs if you plan to program with the Agilent IO Libraries; however, you may omit them to save space. • Select the check box for each feature to be installed. Clear the check box for each feature to omit. • When you are done selecting features, click Next >.
Installing and Configuring the 82350 1 14 After the files have been copied, you may see a dialog asking you to restart your PC. This occurs only if you have certain I/O hardware configurations. If you choose not to reboot at this time, you should reboot before running Connection Expert.
1 Installing and Configuring the 82350 If Connection Expert is not already running, run it now to verify your I/O configuration: In the Windows Notification area, click the IO icon ( ), then click Agilent Connection Expert. a Locate your interfaces and instruments in the Explorer Pane. Click on them to see their properties (displayed in the right- hand pane).
Installing and Configuring the 82350 1 Step 3: Connecting your instruments This step shows how to install an 82350 in a PCI slot in your PC and how to connect GPIB instruments to the 82350, including: • Installing the 82350 in your PC • Connecting instruments to the 82350 NO TE If you have not yet installed the Agilent IO Libraries Suite, go to “Step 2 - Installing the Agilent IO Libraries Suite” and install the software BEFORE you install the 82350 in your PC.
1 Installing and Configuring the 82350 cover from the PC to allow access to the I/O slots. See your PC documentation for instructions. NO TE Take precautions against static discharge when handling and installing cards. Figure 1-4 Remove the PC cover 3 Remove a Cover Plate. Remove one of the PC back panel cover plates. The 82350B is a 5V PCI card and will not fit in a 3.3V PCIe slot or in an EISA or ISA slot. Choose a 5V PCI slot that will give adequate clearance for the GPIB connector.
Installing and Configuring the 82350 1 connector should extend through the back panel opening to allow GPIB cable connection. If you install more than one 82350, you may want to install the cards so there is at least one empty slot between 82350s. When inserting the 82350, be sure to hold the card by its edges. Also, be careful with the metal faceplate around the GPIB connector as the faceplate can be bent. Figure 1-6 Install the 82350B 5 Replace the Cover Plate Screw. This will hold the 82350 in place.
1 Installing and Configuring the 82350 After the 82350 is installed in your PC, the next step is to connect your GPIB instruments to the installed 82350. Suggested steps follow. When you have made the connections, go to “Step 4 Configuring the 82350”. 1 Review Connection Guidelines. The recommended method for connecting a GPIB system is a linear arrangement with the system controller (PC) at one end of the system.
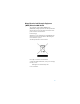
Installing and Configuring the 82350 1 2 Connect GPIB Cables to the 82350. Connect a separate GPIB cable to each installed 82350. Tighten the GPIB connector screws finger- tight only. (The screwdriver slots are for removal purposes only.) Two examples follow showing how to connect a single GPIB instrument or how to connect multiple GPIB instruments. For information or to purchase Agilent GPIB cables, see www.agilent.
1 Installing and Configuring the 82350 Example: Connecting Multiple GPIB Instruments Figure 1- 9 shows one way to connect three GPIB instruments to an Agilent 82350 GPIB Interface Card. You may want to record the primary GPIB address of each attached instrument for future programming use. After making the connections, reconnect the PC power cord and apply power to the PC and attached peripherals/instruments. CAU TI O N NO TE To avoid damage to the connectors, only finger-tighten the connectors.
Installing and Configuring the 82350 1 Step 4: Configuring the 82350 This step shows how to configure a Windows XP/Vista/7 operating system for a PC that has an 82350 installed. Installing configuration files 1 Apply Power. Apply power to the PC and to the installed GPIB instruments. As Windows starts again, a Found New Hardware Wizard may start. 2 Install Configuration Files. Click Next> to accept the defaults. (Make sure that you have installed Agilent IO Libraries Suite first. You will not need a CD.
1 Installing and Configuring the 82350 Configuring the 82350 interface 1 Open Connection Expert. Click the Agilent IO Control icon (IO icon on the Windows Notification Area) and then click Agilent Connection Expert. When the Connection Expert window appears, highlight the GPIB interface in the explorer view (tree view at the center of the window) and then click Change Properties... to display the Agilent 82350 PCI GPIB Interface dialog box.
Installing and Configuring the 82350 1 2 Configure GPIB Card Parameters. When the Agilent 82350 PCI GPIB Interface dialog box appears, set the VISA interface ID, SICL interface ID, Logical unit and GPIB address values as required. Also, verify that this is the System controller for the GPIB to which it is attached (this is the typical operating mode). (See the System Controller discussion below.) Then, click the OK button. Some guidelines to set these values follow.
1 Installing and Configuring the 82350 Table 1-1 82350 GPIB interface card configuration parameters VISA Interface ID Symbolic name that VISA uses to uniquely identify this GPIB interface. The default VISA interface ID is GPIB0. The 82350 interface ID for VISA must begin with the string GPIB and have an integer appended to it, such as GPIB0, GPIB1, GPIB2, etc. Remember this value to properly address GPIB devices in your VISA applications.
Installing and Configuring the 82350 1 3 Repeat Steps for Other Cards. If you have installed more than one 82350 in your PC, repeat these steps for the remaining cards. Then, go to “Step 5 - Communicating with Instruments”.
1 Installing and Configuring the 82350 Step 5: Communicating with your instruments After the 82350 has been configured and you have connected your GPIB instruments to the 82350, the next step is to verify communication between your PC and the instruments using the Interactive IO utility. After communication has been established, you can begin programming the instruments using VISA, VISA COM, SICL, or SCPI commands.
Installing and Configuring the 82350 1 Interactive IO, including a list of common commands and their meanings, click Help | Help Topics. 3 *IDN? is the default command. Click Send & Read to send the identification query to the instrument and display its reply in the Interactive IO window. 4 To send other commands, click Commands> to select from a list of common commands, or type a command into the Command: field.
1 Installing and Configuring the 82350 See the applicable User’s Guide, such as the Visual Basic User’s Guide, for programming guidelines. You can also find additional programming examples using various IO Libraries and instrument drivers in the instrument User’s Guide. After the 82350 is successfully installed and configured, it should act as a transparent interface for programming GPIB instruments. For information on programming using Agilent VISA, see the Agilent VISA User’s Guide.
Installing and Configuring the 82350 1 Example: GPIB Interface Configuration An I/O interface consists of a hardware interface and a software interface. One purpose of the Connection Expert utility is to associate a unique software interface ID with a hardware interface. The Agilent IO Libraries Suite uses an Interface ID or Logical Unit Number to identify an interface.
1 Installing and Configuring the 82350 GPIB Interface (82350 PCI GPIB Cards) Interface VISA/SICL IDs Windows PC GPIB Cable GPIB Instruments 5 VISA Interface ID SICL Interface ID "GPIB0" "gpib0" 82350 GPIB Card #1 "GPIB1" "gpib1" 82350 GPIB Card #2 3 3 VISA/SICL Addressing VISA: viOpen (... "GPIB0::5::INSTR"...) viOpen (... "GPIB0::3::INSTR"...) viOpen (... "GPIB1::3::INSTR"...
Agilent 82350B PCI GPIB Interface 82350B PCI GPIB Interface Installation and Configuration Guide 2 Troubleshooting Guidelines This chapter shows suggested troubleshooting steps for an Agilent 82350 GPIB interface, including: NO TE Additional troubleshooting information appears in the Agilent IO Libraries Suite Online Help and on the Web at http://www.agilent.
2 Troubleshooting Guidelines Troubleshooting Overview A suggested troubleshooting flowchart for the 82350, installed instruments, and the Agilent IO Libraries Suite follows. We suggest that you start at Step 1 and then go to Step 2 and then to Step 3, as required. 1 82350 Hardware Checks 2 82350 Software Checks 3 IO Libraries Checks Typical Causes Typical Causes Typical Causes Bad GPIB cables/connections or power not ON for PC or instruments.
Troubleshooting Guidelines 2 82350 Hardware Checks This section gives guidelines to make hardware troubleshooting checks for the 82350, including: • Check Cables/Connections/Power • Check Device Manager • Sound Card Does Not Work • Data Transfers to Devices Fail • Connection Expert Finds 82350 Card with Serial Number Check cables/connections/power We suggest you start your troubleshooting sequence by performing the following hardware checks.
2 Troubleshooting Guidelines 4 Check PC/Instrument Power- on. Verify that the PC and all connected GPIB instruments are functional and are powered ON. Verify that host computer is not in a Suspended power management state. 5 Reboot Your PC. If doing Steps 1, 2, 3 or 4 does not solve the problem, reboot the PC. If this does not solve the problem, go to “Check Device Manager”. Check Device Manager You can use the Windows Device Manager to reinstall the 82350 or equivalent, as required.
Troubleshooting Guidelines 2 If Data Transfers to Devices Fail If devices attached to your ISA (82341) GPIB card are detected, but data transfers to those devices fail, this is usually caused either by an IRQ conflict with another card or by your system having no IRQs available for this card. If no IRQs are available, the IRQ value shown in Connection Expert will be - 1. For Windows XP/Vista/7: Try changing the IRQ setting to other values. You must reboot after changing the value to test it.
2 Troubleshooting Guidelines one of them returns TRUE (meaning that it handled the interrupt). The ISR’s responsibility is to correctly return TRUE if its device was interrupting, or FALSE if not. 4 Perform Driver Workarounds. Here are some ways to work around drivers that are not behaving properly: a Upgrade the drivers for devices sharing an IRQ with the 82350, including but not limited to, your video drivers, your LAN drivers, Agilent IDE and/or SCSI drivers, and your sound drivers.
Troubleshooting Guidelines 2 6 Upgrade your system BIOS. Note that even new computers may have a newer BIOS available. a Make sure the BIOS Installed O/S setting is set correctly. This determines what software will configure all the Plug and Play cards in your system. Either the BIOS or the operating system can perform the task of querying all the cards to determine their resource needs, picking a valid configuration for all these cards, and telling the cards what their actual resource settings are.
2 Troubleshooting Guidelines 82350 Software Checks This section provides guidelines for 82350 software checks, including: • Disable Connection Expert Auto- Discovery • Check BIOS/Interrupts Settings • Set 82350 Read/Write Performance Mode Disable Connection Expert Auto-Discovery If your PC sound card stops working after configuring interfaces, disable the auto- discovery process in Connection Expert, as the auto- discovery process can cause sound and other cards to stop responding.
Troubleshooting Guidelines 2 conflicts with other drivers in the system. PCI allows sharing of IRQs, but this also means the drivers for cards which share an IRQ must handle interrupt chaining properly. Both Windows NT and Windows 98 allow multiple drivers to install interrupt service routines (ISRs) for a single IRQ. The operating system (OS) keeps a list of all the ISRs installed for each IRQ.
2 Troubleshooting Guidelines be configured using the setup option when the PC is booting. 5 Upgrade your system BIOS. New computers may have a newer BIOS available. When installing a new system BIOS: • Make sure the BIOS Installed O/S setting is set correctly. This determines what software will configure all the Plug and Play cards in your system.
Troubleshooting Guidelines 2 The default behavior of the 82350 driver is to use Polling mode for transfers of 256 bytes or less and to use Interrupt mode for larger transfers. You can modify this default behavior by doing the following: SICL: The SICL ihint(id, hint) function can be called to modify the read/write behavior for on a SICL session. The hint values allowed are: 1 I_HINT_DONTCARE (default value) Use Interrupt mode for transfer requests larger than 256 bytes, otherwise, use Polling mode.
2 Troubleshooting Guidelines • The default formatted IO read buffer size is 4096 so when using this default size, formatted reads in SICL (with hint = I_HINT_DONTCARE) and VISA (with VI_ATTR_DMA_ALLOW_EN = VI_TRUE) will use Interrupt mode even when a small number of bytes are expected.
Troubleshooting Guidelines 2 Agilent IO Libraries Suite Checks This section gives guidelines to troubleshoot problems involving the Agilent IO Libraries Suite, including: • Check IO Libraries Suite Installation • Check IO Control Operation • Install IO Libraries Suite (if 82350 was Installed First) Check IO Libraries Suite installation Start your Agilent IO Libraries Suite troubleshooting sequence by verifying IO Libraries Suite installation.
2 Troubleshooting Guidelines • If this group is displayed, click Agilent IO Libraries Suite | Utilities | IO Control to display the IO icon. Then, click the icon and click About Agilent IO Control to display the installed version (must be version 15 or greater). • If neither the IO icon nor the Agilent IO Libraries program group is displayed, no Agilent IO Libraries are installed. In this case, or if the installed version is not 15.0 or greater, you must install the latest version (see Step 2, following).
Troubleshooting Guidelines 2 • Clicking Exit. Clicking the blue IO icon and then clicking Exit causes a dialog box to appear that asks you if you want to terminate the Agilent IO Control. Clicking Yes hides the blue IO icon and deactivates the IO Control. If the blue IO icon is not displayed, either the blue IO icon display has been turned off and/or the IO Control (and associated iprocsvr.exe) is not active.
2 Troubleshooting Guidelines • Windows XP/Vista/7: Start the Windows Device Manager as follows: Right- click on My Computer, select Properties, then the Hardware tab, then Device Manager. Find the PCI Simple Communications Controller in the Device Manager, and select Update Driver... Allow Windows to find and install the driver automatically. You should not need to insert a CD. NO TE On older operating systems, you may be asked to insert the 'HP I/O Libraries' CD.
Agilent 82350B PCI GPIB Interface 82350B PCI GPIB Interface Installation and Configuration Guide 3 82350 Specifications and Information This chapter provides general information for the 82350B PCI GPIB Interface.
3 82350 Specifications and Information General Requirements Before installing your Agilent 82350, make certain your PC meets or exceeds the following criteria. Table 3-1 lists the general requirements for installing the 82350. Table 3-1 82350 General requirements Minimum system requirements Windows XP/Vista/7 (IO Libraries Suite v15) Software required Agilent IO Libraries Suite (IO Libraries Suite v15 included) PCI bus slot 5-V PCI slot, 32 bits Supported standards PCI rev 2.2 IEEE 488.
82350 Specifications and Information 3 General Characteristics All characteristics are typical performance values and are not warranted. Table 3-2 lists the general characteristics of the Agilent 82350.
3 82350 Specifications and Information Accessing an Electronic Copy of this Guide There are two ways you can access an electronic (.pdf) version of this guide, as follows. You will need Adobe Acrobat Reader Version 3.0 or later to view the electronic version. 1 Access from the IO Control. After the Agilent IO Libraries Suite is installed, a blue circled IO icon appears on the right hand side of the Windows toolbar.
82350 Specifications and Information 3 Contacting Agilent You can reach Agilent Technologies at this telephone number in the United States: United States Call Center: 1- 800- 829- 4444 For other locations, contact your country’s Agilent support organization. A list of contact information for other countries is available on the Agilent Web site at: www.agilent.com/find/assist A list of other Agilent Web sites follows. URL Description www.agilent.
3 54 82350 Specifications and Information 82350B Installation and Configuration Guide
Index A Administrator privileges required, 8 Agilent IO Control icon, 19 Agilent VEE, 24 Agilent Web sites, 51 Agilent, contacting, 51 C Changing Configuration Parameters, 34 Changing Modes of Operation, 35 configuration parameters, changing, 34 configuration parameters, setting, 34 Configuring 82350B, 17 connecting 82350A to PC, 11 connecting 82350A to USB hub, 16 Connecting GPIB Instruments, 23 Connection Expert, 8, 36 contacting Agilent, 51 crossover point, 39 E examples Connecting Multiple GPIB Instru
initial operating states, 29 Installing Agilent IO Libraries Suite, 8 installing the 82350A configuring the 82350A, 17 Interactive IO, 23 interface ID, 26 IO Libraries Suite, checking for installation, 8 iopen, 26 L LED states, 29 logical unit number, 26 M Modes of Operation, changing, 35 P PCI Bus Slot, 7 S setting configuration parameters, 34 setting default configuration, 17 setting timeout floor values, 37 system requirements, checking, 6 T troubleshooting check GPIB driver files, 34 GPIB crossover
www.agilent.