
User`s guide


Procedure for Creating Amplitude-Correction Factors
This procedure demonstrates how to create and activate amplitude-correction data. Detailed
descriptions of the amplitude-correction functions follow this procedure.
1.
Press
(-1.
Note
A signal is not used in this procedure for demonstrating how to create
amplitude-correction data. Disconnect any cable on the spectrum analyzer
input.
2. Set the center frequency to 300 MHz and the span to 500 MHz by pressing:
CFRE4UENCY)
300
INIHz)
ISPAN)
500
IIVIHz)
3.
Press
(CAL),
More
1
of 4,
More
2
of
4
,
More
3
of
4
,
then
Amp
Cor to access the
amplitude-correction menus.
4.
Press Edit Amp Cor to access the editing menus for amplitude-correction factors.
5.
To clear any existing amplitude-correction data, press PURGE AMP COR two times
consecutively.
Note
After pressing PURGE AMP COR the first time, the message If you are sure,
press key again to purge data will appear. Pressing PURGE AMP COR a
second time erases the amplitude-correction data.
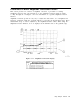
6. Specify the first amplitude-correction point by pressing the following keys:
SELECT
FREQ
50
INIHz)
12
(+dBm)
7. Specify the second amplitude-correction point by pressing the following keys:
250
m
10
I+dBml
Note
‘lhble
entries can be edited if you make a mistake. To edit an existing
point, use SELECT POINT to specify the point. Then use SELECT
FREQ
or
SELECT AMPLITUD to specify the entry that you wish to edit.
8. Specify the third and fourth amplitude-correction points by using the following key
sequence:
300@KJ
15(+dBm-j
350
INIHz)
22
(+dBm-
5-36
Using Analyzer Features