
Installation guide


Setting up a LAN Instrument Network 11
4. Scroll to SM and press [Mode/Type]. Scroll to the appropriate
subnet mask from the list of modes and press [Enter]. The GC
displays a message instructing you to power cycle the
instrument.
5. Power cycle the instrument to apply the LAN setpoints to the
card.
6. Press [Options]. Scroll to Communications and press [Enter].
Confirm that the correct setpoints are present.
Setting the IP address for a 6850 GC with SN≥US102430001
NOTE
For Agilent 6850 (SN≤US00003200*) GCs refer to the instructions in the section Assigning IP
addresses permanently with Telnet on page 16.
1. Turn the GC off.
2. Press and hold LOAD and turn the GC on. Continue to hold LOAD
until five dots appear in the GC display.
3. When the GC finishes initializing, the display should read:
DHCP mode or IP Address
DISABLED XXX.XXX.XXX
If the DHCP MODE is ENABLED, change the mode to DISABLED by
pressing ▲ or ▼.
Press LOAD to continue to the IP ADDRESS.
If the GC does not display either of the above two screens, your
GC uses card J2552B or card J4100A and firmware that does not
support local IP addressing. If this is the case, either update the
firmware or use Agilent Bootp service to set the IP address.
4. The display will now read:
IP ADDRESS
XXX.XXX.XXX
Press LOAD to adjust the IP ADDRESS values. Press ▲ or ▼ to change
values and LOAD to move from one value to the next.
5. When the IP ADDRESS is completed, the display reads:
DEFAULT GATEWAY
XXX.XXX.XXX.XXX
Change the DEFAULT GATEWAY as you did the IP ADDRESS.
6. Change the SUBNET MASK value in the same manner.
7. Cycle the GC power for the new settings to take effect.
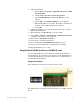
Setting the 7820A IP Address from software keypad
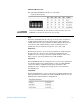
From the factory, the 7820A GC is set to:
IP address 192.168.0.26
Subnet Mask 255.255.255.0
Gateway 192.168.0.1