
Troubleshooting guide


Lab Exercise: Introduction to the HPLC ChemStation
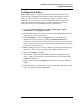
Configuration Editor
5
Configuration Editor
You customer engineer configured your instrument during installation. This
process includes configuring the instrument devices and setting the LAN IP
address so that the software can communicate with the instrument. After
installation, you may need to access the Configuration Editor to add another
instrument, change the default path for methods, sequences or data files, or
change the colors used for chromatograms, titles, and baselines.
1) Open the Configuration Editor from Start, All Programs, Agilent
ChemStation, then Configuration Editor.
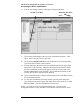
2) Find the small window that contains your instrument configuration and click
on the title bar to activate the window.
3) Select Instruments… from the Configure menu. You should have a
Modular 3D System configured. Change the Instrument Name from
Instrument 1 to a name of your choice. The instrument name is printed in the
footer of all reports, and you will use this name to identify reports you print in
this course. You should have a
4) OK this dialog box and view the next dialog box showing the instrument type
and address. Do not make any changes here. OK this window as well.
5) Now select Configure > Colors.
6) Note the color changes that can be made and practice changing the signal
colors. When you are satisfied, set the elements back to their default values
and OK the dialog box.
7) Explore other areas of the Configure menu, but do not make any additional
changes.
8) Under File, Save the configuration so the new instrument name will be saved.
Exit the Configuration Editor (File, Exit).