
Troubleshooting guide

Lab Exercise: Qualitative Data Analysis
Graphics - Signal Options
31
Graphics - Signal Options
1) Enter the Data Analysis view.
2) Load the method democal2.m. Either double-click on democal2.m in the
method ChemStation Explorer or select Method > Load Method.
3) In Data Analysis, just below the Navigation Table on the left, there are five
tools for five types of data analysis tasks: Integration, Calibration, Signal,
Purify and Spectrum.
The choice of data analysis task causes the tool bars to display appropriate
tools for the type of task. For this exercise, select the Signal Tool. The
chromatogram will then be displayed as large as possible, and the tool bars
will show the Signal Manipulation Tools.
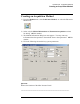
4) In the Graphics menu, select Signal Options....
5) Use the Signal Options dialog box to define how chromatographic signals
will look when drawn to the screen or printer. For this example, select to
include: Axes, Baselines, Tic Marks, and Retention Times. Note that the
fonts are selectable. This example chromatogram will use the entire recorded
x and y axes, Full Ranges. For the Multi-Chromatogram output, select
Layout: Overlaid with the Scale: All the same Scale. OK this dialog box.
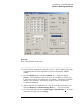
6) Expand the Demo files in the Data ChemStation Explorer. Find the Single
Runs and couble-click to load them into the Navigation Table.
7) Go to the Navigation Table. Position the mouse on the Method Name
heading. Click the right mouse button. Choose Group By This Column.
What happens?
8) Click on the ‘+’ on several of the methods listed to see the new layout of the
table. Right click anywhere in the heading row and choose Reset grouping.
What happens? Notice that you can customize the layout of the Navigation
table using the tools provided.
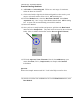
9) Find the data file C:\Chem32\1\data\demo\005-0104.d in the Navigation
Table (Demo – Single Runs) or find the file you acquired in the acquisition
lab. Double-click to load into the Navigation Table.
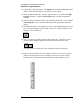
10) In the Navigation Table, click on the ‘+’ in the first column next to the
date/time stamp.