
Technical data


Preparing to Take Measurements 2
U7232A DisplayPort Compliance Testing Notes 19
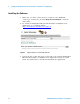
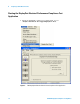
Figure 3 shows the DisplayPort Electrical Performance Compliance Test
Application main window. The task flow pane, and the tabs in the main
pane, show the steps you take in running the automated tests:
NOTE
If DisplayPort Test does not appear in the Automated Test Apps menu, the DisplayPort
Electrical Performance Compliance Test Application has not been installed (see Chapter 1,
“Installing the DisplayPort Electrical Performance Compliance Test Application).
Set Up Lets you select your setup options. Allows you to
setup by connection type, device identifier, jitter
separation measurements and test fixture type.
Select Tests Lets you select the tests you want to run. The tests
are organized hierarchically, so you can select all
tests in a group. After tests are run, status indicators
show which tests have passed, failed, or not been
run, and there are indicators for the test groups.
Configure Lets you enter information about the device being
tested and configure test parameters (like memory
depth). This information appears in the HTML report.
Connect Shows you how to connect the oscilloscope to the
device under test for the tests to be run.
Run Tests Starts the automated tests. If the connections to the
device under test need to be changed while multiple
tests are running, the tests pause, show you how to
change the connection, and wait for you to confirm
that the connections have been changed before
continuing.
Results Contains more detailed information about the tests
that have been run. You can change the thresholds at
which marginal or critical warnings appear.
HTML Report Shows a compliance test report that can be printed.
NOTE
When you close the DisplayPort application, each channel’s probe is configured as
single-ended or differential depending on the last DisplayPort test that was run.