
User`s guide


85
Using the Trigger Menu
Arming and Additional Instruments
To arm the oscilloscope with the analyzer
(1670G-series logic analyzers with the
oscilloscope option)
If both analyzer and the oscilloscope are turned on, you can configure
one analyzer to arm the other analyzer and the oscilloscope. An
example of this is when a state analyzer triggers on a bit pattern, then
arms a timing analyzer and the oscilloscope which capture and display
the waveform after they trigger.
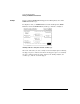
1 In the Analyzer Trigger menu, select Arming Control.
2 Select the Analyzer Arm Out Sent From field, and choose from
the list the Analyzer that will generate the arm.
3 Select the Analyzer Arm In field, and choose Group Run.
This allows you to time-correlate the data from the analyzers and the
scope. The Scope Trigger Mode must be Immediate for correlation.
4 Select the field of the instrument which will arm the others, and
in the pop-up set it to run from Group Run.
The Scope field is not selectable. To set how the scope is run, select the
field under Scope Arm In.
5 Select the other instrument fields and choose the mechanism
which will arm them.
The Analyzer Arm Out field determines which analyzer sends the
arming signal to Port Out and to the oscilloscope if the oscilloscope is
being armed by an analyzer.
As you set each machine, the arrows connecting the fields in the
Arming Control menu change. The arrows show the order in which the
instruments are armed.
See the example on the next page.
6 Select Done until you are back at the Trigger menu.