
User`s guide

Contents ▲ 212 ▼ Index
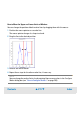
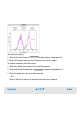
How to Copy Markers to All Histograms
Once a marker is defined, you can copy it in the histograms of all samples (generic assays
only):
1 Select the marker in the histogram or in the result table.
The Insert the selected marker into all histograms button is now enabled.
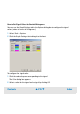
2 Click this button.
The Copy Marker dialog box appears. This dialog box asks you whether or not you want
to use the marker as reference.
3 Click Yes to use this marker as reference. The marker will be inserted in all other
histograms of the blue or red channel. When the properties of this marker are changed,
the changes will be applied to all samples.
– OR –
Click No. The marker will be inserted in all other histograms of the blue or red channel.
When the properties of this marker are changed, the changes are only applied to the
current sample.
How to Set the Gating Direction (Generic assay only)
You can use one marker to define the gating direction. In other words, you define whether
red or blue fluorescence is used as a gate to define a subset in the other histogram. This
also depends on the dyes that you have used for staining.
You can set both gating directions: either from the blue histogram to the red histogram or
from red to blue.