
User`s guide

Additional Imaging Modes 7
Agilent 5500 SPM User’s Guide 126
6
Bring the tip close to the sample:
a Press the Close switch on the HEB to raise the sample until the
tip is close to, but not touching, the sample.
b Focus the cantilever in the video window.
c Turn the video system focus knob toward you such that the tip
goes just out of focus.
d Press the Close switch to raise the sample until both the tip and
sample are in focus (i.e., they are nearly touching).
7 In the Servo window, enter a Setpoint value slightly more positive
than the current Deflection reading. This sets the force on the tip that
will represent “contact” both during approach and during the scan.
8 Click the Approach button in PicoView’s toolbar. The system will
raise the sample until the deflection reaches the Stop At value.
9 After approach, a scan may be performed to check for a region of
interest and to optimize the scanning parameters. When the area of
interest has been located, stop the scan.
10 Set the oscillation frequency for the cantilever:
a Choose Controls > Advanced > AC Mode. Select Friction as
the Input. This will cause the lateral signal from the detector to be
used for tuning the resonance of the cantilever, rather than the
deflection signal.
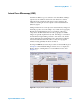
b Choose Controls > AC Mode Tune to open the AC Mode Tune
window.
c In the Manual Tune (bottom section) of the window, enter
appropriate Start (kHz) and End (kHz) frequencies. The
frequency range should encompass the possible resonance
frequency of the cantilever. The frequencies are generally in the
20-50 kHz range.
d Click the Manual Tune button.
•The system will perform a single frequency sweep from the Start
to the End frequency.
•Note that the frequency can be selected by moving the vertical
dashed bar in the frequency plot.
e Experimentation will probably be required to determine the best
frequency for each tip and sample combination but a good
starting point is a frequency that produces the largest deflection.
11 In the Servo window set the I Gain and P Gain to 5 %.