
User`s guide


Additional Imaging Modes 7
Agilent 5500 SPM User’s Guide 132
10
Bring the tip close to contact with the sample:
a Press the Close switch on the HEB to raise the sample until the
tip is close to, but not touching, the sample.
b Focus the cantilever in the video window.
c Turn the video system focus knob toward you such that the tip
goes just out of focus (the focal plane is just below the tip now).
d Press the Close switch to raise the sample until both the tip and
sample are in focus (i.e., they are nearly touching).
11 Now initiate an approach:
a In the Scan and Motor window, click the Motor tab.
b Set the Stop At (%) to specify the percentage of total oscillation
that represents “contact,” typically 90-95 %.
c Click the Approach button in PicoView’s toolbar. The system
will raise the sample until the amplitude is damped to the Stop At
percentage.
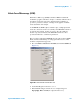
12 On the EFM tab you will now set up the MAC III controller’s
second lock-in to provide the AC bias. Use the AC Tune window to
verify that this signal is at a frequency that does not add unwanted tip
responses.
a In the Servo window note the Setpoint value. Change the
Setpoint to 10 V to move the tip several microns above the
sample.
b In the EFM tab, set the Drive% to 10 %. The Drive % value is
somewhat experimental; a higher value will improve image
contrast but, beyond a point, it will add noise.
c Enter a Frequency that is smaller than, and not an even factor of,
the Lock-in 1 signal (from the Main tab). For example, if the
Lock-in 1 Frequency is 60 kHz choose a frequency other than 30,
15, or 7.5 kHz.
d Set the Gain, which multiplies the output of the lock-in by the
selected factor. Use a larger multiplier to improve signal-to-noise
ratio for a small signal. Ensure that the gain will not result in an