
User`s guide


Scanner Maintenance and Calibration 8
Agilent 5500 SPM User’s Guide 139
nose assembly will likely need to be replaced. Use careful handling to
avoid damaging the window.
Only remove the nose assembly from the scanner using the Nose
Assembly Removal Tool, with the scanner placed upright in its fixture.
Do NOT use the Removal Tool to install the nose assembly in the
scanner.
Two-Piece Nose Cone Cleaning
The two-piece nose cone is not to be used in liquid because it does not
have a glass window to prevent liquid from getting to the scanner. After
it is removed from a scanner, the two-piece nose cone may be cleaned
with a low oxidizing organic solvent such as ethyl alcohol.
Scanner
Between uses, remove the scanner from the microscope and store it, on
its assembly fixture or in its storage case, in a location where it will not
be subject to excessive humidity, temperature changes or contact.
Agilent recommends that scanners be stored in a desiccator.
Use care when moving the scanner on its assembly stand as it is not
secured to the stand and can be damaged if dropped.
The scanner contains very brittle and fragile piezoelectric ceramic
components. Applying excessive lateral force while exchanging nose
assemblies, or dropping the scanner even a short distance onto a hard
surface, will permanently damage the scanner. Use only the procedures
described in Chapter 4 to install and remove the nose assembly.
If the nose assembly housing becomes loose or can be wiggled with the
fingers when in place, contact Agilent support for assistance.
Cracked or broken piezo components will result in abnormal imaging.
Damage to the scanner such as those described above are NOT covered
by the standard warranty.
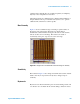
Scanner Characteristics
The multi-purpose scanner includes several piezoelectric elements for
moving the probe along the X, Y and Z axes. Piezoelectric materials
inherently exhibit non-ideal properties, the effects of which are