
User`s guide

Liquid Cell 12
Agilent 5500 SPM User’s Guide 192
sample are almost touching (i.e., both the tip and sample are close to
focus).
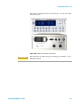
4 In PicoView, click the Approach button to place the tip in contact
with the surface.
5 Use the video system to locate the region of interest.
6 Now, in PicoView click the Withdraw button to take the tip out of
contact with the surface.
7 Use the motor controls to move the scanner several millimeters from
the sample, providing enough clearance to safely remove the sample
plate. Be sure to note the distance that the scanner is moved—you
will need it to accurately re-engage the tip and sample shortly.
8 Remove the sample plate from microscope.
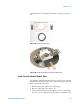
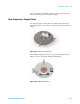
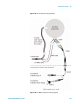
9 Place the O-ring on the sample plate so that it encompasses the
sample.
10 Place the liquid cell plate over the O-ring and sample, such that it
aligns with the sample plate’s spring-loaded pins.
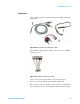
11 Push one of the pins up through the liquid cell plate and slide one of
the retaining clips into the groove in the pin. Repeat for the other pin.
The liquid cell is now firmly attached and sealed to the sample plate.
12 Add the appropriate liquid to the cell. Use enough liquid to submerge
the sample but not so much that the liquid rises to the top of the cell.
This will prevent spillage as the scanner moves into the cell.
13 Replace the sample plate on the microscope.
14 Move the scanner down the same distance it was moved up in step 6,
such that the tip is now just above the sample surface. You will need
to adjust the photodetector position due to the change of the laser
location caused by the laser now going through liquid.
15 If necessary, readjust the photodetector position to account for the
change of laser location caused by the liquid.
16 Approach and contact the sample.
CAUTION
Be extremely careful when moving the scanner while using the liquid cell.
Clearance is limited, and contact between the scanner and cell will
damage the scanner.
NOTE
Make sure that the liquid cell plate sits flat against the sample plate to
create a good seal and prevent leakage. If necessary, use a flat head
screwdriver to adjust the tension on the two retaining pins.